Rootkits - how deep the rabbit hole is?
Rootkits are malicious software designed to gain unauthorized access to a computer system and hide their presence. Therefore attackers can use rootkits to conceal their presence on a compromised system and make it possible to return undetected at some later date.
A rootkit usually hides by intercepting and altering communications at the interfaces between various system components, so rootkits are a form of man in the middle attack.
Rootkits allow an attacker to maintain command and control over a system without the owner’s knowledge. Typically they enable remote file execution, system configuration changes, can log keystrokes or network activity and other forms of spying on user activities. If they are hidden in device or file system drivers, they can hide files, they can hide processes, disable security policies, etc.
First generation rootkits just modified system files on the target system. Typical example was modified UNIX login program, that stole login credentials of a victim. Later rootkits started to modify static OS components and dynamic OS objects loaded in memory.
Bootkit
Bootkit is a malware and specific type of rootkit, designed to infect a computer and to load their malicious code into memory before the operating system initializes. Bootkits usually target the system's bootloader, kernel boot files, Master Boot Record (MBR), or Basic Input/Output System (BIOS)/Unified Extensible Firmware Interface (UEFI). By targeting the pre-boot environment, bootkits can bypass standard security measures and remain hidden. They often have the ability to survive reinstallation of an operating system, so they are hard to remove.
Bootkits were popular in 1980s and 1990s, but the technology of bootkits is also implemented in various governmental and commercial remote surveillance tools (“Nice Boots!” - A Large-Scale Analysis of Bootkits and New Ways to Stop Them).
CIH - Chernobyl virus
The first bootkit was CIH (Chernobyl virus), which appeared in 1998. It was developed by a Taiwanese student Chen Ing-hau (hence the name CIH) and targeted Windows 9x systems. The malware corrupted the MBR and overwrote parts of the BIOS, rendering the system unbootable.
Another known bootkit/computer virus was Stoned. It was created in 1987 and infected computers by booting from an infected floppy disks (that was also the vector of its spreading).
Around 2007 security researchers identified more advanced Alureon bootkit (also known as TDSS or TDL-4), that infected MBR of the computer and was used to intercept network traffic and to steal banking and other sensitive user data.
In 2007 appeared IceLord (also known as ICLord Bioskit), which was the first BIOS based proof-of-concept bootkit. In 2011 the first BIOS bootkit appeared in the wild. It was called Mebromi and targeted Chinese computers. The first UEFI bootkit that was sold on cybercrime forums (BlackLotus) was discovered in 2022.
As mentioned, the technology of bootkits is often implemented in various governmental and commercial remote surveillance tools. One of the reasons is, that bootkits can be used to bypass encryption, typicaly by intercepting passwords or encryption keys entered during boot.
This was shown by security researcher Joanna Rutkowska in her Evil Maid proof-of-concept tool (developed in 2009), that targeted systems using TrueCrypt (version 6.x) full disk encryption software. The tool replaced the original bootloader with a malicious version, which logged the user's encryption passphrase when it was entered during the next legitimate boot.
Evil Maid attack is a name of physical attack scenario where an attacker with physical access to a device (for instance laptop) manipulates it to compromise security, usually while the legitimate owner is absent. The name comes from the hypothetical scenario of a "maid" in a hotel tampering with a guest's computer. The mentioned application Evil Maid, developed by Joanna Rutkowska, is a bootkit, that was developed to perform an Evil Maid attack against TrueCrypt. The malware intercepted TrueCrypt's password that was typed in by the user, and stored it in a particular location on the disk and then passed it on to TrueCrypt. The attacker could later extract the stored password the next time they have physical access to the computer, thus bypassing encryption protection.
According to some media reports, this is how the Israeli secret service obtained the access to the data on a computer of a Syrian diplomat who had left his computer unattended in a hotel room in London in 2006. The data obtained that way had proved that Syria was building the secret Al-Kibar nuclear facility in the desert (in IAEA documents it is also referred as Dair Alzour). The nuclear facility was subsequently bombed in Operation Orchard (also known as Operation Outside the Box) on September 6th 2007.

Al Kibar facility - before and after bombing
From this we can clearly see how bootkits (and rootkits) could be utilized for cyberattacks and spying.
How deep the rootkit can go?
Rootkits can hide at different parts of the system, or, to be more specific, in different so called protection rings.
Protection rings, also called hierarchical protection domains, are mechanisms to protect data and functionality from faults (by improving fault tolerance) and malicious behaviour.
Rings in computer systems are arranged in a hierarchy from most privileged (most trusted, usually numbered zero) to least privileged (least trusted, usually with the highest ring number). On most operating systems, Ring 0 is the level with the most privileges and interacts most directly with the physical hardware.
Computer operating systems provide different levels of access to resources, and correctly gating access between rings can improve security by preventing programs from one ring or privilege level from misusing resources intended for programs in another.
Example, spyware running as a user program in Ring 3 should be prevented from turning on a web camera without informing the user, since hardware access is reserved for Ring 0 (kernel mode).
Modern operating systems are using only Ring 0 (kernel mode) and Ring 3 (user mode). However, there are even lower rings, that - if attacked - could compromise the entire systems (operating system and user applications). So let's take a look into the different levels of rootkits to see how stealthy they could get.
Ring 3 rootkits
Ring 3 rootkits, also called user mode rootkits are running at the user-space level. They run with the lowest level of privileges within the operating system and can perform a damage at the user space of the infected user.
Ring 3 rootkits mitigation
Since Ring 3 rootkits do not have kernel-level access they are easier to detect and remove. Good strategy against this malicious software is application sandboxing (in order to minimize damage within the infected user space) and regular backuping/snapshoting of the complete user space in order to prevent complete data loss.
Also, good strategy of a user could be to use different isolated environments for different tasks. For instance, for web browsing user should use one isolated environment, for banking another, and so on. So in case web browsing environment gets compromised, infection is limited to this environment only and would not affect environment used for online banking.
Ring 0 rootkits
Ring 0 rootkits, known also as kernel mode rootkits reside in the core of the operating system (so called kernel space). They have the highest level of privileges within the operating system. They are usually hard to remove, since they operate at the highest privilege level (Ring 0) and could be deeply integrated into the operating system.
They can hide files, processes, or network activity and modify system calls. Often the removal requires specialized tools or reinstalling the complete operating system.
Ring 0 rootkits mitigation
However, good strategy against this malicious software is running the operating system in virtual compartment and to use different isolated environments for different tasks. Additionally, if system enables virtual machine level snapshots, that can assure that the whole system could be easily returned to a last known good state.
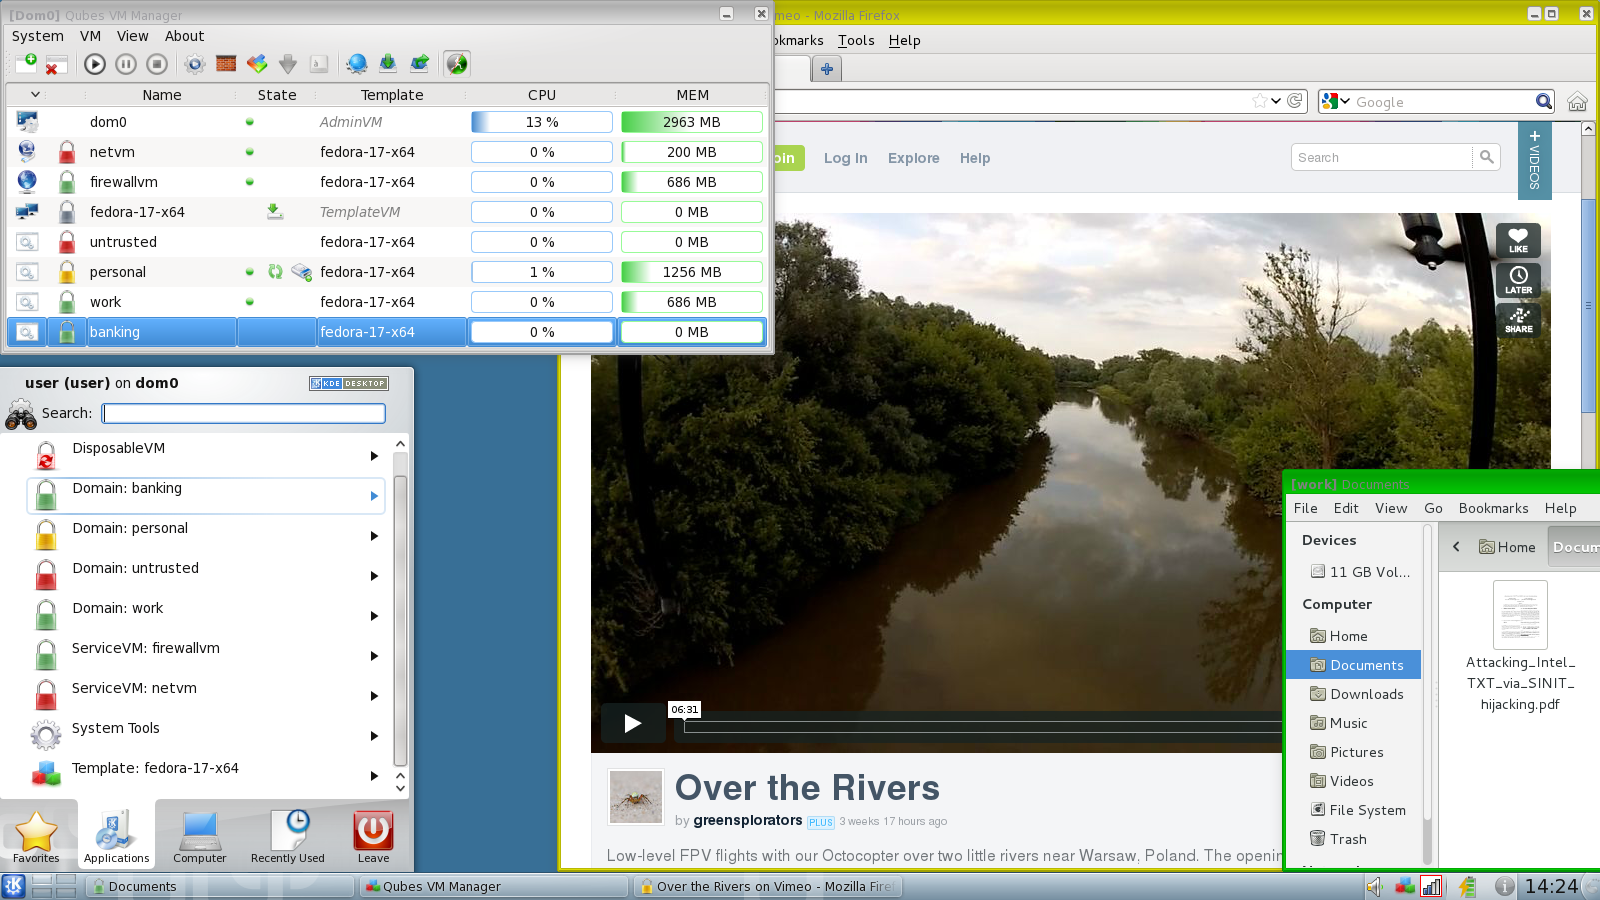
In that case virtualisation technology provides the isolation of different virtual machines. One example of solution against that type of threats is provided by QubesOS. QubesOS is a security focused desktop operating system that provide security and segmentation of applications through isolation with virtualization services.
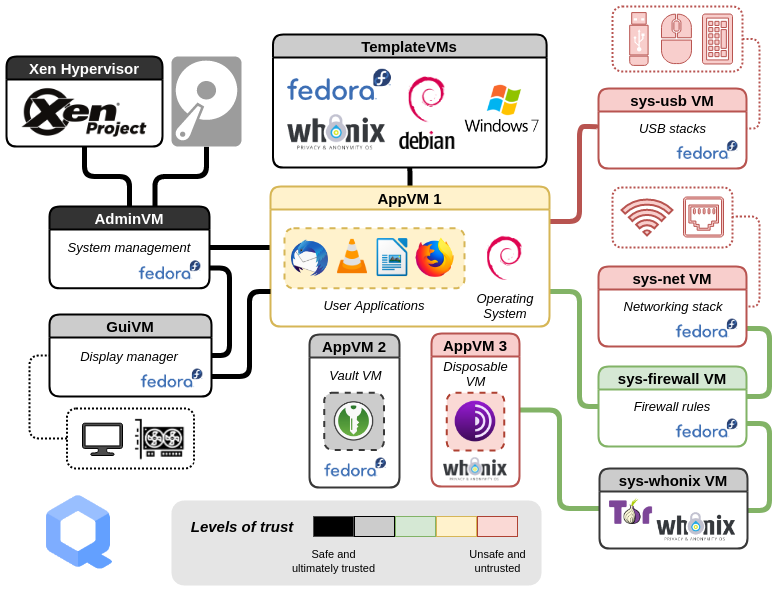
QubesOS architecture
In QubesOS, the user has several isolated environments, which are used for different tasks. If one of the virtual compartments gets compromised, the malicious software would get access to only the data and applications inside that environment. Isolation is provided by hardware controllers (some virtual compartments can have limited access to the hardware, for instance to microphone or camera), and with virtualisation, where the user's digital life is divided into security domains with different levels of trust. Unfortunately, QubesOS is quite complex and is less suitable for regular users, because it has quite steep learning curve.
QubesOS
Ring -1 rootkits
Ring -1 rootkits, also known as hypervisor rootkits operate at the hypervisor level, below the operating system. Hypervisor is a software code used to run and manage one or more virtual machines on a computer. Because they run at a privilege level higher than the operating system's kernel, they are called Ring -1.
Those rootkits exploit virtualization features in modern CPUs to run the rootkit as a hypervisor beneath the operating system. Usually they can intercept and manipulate hardware-level instructions and can virtualize the operating system to control it entirely. Basically they create virtual environment and confine operating system into it, while the compromised operating system believes it is running directly on the hardware. They are extremely challenging to detect (and remove), because they can manipulate the operating system from outside its own context.
In 2006, a Polish security researcher Joanna Rutkowska conceptualized Ring-1 malware, called Blue Pill. It exploited virtualization extension AMD-V to act as a hypervisor, and was able to place the operating system in a virtualized environment without the operating system being aware of it. While operating system thinks it is operating on bare-metal hardware, in reality, it's running in a hypervisor and is being being monitored and manipulated by the Blue Pill rootkit.
While Blue Pill initially used AMD-V virtualisation extension, other researchers (for instance, Dino Dai Zovi, also in 2006) has shown, that Intel VT-x virtualisation extension could also be exploited. Similarly, researchers from Microsoft and the University of Michigan in 2006 developed a proof-of-concept malware designed as a virtualization-based rootkit, called SubVirt.
Ring -1 rootkits mitigation
One solution against Ring-1 rootkits is to disable hardware virtualization in BIOS/UEFI, however in that case user will be limited running virtual environments on their system.
Another solution is to use trusted boot mechanisms. Those mechanisms perform hypervisor integrity checks (by verifying its cryptographic signature) and can help to ensure that unauthorized hypervisors cannot load during the boot process. Those mechanisms are provided by the open source BIOS/UEFI project called Dasharo (with Heads payload), however more about that will be explained later.
Ring -2 rootkits
Ring -2 rootkits are a mix of so called SMM rootkits and BIOS/UEFI bootkits (also called UEFI implants). Usually Ring-2 rootkits utilize SMM and UEFI compromise. While SMM rootkits operate dynamically within the CPU’s SMM environment they usually use UEFI rootkit technology to embedd malicious code in the firmware layer to achieve persistence.
It also needs to be noted, that SMM and UEFI contain security vulnerabilities (for instance some SMM's contained complete USB stack), which is briefly explained by Ron Minnich in his talk Replace Your Exploit-Ridden Firmware with Linux.
SMM rootkits
SMM rootkits run at the System Management Mode (SMM). SMM operates in a protected memory space called SMRAM (System Management RAM), which is inaccessible to the operating system and most security tools. SMM is the most privileged mode in the modern x86_64 processors. It gives an execution environment with full access to every (physical) resource of the computer. In addition, SMM is a non-pre-emptive mode meaning that it cannot be interrupted by normal hardware/software interrupts. This allows completely stealth code execution from the execution context of the operating system.
SMM has its own private memory space and execution environment which is generally invisible to the outside environment (operating system) and is immune to memory protection mechanisms. Since SMM can directly interact with hardware, it is bypassing the operating system and hypervisors. Therefore SMM rootkits can remain persistent across reboots because they are embedded in firmware or manipulate SMRAM configurations, which are reloaded during system startup. SMM rootkits are often not persistent on its own and usually utilize UEFI compromise to gain persistance.
In 2005 Sherri Sparks and Jamie Butler presented a proof of concept SMM rootkit Shadow Walker, which demonstrated that it was possible to control the view of memory regions seen by the operating system and other processes. Shadow Walker was capable of hiding both its own code and changes to operating system's components and was able to fool both signature and heuristic based scans.
In 2008 Shawn Embleton, Sherri Sparks and Cliff Zou presented their development of a proof-of-concept SMM rootkit (see: SMM rootkits: a new breed of OS independent malware. They implemented a chipset level keylogger and a network backdoor capable of directly interacting with the network card to send logged keystrokes to a remote machine via UDP. The rootkit was able to hide its memory footprint and requires no changes to the existing operating system (i. e. was OS independent).
There is also an interesting proof-of-concept demonstration by Jussi Hietanen how injecting shellcode to a Ring0/Ring3 context that can be achieved from the SMM (described in the article System Management Mode (SMM) rootkit. The rootkit's capability was to infect a Windows usermode process, access the full memory space and persist between OS reinstalls.
BIOS/UEFI rootkits
Another class of Ring -2 rootkits is called BIOS/UEFI rootkits, because they specifically target the BIOS (Basic Input/Output System) or its modern equivalent, UEFI (Unified Extensible Firmware Interface).
As mentioned on the beginning, the first rootkit/bootkit targeting BIOS was CIH (Chernobyl virus) in 1998, and in 2007 a Chinese researcher know under nickname icelord developed proof-of-concept bootkit ICLord Bioskit that has demonstrated that BIOS rootkits were feasible and powerful. Another interesting proof-of-concept firmware rootkit was developed in 2012 by security researcher Jonathan Brossard, which presented Rakshasa, that was able to persist in UEFI/BIOS firmware.
Probably the first known Ring -2 rootkit used in the wild was Mebromi, discovered in 2011, that targeted mostly the computers in China.
Notable research on UEFI rootkits has also been done by Andrea Allievi in 2012, who developed one of the first UEFI bootkit concepts (for Windows 8). Also, in 2013, Sebastien Kaczmarek from Quakerslabs presented Dreamboot), which was also Windows 8 x64 experimental bootkit (however Andrea Allievi later accused Quakerslabs that they stolen the project in the year 2013 without mentioning him.
Rootkit/bootkit technology is often used by government spying tools. One of the fist known examples of that thype of rootkit was used by the Hacking Team group, which infected UEFI/BIOS to keep their malware tool called Remote Control System persistently installed in their targets’ systems. It was first discovered in 2015. (Just a sidenote - Hacking Team Group was trying to sell their malware to the Slovenian police and secret service). Similar tool, FinSpy (also known as FinFisher or Wingbird), is also used for cybersepionage. It is being used at least from 2011, but in 2021 thy employed UEFI bootkit technology to preserve
In 2021 security researcher by Kaspersky discovered MoonBounce rootkit, that injected its malicious code into the SPI flash chip on computer motherboard, targeting UEFI firmware. This means that the rootkit does not leave any traces on a hard drive, and is capable of persisting in the system even if disk is formatted or even replaced. It is linked to Chinese APT41 hacker group and is used for cyberespionage.
Probably the most known Ring -2 rootkit used for cyberespionage in the wild is LoJax. It was discovered by security researchers from ESET in 2018. LoJax embedded itself into UEFI firmware to execute at system startup and was operating in SMM, bypassing OS-level detection. LoJax can persist in the UEFI even if the operating system is reinstalled or its hard drives are replaced. When infection is successful, attackers can use LoJax to track the system's location, remotely access the system and install additional malware on it. The researchers found out, that LoJax was - similar to Hacking Team's malware - used for cyberespionage.
Researchers found out that LoJax targeted organizations in the Balkans and countries in Central and Eastern Europe.
Mac EFI Rootkit
UEFI bootkit concept that could be applied to various operating systems, but those rootkits in the past mostly targeted Windows systems. Not exclusively, because in 2012 a security researcher Loukas K., "snare", presented Mac EFI rootkit (DE MYSTERIIS DOM JOBSIVS:\ MAC EFI ROOTKITS). And in 2017 Wikileaks published information about CIA's Vault 7 hacking tools, containing Mac OS X EFI implant, QuarkMatter (QuarkMatter used an EFI driver stored on the EFI system partition to provide persistence to an arbitrary kernel implant.).
However in 2024 the first UEFI bootkit designed for Linux systems appeared, named Bootkitty. It was a proof of concept tool that disables the kernel’s signature verification feature to load unsigned boot code. But it has to be noted, that Bootkitty was not the first rootkit capable of bypassing UEFI Secure Boot mechanism. The first one was BlackLotus, discovered in 2022, which integrated Secure Boot bypass and is probably the first UEFI rootkit that was "commercially" sold on cybercrime forums. It also implemented several detection evasion features, for instance code obfuscation, anti-virtualization, disabling Windows Defender antivirus software, bypassing User Account Control (UAC), etc.
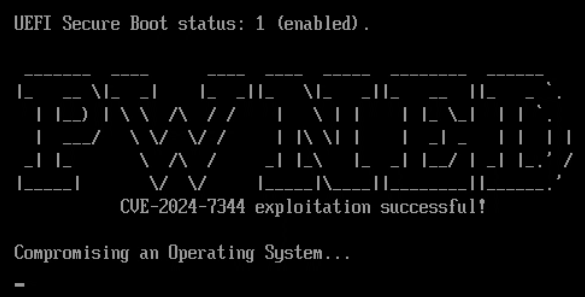
SecureBoot bypassing - CVE 2024-7344
Ring -2 rootkits mitigation
Ring -2 rootkits are very difficult to detect, because they are firmware-level and they operate independently of the OS. Usually they require firmware reflashing or even physical replacement of the hardware.
However, there are some more practical mitigation techniques, and that is to enable hardware protections like BIOS lock (a security feature designed to prevent unauthorized access when the computer is booting) and SMM lock (hardware protection to prevent unauthorized access to SMRAM). Using Secure Boot to prevent unauthorized firmware or bootloader modifications is also an option, however some rootkits (for instance BlackLotus and Bootkitty) can bypass Secure Boot protection. Another option is also to prevent physical access to the system, because BIOS/UEFI rootkits could also be installed via direct hardware access (this requires special hardware device called BIOS firmware programmer).
Unfortunately, security researchers found several vulnerabilities in closed source BIOS firmware code. One of the main problems is, that Secure Boot and Intel Trusted Boot in traditional BIOS'es are vulnerable to rollback attack. While updating BIOS requires that firmware code is digitally signed with a valid signature, an attacker can install one of the previous official versions of the BIOS firmware (with valid digital signature), but this old version contain security vulnerabilities that could be exploited. There are also known UEFI vulnerabilities that could be exploited (for instance LogoFAIL attack). And in 2024 security researchers found out, that Secure Boot was completely compromised on more than 200 device models sold by Acer, Dell, Gigabyte, Intel, and Supermicro, because someone mistakenly published the cryptographic key that forms the root-of-trust anchor between the hardware device and the firmware that runs on it (so called platform key). This was another warning that BIOS/UEFI code is not under the control of the user, and that the users must trust the vendor in order to trust their systems.
Fortunately there is a solution for that. The open source BIOS/UEFI project Dasharo with so called Heads payload, incorporates several measures to protect against SMM rootkits.
Dasharo ensures that System Management RAM (SMRAM), where SMM code executes, is locked down during the boot process. It has an option to enable SMM BIOS write protection. When this is enabled, it allows only SMM code (the privileged code installed by the firmware in the system memory) to write to BIOS flash. It has implemented BIOS/UEFI lock to lock down the firmware after boot, preventing modifications by unauthorized software and has implemented Secure Boot and Measured Boot to detect unauthorized changes to firmware and SMM code (and also operating system's boot scripts!) and with the help of external hardware security module.
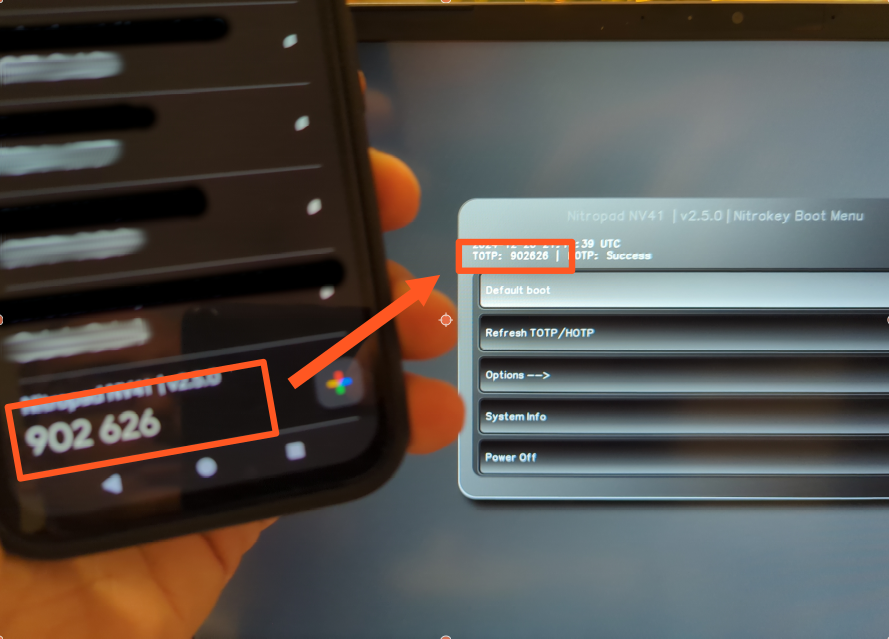
Dasharo with TOTP
Dasharo with Heads payload boot firmware and software suite uses a combination of the Trusted Platform Module (TPM), Time-based One-Time Passwords (TOTP), and HMAC-based One-Time Passwords (HOTP) to provide enhanced system integrity verification and secure authentication. Verification of the system could be done with external hardware security module (small USB device), which verifies system's firmware, kernel, and bootloader, and provides a visual confirmation of the verification status.
Ring -3 rootkits
Ring -3 rootkits operate in the Management Engine (ME) or Platform Controller Hub (PCH) firmware, such as Intel's Management Engine (ME) or AMD's Platform Security Processor (PSP). These are embedded microcontrollers within the CPU chipset, designed for out-of-band system management and security features. Since those rootkits reside in firmware, they are also called firmware rootkits.
While Ring -2 rootkits exploit SMRAM and SMI (System Management Interrupts) vulnerabilities, Ring -3 rootkits relies on firmware in chipset microcontrollers (for instance Management Engine). They can access host memory via DMA (direct memory access), they can directly access network interface, can boot the system from the emulated CDROM and are active even in so called S3 sleep (System Power State S3).
Ring -3 rootkit concept was first presented in 2009 by Alexander Tereshkin and Rafal Wojtczuk in a presentation Introducing Ring -3 Rootkits.
The presented that many Intel vPro chipsets have an independent CPU, access to dedicated DRAM memory, special interface to the network card and execution environment called Management Engine (ME). Also, they found that the Intel Q35 chipset has also a standalone web server. So this chipset is a little computer, that can execute programs independently from the main CPU.
Researchers have shown, that Intel ME and similar technologies could be exploited. Intel Active Management Technology (AMT) is a technology for remote management of computers and is running on the Intel Management Engine.
One of the first research on the security of Intel's AMT was published in Vassilios Ververis' master thesis titled Security Evaluation of Intel’s Active Management Technology in 2010. Ververis described several fundamental security weaknesses in Intel's AMT that allow the attacker to remotely control the target machine (over the Internet or a mesh networking) and enables the installation and control of a botnet on the hardware level.
in 2017 Mark Ermolov and Maxim Goryachy presented a talk titled How to Hack a Turned-Off Computer, or Running Unsigned Code in Intel Management Engine, where they have shown how to execute unsigned code even on a powered-down system by exploiting Intel ME.
The critical vulnerabiliy in Intel ME, CVE 2017-5689 - Manually Exploiting Intel AMT Vulnerability (also see Intel-SA-00086 advisory) from 2017 allowed an attacker to gain system privileges remotely (through the Internet). This vulnerability was also known under nickname "Silent Bob is Silent" and was present in Intel CPUs from 2008 (9 years).
In June 2017, the cybercrime group PLATINUM started to exploit Intel's AMT Serial-over-LAN functionality, which allows them to remotely access computers, bypassing the host operating system and its firewalls. The cybercrime group exploited AMT to perform data exfiltration of stolen documents.
Also, in June 2022, the Wizard Spider ransomware group, who was developing Conti ransomware developed proof-of-concept code targeting Intel firmware to carry out persistent, hard-to-detect attacks.. This should be a serious warning, that the danger is not just the theoretical one, but could be (and probably it is) already exploited in the wild.
Ring -3 rootkits mitigation
Ring -3 rootkits enables attackers to maintain deep, persistent, and stealthy control over a system, beyond the reach of traditional security mechanisms. However, there is a possible mitigation, that is to disable ME functionality (at least partially, because completely disabling destroys the CPU), which can be achieved with the special tool ME Cleaner, developed by Nicholas Corna. However, this is possible only for specific Intel CPUs only and might not work in the future anymore.
There are two methods to disable Intel ME on a computer. The first on is so called HECI (soft-disabling; Host Embedded Controller Interface) method, but it is not fully trusted by the security community and it also only partially disables Intel ME. Another option is HAP disabling method, which sets a special HAP bit that acts like a kill-switch. This method completely turns off Intel ME that can be disabled.
Ring -4 rootkits
Ring -4 rootkits are more theoretical, however there are some proofs that they can be successfully deployed. The term Ring -4 is used to describe emerging threats in the privilege hierarchy below known Ring -3 systems.
Those rootkits would target components even deeper within the system, such as the System on Chip (SoC) or physical hardware devices themselves. So let's take a look to some of the exploits that have already happened.
Exploits on baseband processors
Baseband processor is a special processor inside a mobile device or a computer, that manages all the radio functions. Researcher have shown, that firmware code on baseband processors is vulnerable, and some vulnerabilities are known to be already exploited, usually for cyberespionage.
In 2011, security researcher Ralf-Philipp Weinmann from University of Luxembourg had a presentation titled The Baseband Apocalypse, where he has shown how to set up fake base station, attract nearby phones to join the fake network, where he was then able to inject a malicious firmware update into the baseband processor. His malicious firmware would then switched on the phones’ auto-answer feature, which would have let the researcher to silently dial into the phone and remotely listen to nearby conversations.
In 2019 Android security patches included a fix for two dangerous vulnerabilities called QualPwn (CVE-2019-10538 and CVE-2019-10540), that impacted devices with Qualcomm chips. The attack allows to send a specially-crafted packets to a device's WLAN interface, which would create the so called buffer overflow, that allows the attacker to run code with kernel privileges and code execution on the device.
Also in 2019, the security researchers from AdaptiveMobile Security discovered a Simjacker vulnerability, which allows the attacker to send a special crafted SMS to the victim's device, which instructed the SIM card within the phone to take over the mobile phone and perform sensitive commands. The Simjacker attack was exploited by surveillance companies for cyberespionage operations.
Exploits on network interface cards
Malware could also be run on a processor on a network interface card. This has been shown in 2008 by a security researcher Arrigo Triulzi, who presented Project Maux Mk.II. He developed proof-of-concept hardware rootkit that he stored on a network card, called NIC SSH. The tool allows him to connect directly to compromised network, completely bypassing the operating system (and the firewall) to access the computer. More about the tool can be read in my interview with Triulzi from 2009 (Slovenian version is also available).
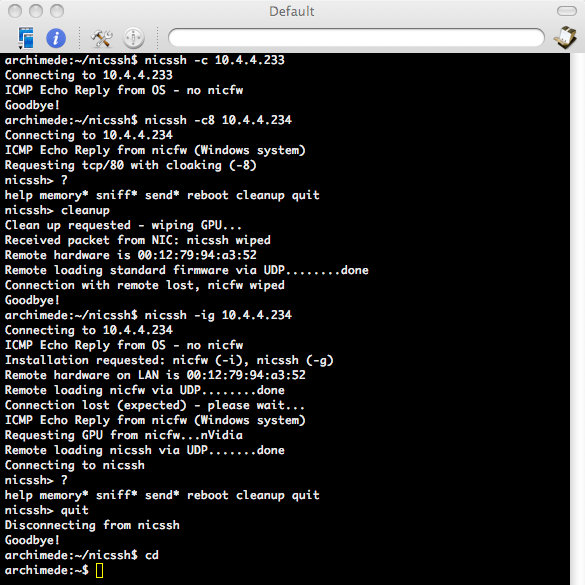
NIC SSH tool
Exploits on storage controllers
Storage controllers (especially for hard disks and SDD's) are desirable location for malware attack, because the can directly access or modify the content of the files on a target systems.
In 2013 security researcher Jeroen Domburg published a blog post describing how he developed malware that could be installed on a hard disk controller (article in Slovenian language is also available). That malware was able to modify data when reading from the hard disk. In his case, he demonstrated how to "inject" replacement password to a target system.
The malware activity could be triggered with a certain magic string the modified firmware would look for to the disk. The magic string in that case is a sequence of characters prepared in advance by the attacker, and can be hidden in any file, e-mail message or (in case the compromised server is web server) - URL. When the magic string is received on a target computer, it will be written on a disk, and that means it would be passed through hard disk controller, which would activate the malware.
When the malware is activated, it would modify the replacement password hash in /etc/shadow file (in Linux systems this file stores login passwords of users in hashed format). When the attacker would then try to log into the system with his own (replacement) password, the machine would check this password against the now-modified /etc/shadow and the attacker would be able to login. In that example the target system remains vulnerable even if the operating system is completely reinstalled.
Another research was presented in 2015 by security researcher Marcus Hutchins, who created a firmware rootkit that could be stored on hard drive’s memory chip, and can intercept and modify data being sent back to the host computer. This allows the rootkit to trick the host system into executing arbitrary code (more technical description is also available).
What is interesting is, that the leaked Snowden files revealed, that NSA has also developed a tool called IRATEMONK, that provided software application persistence on desktop and laptop computers by implanting the malware (rootkit) in the hard drive firmware to gain execution through Master Boot Record (MBR) substitution. So this attack is not just theoretical, but has been actively used for cyberespionage.
Other exploits on hardware components
The possibilities for attacks of course does not end here. In the past we have seen various attacks through Firewire interface, installing malware on a Apple Aluminium Keyboard, on a PCI card, etc.
Ring -4 rootkits mitigation
While Ring -4 rootkits are not easy mitigated, there are some effective defences against them - but it depends on a type of a component that rootkit resides on. However, in general the main mitigation approach would be firmware validation (unfortunately most of the firmware for computer components is not open source), and secure supply chain practices.
Exploits on baseband processors could be mitigated by baseband isolation (this is for instance approach used by GrapheneOS mobile operating system), while some other providers provide so called blob-free network cards for computers. That means that the network card’s firmware is considered to be non-modifiable pre-installed firmware that is part of the hardware.
Malware on storage controllers could be defeated by software level full disk encryption, because the rootkit is only effective if the data written or read from the storage disk is in the clear (however full disk encryption should have data integrity algorithm in place, which would detect if malware is corrupting data).
For other hardware components the threat level is different. For instance malware on a keyboard controller could be less problematic if it can not communicate with device's operating system. So keeping the operating system secure, can also help defending against firmware attacks. Physical security is also important. If the attacker does not have physical access to the infected firmware device, they can not exfiltrate data, even they are being recorded. Using hardware components with open source and verified firmware also helps.
As a sidenote, Row hammer attack could be prevented by using ECC RAM, TTR (Target Row Refresh) enabled DDR4 or DDR5 RAM and by use of operating systems or hypervisors that implement memory partitioning or access throttling to complement hardware defences. Incorporating robust mitigation strategies like strict memory isolation and minimal privileges for different components on the operating system level can also help to reduce the impact of any memory-related vulnerabilities, including Row hammer attacks.
Can we go even deeper?
Now, the question remains, can rootkits go even deeper? And what could be possible defence? The answer to the first questios is - unfortunately - yes. (But fortunately, yes, there is possible defence).
Processors with malicious design
One of the early public research on this topic was published in 2008 by Samuel T. King, Joseph Tucek, Anthony Cozzie, Chris Grier, Weihang Jiang and Yuanyuan Zhou in a paper titled Designing and implementing malicious hardware.
They presented so called Illinois Malicious Processor (IMP), that was a proof-of-concept research project demonstrating how malicious functionality can be embedded directly into a processor's design.
The authors have shown, that an attacker can design a hardware to support general purpose attacks. Their proof-of-concept has shown that malicious hardware design can bypass traditional software-based security mechanisms. Illinois Malicious Processor included a hidden operational mode, that was designed to be undetectable by traditional hardware and software monitoring tools. This mode allows the malicious processor to execute hidden instructions and access reserved parts of the cache memory for storing attack payloads.
Processors with malicious manufacturing
Another vector of attack could be malicious manufacturing of the processors. We will show, that these attacks are not just theoretical, since researchers have already proven that they can be carried out in practice.
But first we must understand how the processors are manufactured. The main raw material for processors is silicon, which needs to be first purified to a high degree (99.9999%) then sliced into thin wafers. Silicon is a semiconductor that can switch between conducting and insulating electricity.
In the next step photolithographic and chemical processes are used to create the actual circuit on the silicon wafer. First the layer of photoresist (light-sensitive material) is applied to the silicon wafer, then the circuit is illuminated with UV light through a photomask with a picture of a circuit. During that procedure photoresist that is illuminated through photomask is hardened, while other parts of photoresist could be removed. This creates image of a circuit on the silicon wafer. Exposed silicon is then etched away (chemically or with plasma).
Next step is important, and it is called doping. Doping refers to the process of intentionally introducing impurities into a semiconductor to modify its electrical properties. In that step impurities like phosphorus or boron are added to the silicon to alter its electrical properties and create areas that can conduct or block electricity.
If elements of chemical group V (such as phosphorus), which have more electrons than silicon, are added to the silicon, the result is weakly bound and very mobile electrons. We get an n-type semiconductor. However, if we dope silicon with elements chemical of group III (such as boron), we create a deficit of electrons, so we get p-type semiconductors.
Finally, thin layers of materials like copper, aluminium, or insulating oxides are deposited on the wafer in order to get the multi-layered structure of the chip.
Theoretically doping could be used to introduce hardware vulnerabilities or even inject malware-like behaviour into a chip. For instance, malicious actor could create regions in the chip with altered electrical properties. This might cause the chip to malfunction, leak data, or execute unintended instructions under specific conditions.
Typically the attacker would try to target security-critical features, like random number generators or handling of encryption keys. In that case the attacker would make the generation of cryptographic keys predictable, which would facilitate attacks on encryption.
Another feasible attack is to create subtle data leakage channels, enabling side-channel attacks. Slightly varying power consumption or electromagnetic emissions could then enable the attacker to reconstruct encryption keys or other sensitive data.
Doping could also be used to create hidden circuits that are not part of the original design. That would in fact create hardware Trojan on a chip.
So, is it only theoretical or could be carried out in practice?
Researchers Georg T. Becker, Francesco Regazzoni, Christof Paar, and Wayne P. Burleson have shown that hardware Trojans can be implemented completely undetectably on consumer grade processors (their research is from 2013 and they used Intel's Ivy Bridge processors). With appropriate doping, researchers were able to create malicious changes to the logic gates of transistors on an integrated circuit.
They also pointed out that a similar process is already commercially used to obfuscate the operation of integrated circuits (see the article A Survey on Chip to System Reverse Engineering from 2016 by Mdshahed Enamulquadir, Junlin Chen, Domenic Forte, and Navid Asadizanjani), which suggests that performing this type of attack in practice is not as impossible as it might seem at first glance.
In an article titled Stealthy Dopant-Level Hardware Trojans they demonstrated the creation of two hardware Trojans. First was malformed random number generator implemented in Ivy Bridge processors, and the second one was malicious hardware implementation of the AES encryption functions, so that they were not resistant to a side channel attack any more.
As already mentioned, in the first case, they modified the random number generator (so-called hardware RNG) on Intel's Ivy Bridge processor.
Intel's hardware RNG generates 128-bit random numbers by default. This means that there are 2\^128 possible combinations of a single random number (340282366920938463463374607431768211456 possible combinations).
However, by modifying the processor, the researchers were able to arbitrarily reduce the range of random numbers. For example, from 2\^128 to 2\^32, which returns only 4294967296 possible combinations. These are much easier to guess and subsequently encryption keys generated with that random number generator are much easier to break.
Interestingly, the random number generator modified in this way passed the test of the American National Institute of Standards and Technology (NIST) to determine the randomness of the generated numbers.
In the second case, the researchers implemented the attack on a hardware implementation of an AES encryption chip that is supposed to be resistant to the side channel attacks. It is a special purpose integrated circuit, called iMDPL (Improved Masked Dual-Rail Logic), which they modified so that it changed its power consumption depending on the input data (but only in a way known to the attacker).
The researchers then shown how this could be used to implement leaking of the AES encryption key, while the integrated circuit still performs its task - protecting against the all other side channel attacks. In this case, too, no functional testing can detect a hardware Trojan horse.
Those malicious hardware modifications could not be detected neither by optical inspection (the metal and polysilicon wiring of the modified chip is unchanged), or by performing a BIST test (build-in-self-test, a hardware self-testing process), or by checking with a reference chip, so called gold chip.
What about mitigation?
While malicious design of the processors could be detected at least by third-party verification, doping-based attacks are nearly impossible to identify without highly advanced equipment and specialized knowledge. Again, general mitigation strategies here are to ensure secure supply chains and third-party verification. Unfortunately, those strategies are not really feasible for ordinary users.
On the other hand, ordinary users can use external random number generators for generating unbiased random numbers, and hardware security modules for handling encryption keys, which enables them to mitigate at least some of the risks.
Conclusion
As we have shown, rootkits can hide pretty deep in our systems. The most advanced attacks can usually be performed by very advanced, usually state actors. But we have also shown, that the bar is lowering and advanced rootkits are becoming more easily accessible to non-state actors, like ransomware group Wizard Spider who was developing their own SMM rootkit and PLATINUM cybercrime group who exploited Intel Management Engine on Intel CPU's.
On the other hand, there are several mitigation techniques available, that can help to secure our systems, even though no system could be 100% secure.
Good mitigation strategies are using sandboxing and different isolated virtual environments for different tasks. In case of malware attack, malware would be limited to an isolated environment, and infection would not be able to spread (at least not easily). And if we implement virtual machine level snapshots, compromised environments can be easily returned to a last known good state.
Another line of defence is BIOS/UEFI, that has safeguards against compromising SMM, and has implemented secure boot and measured boot with external hardware security module. This not only reduces the attack surface, but also provides enhanced system integrity verification and secure authentication.
Disabling Management Engine functionality helps to disable Ring -3 rootkit attacks. Malware on storage controllers could be defeated by software level full disk encryption, and for other critical components using hardware with open source and verified firmware (or at least without firmware blobs) also helps. Several attacks could also be prevented by using external random number generators and hardware security modules for handling of secure cryptographic materials.
Also, we should not forget on general mitigation strategies, which are to ensure secure supply chains, third-party verification of hardware components and software and firmware validation.
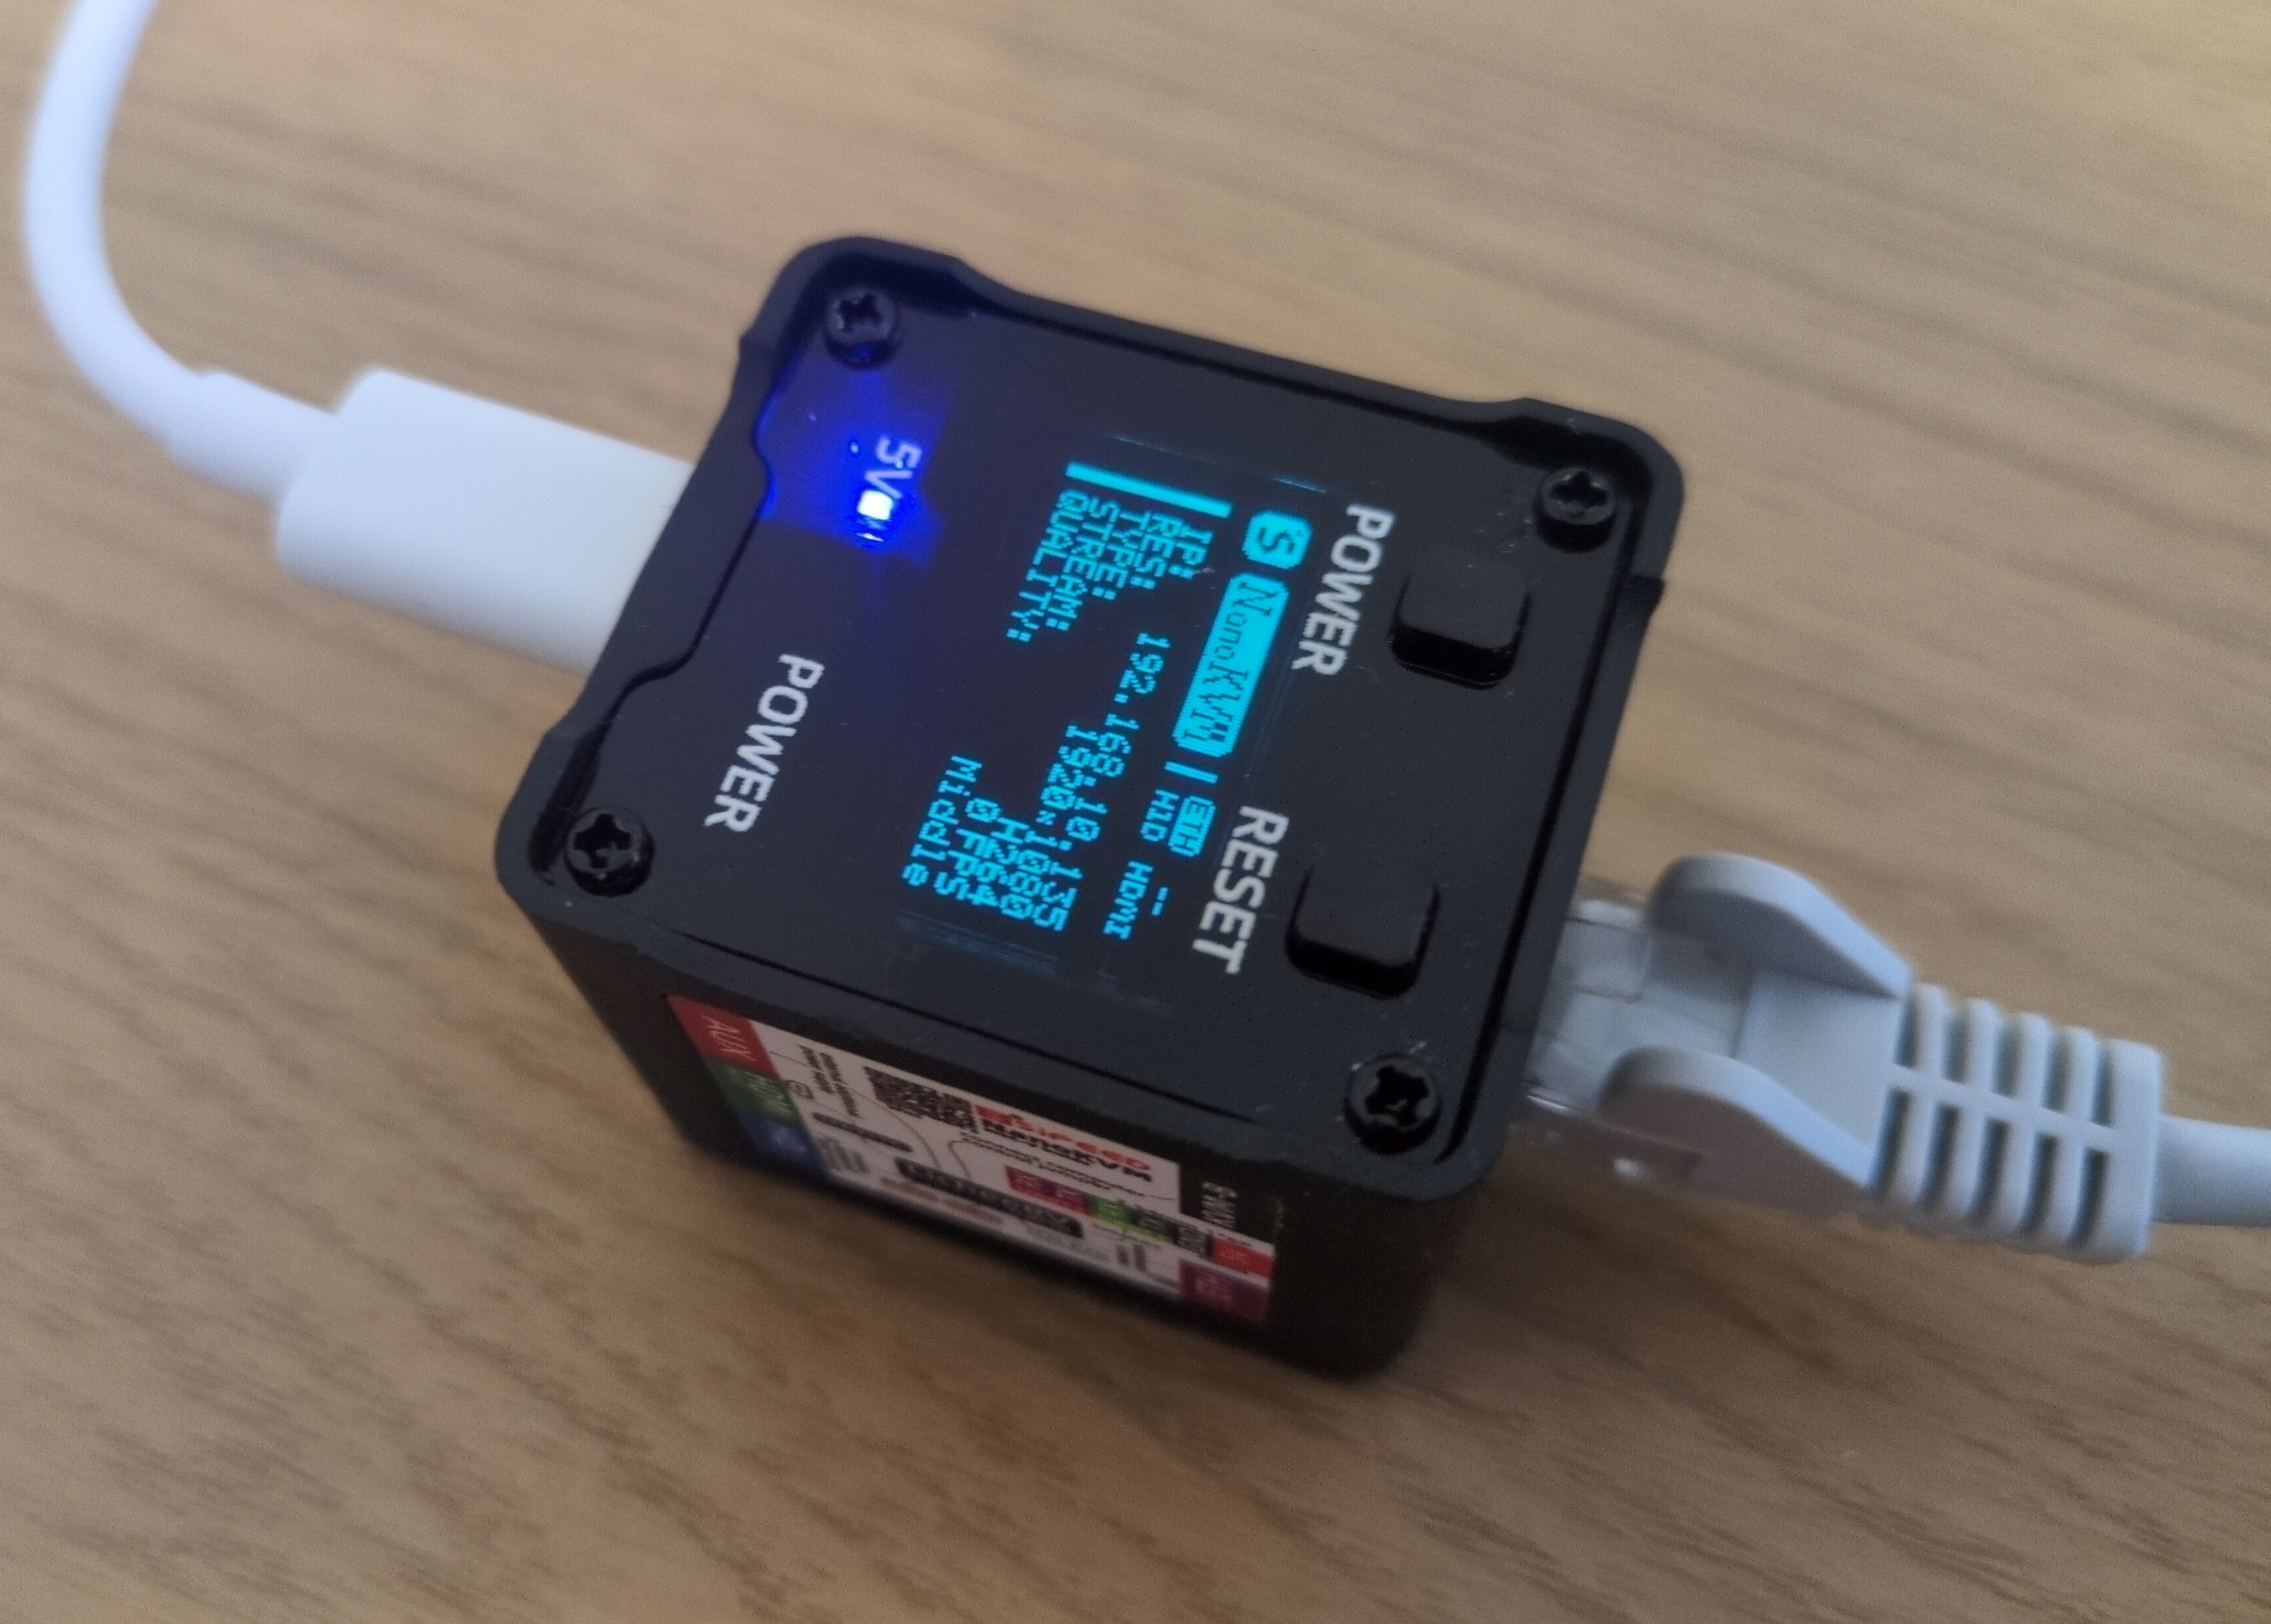
Info: you can also download my presentation on this topic.
Also, I developed a working prototype of security enhanced laptop that has implemented most of the rootkit mitigation strategies presented in this article, which means that advanced rootkit protection is possible and accessible to ordinary users.