Normal view

There are new articles available, click to refresh the page.
Before yesterdayMain stream

Morgan Stanley Says the ‘Space’ in SpaceX Is Worth About $8 Per Share

By: Nick Heer
16 July 2026 at 04:36

Bryce Elder, on the Financial Times’ Alphaville blog:

Here’s paragraph one of the Morgan Stanley’s SpaceX initiation note:

With an ‘X of 1’ position in space infrastructure, we believe SpaceX can convert energy into intelligence at scale with optionality to monetize through a range of consumer and enterprise solutions for the next era of AI… the final frontier.

[Adam] Jonas — formerly the Wall Street bank’s Tesla and occasionally other auto companies analyst — was last year reallocated to the sort of free-radical futurologist role we’d thought had been cornered by Shingy.

Today’s news that SpaceX has already started dipping below its IPO valuation reminded me of this piece. Remind me — is being compared to Shingy good?

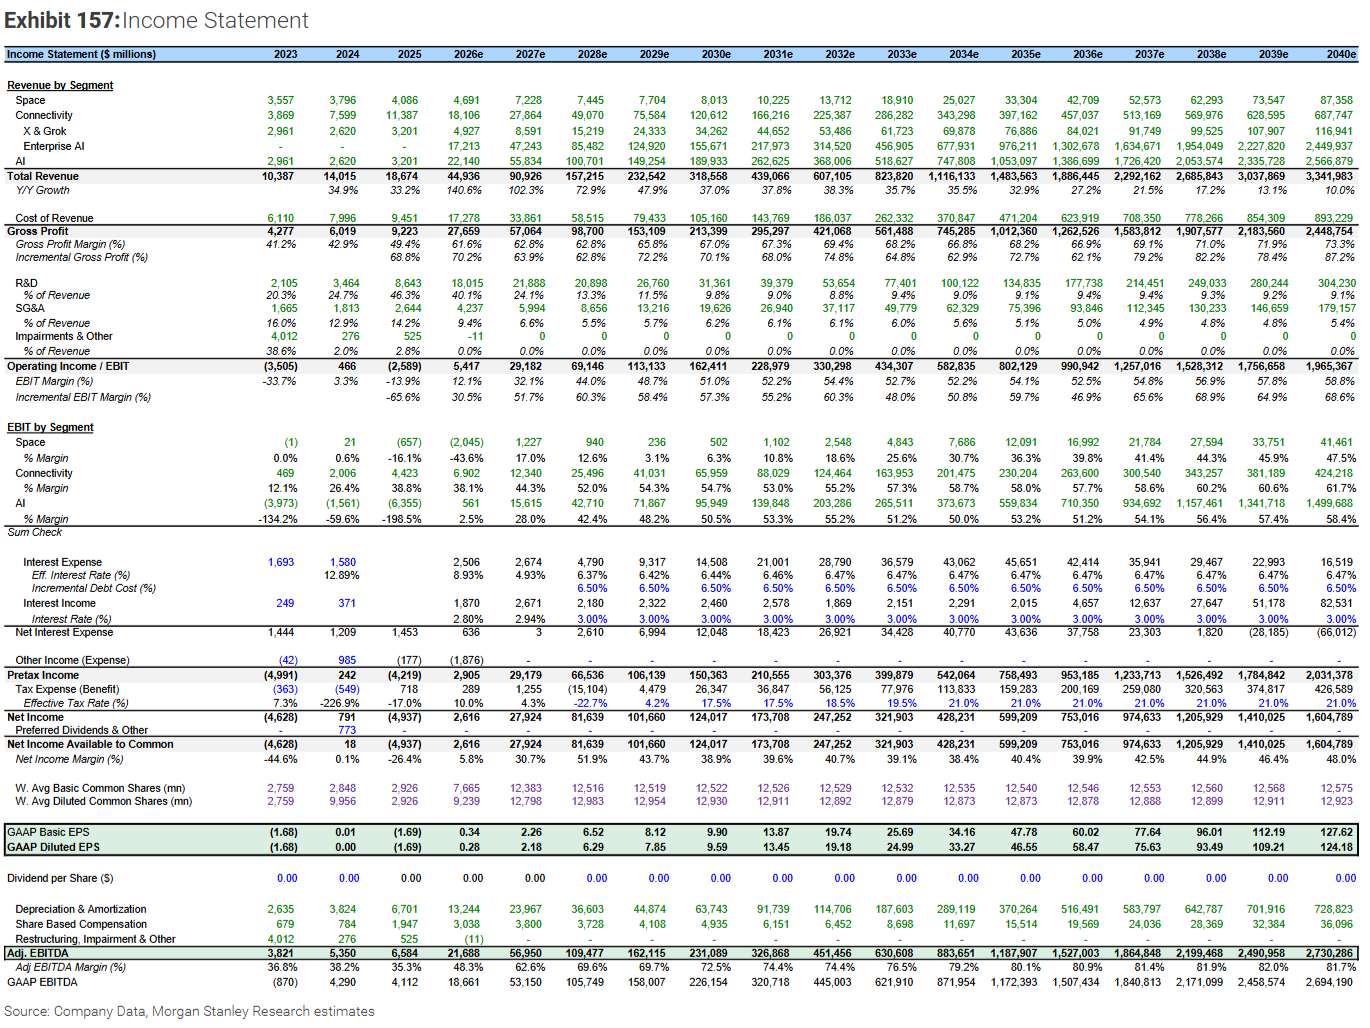
At any rate, Morgan Stanley estimates that the combination of X and Grok will grow this year to generate only a little less revenue than Twitter did in 2021, its last full fiscal year as a public company. Fear not, investors, as the bank also says SpaceX will make $17 billion in “enterprise A.I.”, and then nearly triple that next year. I guess everyone wants to give money to the CSAM and misogynist fantasy generator for business.

⌥ Permalink

Maybe assigning TCP connection to Linux traffic control 'flows'

By: cks
24 July 2026 at 03:14

Back when I wrote about using tc to limit the outgoing bandwidth of a web server, I expressed a wish:

For our purposes it would be nice to do something sophisticated to aggregate all HTTPS requests from a single IP address together in a single 'flow' for tc-sfq(8). In theory this is possible with tc-flow(8) but in practice I can't figure out a command line that works right (despite consulting eg tc-sfb(8)'s example).

The good news is that I managed to figure out a syntax that tc would accept. The bad news is that I don't know if it does what I want, because I'm not sure how you see what connections are assigned to what flows.

I'll put forward two variations of tc-flow(8) commands. To start with, I'll set the stage. We start with our bandwidth limited class that will have a tc-sfq(8) qdisc below it, straight from the first entry:

tc class add dev eno1 parent 1: classid 1:10 htb rate 400mbit ceil 500mbit prio 10

Our first option is to do exactly what I said above, making the flow per-IP instead of per four-tuple, and attach this flow classification to our bandwidth limited qdisc.

tc filter add dev eno1 protocol ip parent 1:10 handle 20 flow hash keys src,dst,proto,proto-src divisor 4096

(The 'handle <something>' is apparently critical although I don't know why. I got this wisdom from here after extensive online searches.)

This theoretically makes flows be based on the source IP, destination IP, source port, and the protocol. In our case, for a HTTPS web server with us dealing with outgoing traffic, the source, protocol, and source port are all the same, so this only varies the flow by the destination IP. This is what we want to aggregate all connections from the same IP. Some sources will tell you to use 'perturb N' on this. We don't want to do this because we want flows to stay sticky and not get re-sorted every so often, and we want to set a very large divisor so that we maintain a lot of distinct flows to go with our (initially) large number of connections.

(The tc-sfb(8) manual page has an example like this, basing flows purely on the destination IP, but it's attached to the root qdisc.)

The other option is to be even more aggressive and theoretically group flows by the /24 of the destination IP address, and nothing else (since we're already theoretically only dealing with HTTPS responses sent by our web server, with the protocol, source IP, and source port all constant). This is done with the other sort of flow filter, a 'map' filter instead of a 'hash':

tc filter add dev eno1 protocol ip parent 1:10 handle 20 flow map key dst rshift 8 divisor 4096

If I'm understanding tc-flow(8) correctly, this takes the destination IP and right shifts it 8 bits (then divides the result by 4096, once again to try to have as many distinct flows as we could in theory have simultaneous connections). Dropping the right octet of a full IP address effectively reduces it to its /24. I think we could also use 'dst and 0xffffff00' to get basically the same effect, but maybe that would get more flow collisions when the dust settled.

I believe that we also need to tell our tc-sfq(8) queue how many flows it's supposed to have, matched with the number we used above:

tc qdisc add dev eno1 parent 1:10 handle 10: sfq flows 4096 divisor 4096

Unfortunately, I don't know if all of this works because I don't know of any way to see what flow a given connection is classified into (either before or after tc-sfq(8) gets at it). It could be that my tc-flow(8) usage isn't actually assigning flows the way I want (especially in the second case). It could also be that I need to put my flow filter somewhere else in the tc class hierarchy, or maybe somehow attach it directly to the tc-sfq(8) qdisc.

(Given the example in tc-sfb(8), where the filter is attached directly to the sfb qdisc, possibly I need to attach the flow filters to the sfq qdisc, with 'parent 10:' instead of 'parent 1:10'. This appears to be accepted by tc, although who knows if it's working.)

PS: Based on what 'iftop' is telling me, I'm relatively sure that my flow filter isn't actually working the way I want (with a flow filter either in this version or directly attached to the sfq qdisc). But it's hard to be sure.

Ubuntu 26.04 has broken shutdown announcements and wall doesn't work

By: cks
21 July 2026 at 03:28

Today, for reasons outside the scope of this entry, we needed to do unscheduled reboots on a number of Ubuntu 26.04 servers that people log in to and use. As is our usual process, we didn't reboot these on the spot; instead we ran 'shutdown -r +NN "<a message about the situation>"' so that people would have a little bit of warning because the impending shutdown would be periodically announced (by systemd, because this is systemd-based these days). Then, to our unpleasant surprise, we discovered that no announcements were happening. Shortly afterward we discovered that the venerable 'wall' program wasn't making announcements either.

Surprisingly, these turn out to be two separate issues. The wall issue is because starting in Debian 13 ('Trixie') and Ubuntu 25.10, the Debian and Ubuntu systemd is built without support for /var/run/utmp (aka /run/utmp), the traditional file recording who is logged in where; wall (which comes from the 'bsdutils' package) only looks in the utmp file. If there's no utmp file, wall is never going to do anything. If you need a wall equivalent, you'll need to write a script that gets the list of active user sessions with ptys and writes a message to them itself.

(For Debian Trixie dropping support for utmp, see eg this debian-devel thread. Apparently one reason for the change is that the utmp format has Y2038 problems. A replacement is available through the wtmpdb package and project, which also gives you a working 'last' command. You have to hook it up in your PAM configuration, and the Ubuntu 26.04 OpenSSH is built without wtmpdb support, so I believe you're going to be missing some information.)

The issue with shutdown not broadcasting messages appears to be because in Ubuntu 26.04 (with systemd 259.5), systemd's logind doesn't know what ttys people's SSH logins are using. You can see this with 'loginctl' or 'loginctl -j', which will have no TTY information for all SSH logins (although if you log in on the console, it will have that). This isn't the case in Ubuntu 24.04 (with systemd 255.4) or Fedora 43 (with systemd 258.9), although both versions are built with UTMP support (in theory this shouldn't matter, since logind's tty tracking is a separate thing). Logind's announcements of impending shutdowns only go to TTYs that it knows about, so since it doesn't know about any SSH login ptys, none of them get any announcements.

Update: Now that I pay attention, Fedora 43's systemd is older than Ubuntu 26.04's. However, Fedora 44 has systemd 259.7 (with UTMP enabled) and its 'loginctl' doesn't have this problem.

If you're using 'who' or 'w' on Ubuntu 26.04 (or at least the version of 'who' from GNU Coreutils, since the uutils version currently suffers from bug #2152801), you might notice that they do report pty information, at least if you have AppArmor disabled (as we do):

; who
cks      sshd pts/0   Jul 20 21:47 (...)
; lsb_release -r
Release:        26.04

This is because while the GNU Coreutils version of 'who' talks to systemd to try to get this information (through a set of systemd library APIs), if there's no TTY information for a session it will also look through /dev/pts to try to find a likely candidate. This works often enough that 'who' typically shows information for most interactive SSH sessions with a pty. The 'w' program, which comes from procps, has a similar fallback if systemd and utmp are both not reporting the tty. Since 'who' and 'w' use different approaches, on Ubuntu 26.04 one may report a tty that the other doesn't.

(Apparently the default Ubuntu 26.04 AppArmor profiles block access by 'who' to /run/systemd/sessions, which the systemd library API uses under the covers to get session information. Amusingly, this only affects 'who', not 'w', as 'w' has no specific AppArmor profile.)

The Rust coreutils (uutils) are sticky in Ubuntu 26.04 LTS

By: cks
19 July 2026 at 02:08

GNU Coreutils are what they sound like; a GNU version of a bunch of basic, core Unix programs such as 'mkdir', 'head', 'chmod', 'cp', 'mv', and so on. For a long time, talking about 'GNU Coreutils' was unnecessary and you could just talk about 'Coreutils'. Then some people decided to rewrite Coreutils in Rust, the uutils coreutils, which still wouldn't be very important for most people except that Canonical decided to make the Rust versions the default in Ubuntu 25.10 and then 26.04.

In theory the Rust coreutils aim for 100% compatibility with GNU Coreutils and anything to the contrary is a bug. In practice, I found an incompatibility almost immediately when testing 26.04 pre-release, Ubuntu bug reports are useless, and I was pretty certain that other people on our systems would run into other issues, so I decided that we would sit out this round of Canonical making 26.04 LTS people mandatory beta-testers of their current passion project.

Canonical doesn't make it easy to switch from Rust uutils to GNU Coreutils, but they do at least make it possible. The magic apt-get command you need is:

apt-get install coreutils-from-gnu coreutils-from-uutils- --allow-remove-essential

(Taken from here.)

If you do this, I suggest that you immediately do 'apt-mark hold coreutils-from-uutils' (you may not want to hold 'coreutils-from-gnu', since there might be bugfix updates to it for some reason, although the real programs are in the 'gnu-coreutils' package).

The reason you might want to do this is, well, let me quote a Fediverse post of mine:

Ubuntu: you can totally continue to use GNU Coreutils in 26.04 LTS.
Also Ubuntu: build-essential depends on the new Rust coreutils.

Yeah, that's not "you can totally continue to use GNU Coreutils", although it sure is tempting to build my own build-essential package with a different dependency.

What this means in practice is that if you install coreutils-from-gnu, the build-essential package is uninstalled if you have it installed, and if you install build-essential later, coreutils-from-gnu is uninstalled and coreutils-from-uutils (the Rust version) is reinstalled. If you're not paying close attention to all of the messages that an 'apt-get' is printing out, you might miss this (especially if the apt-get is happening in the middle of your general install framework). Then you will be surprised, as I was, when it turns out that your 26.04 systems have Rust coreutils despite you theoretically having switched.

Build-essential itself doesn't do much, although installing it is a convenient way to get some core software building tools (especially if you want to build Ubuntu packages, perhaps to make local changes). What really matters is that 'apt-get build-dep' will insist on installing build-essential, and you may want to do 'apt-get build-dep <some package>' for all sorts of reasons. For example, if you're going to build your own Emacs, 'apt-get build-dep emacs' is a convenient way to get most or all of the development packages it's going to want, rather than looking them up and getting each one yourself.

The build-essential dependency is explicit:

$ apt-cache show build-essential
[...]
Depends: libc6-dev | libc-dev, gcc (>= 4:14.2), g++ (>= 4:14.2), make, dpkg-dev (>= 1.22.11), coreutils-from-uutils

Not 'coreutils' (a meta-package that depends on either), not explicitly 'coreutils-from-uutils | coreutils-from-gnu', a direct, specific dependency on the Rust coreutils. This turns out to be a Canonical bodge from September 2025 that's not in the upstream package (via). Since this is an explicit dependency, dealing with it requires things like building your own version of build-essential that has a fixed dependency (perhaps with dgit).

There may be other packages with specific dependencies on 'coreutils-from-uutils', which is why I suggested you explicitly 'apt-mark hold' it. With the package held (or both coreutils-from-* packages held), 'apt-get install <some package>' will abort rather than flip your Coreutils setup around. Then at least you can find out which new package will make you unhappy with Canonical.

("apt-cache rdepends coreutils-from-uutils' doesn't show me anything on our Ubuntu 26.04 LTS machines, but I don't know if that's complete across the entire Ubuntu package set for 26.04.)

How my desktops wound up with multiple D-Bus user session instances

By: cks
18 July 2026 at 02:02

I mentioned recently (when I dug into systemd and your user D-Bus session bus) that some of my machines were set up so that they sometimes started another D-Bus session bus daemon for me. After having done some experimentation I can say that this isn't necessary (or really, proper) and I've now stopped doing it. You might wonder how I got myself into this situation, and that's a story of history.

On my primary desktops, I've never used any graphical login manager like gdm, xdm, or so on (which has long been sort of a heresy), and I've never run a standard desktop; instead I have my own window manager environment. This leaves me having to do a lot of things myself as part of starting the X server and my environment that a standard desktop and login environment takes care of for you.

D-Bus started being a thing in Linux before systemd. In those days, starting your user D-Bus session daemon was part of the jobs of your desktop environment, either internally or through files it put into the standard /etc/X11/xinit/xinitrc.d (where your graphical login manager of choice should pick them up, although I'm not sure how that works these days). Since I didn't have a desktop environment and was doing it all myself, I had to research what was normally run on session startup and duplicate it in my own shell scripts, and one of those things was running dbus-launch with the appropriate arguments. In the way I ran it, dbus-launch unconditionally starts a D-Bus session daemon and sets '$DBUS_SESSION_BUS_ADDRESS' to point to it.

This was fine in the pre-systemd days, when my regular console login didn't have a D-Bus session daemon started for it (or set up to be ready to start). Well, it was mostly fine, because the D-Bus session bus address was in /tmp, and things can happen to files in /tmp under various circumstances. But I think it only very rarely went wrong, enough that I didn't really notice.

When systemd started providing a D-Bus setup of its own, the proper official /etc/X11/xinit/xinitrc.d was changed so that it detected this and stepped out of the way and not started another D-Bus daemon (and desktop environments that did it all themselves internally were changed similarly). But my own scripts never had this in and never noticed, so when I logged in on the console systemd would set up the whole D-Bus stuff for me even though I was logging in on the console and then my xinit based scripts would promptly start another D-Bus daemon and override that.

(Well, systemd set up all of this provided that my session was in the right class.)

All of this shows one of the challenges of having your own desktop environment; it's on you to keep up with this sort of stuff, and you're probably not hooked into the information channels for it (as far as I know, the various desktop environment people talk to each other). There are probably other places where my environment has drifted away from how it should be.

PS: It's possible that I'll run into problems with my switch, because there's one potentially important thing that's different between the two approaches. The old approach started the D-Bus session daemon with a fully initialized environment (since I was starting it from my login shell after logging in), while the new one starts it with whatever minimal environment it gets from 'systemd --user'.

Argc and argv in early Research Unix

By: cks
17 July 2026 at 02:59

Recently I was peripherally involved in a Fediverse discussion about (C's) argc and argv (the arguments to your main(), the start of a C program). Famously, argv[] is an array of pointers to your program's arguments (including the nominal name of the program), and it's sort of traditional to terminate it with a NULL pointer (although this isn't required by the Single Unix Standard; its execve() specification is silent on this). If you think about it, having both argc and a NULL-terminated argv is redundant, since you could determine one from the other. So me being me, I wondered how far back argc and argv went in Unix (and if argv was NULL terminated from the beginning). The answer turns out to be that they go all the way back to Research Unix V1, which is before C existed, and argv[] wasn't originally NULL terminated.

Update: Tony Finch pointed out that POSIX actually does specifically require argv[] to be NULL terminated (and the NULL not be counted in argc). See the comment for details.

The V1 exec(2) manual page is specific about both sides of the V1 exec() API (which is expressed in assembly language terms, since C wasn't invented yet). Exec() is called with a NULL-terminated array of pointers to the (zero-terminated) argument strings, but the invoked program receives an explicit count of the arguments along with an array of argument pointers, and the array is not listed as NULL-terminated. The V1 kernel source code for sysexec (in u2.s) doesn't appear to put in a final NULL pointer or any other pointer value after the regular argv[] pointers, so your program has to use argc to know when to stop.

The logic of this split between the exec() API and the API to programs is a bit clearer in the C code of the V4 exec() in sys/ken/sys1.c. Exec() needs to count the number of arguments in order to do things like allocate the correct size of argv[] array on the stack of the new program, and having created that count it might as well pass that to the new program as argc. However, if I'm reading the V4 exec() correctly, it adds a final '-1' right after the normal end of the argv[] array:

while(na--) {
  suword(ap=+2, c);
  do
    subyte(c++, *cp);
  while(*cp++);
}
suword(ap+2, -1);

This trailing -1 remains present all the way through the V6 exec() in sys/ken/sys1.c (and I don't know why it was -1 instead of 0; the V6 crt0.s doesn't seem to make any visible check for it).

Finally, in the V7 exece() in sys/sys.1, we get an actual NULL pointer at the end of argv[]. However, this is less of a terminator and more of a separator, because the addition of environment variables in V7 has turned argv[] into two arrays of pointers stacked on top of each other, one for the arguments and one for the user environment (which is also terminated with a NULL, because otherwise there's no way to tell). Based on how the C program startup libc/csu/crt0.s has a loop, I think that it finds the environment by walking the argv[] array to find the separator NULL, although the kernel is still providing argc as well as the argv[] array.

As far as I can tell, both System III and 4.2 BSD continue to add the separator NULL (it's more obvious in the 4.x BSD source, where there's an explicit copy of '0' into the user stack; in System III, it appears that the user stack section is pre-zeroed so the code just bumps the offset). BSD continued doing this at least as late as 4.3 BSD Reno (cf). Based on this repository, it appears that System V Release 2 for the Vax also separated argv[] and the environment with a NULL (cf vax/os/exec.c).

If there were Unix systems that later changed this to not have a separating NULL between argv[] and the environment (and thus not giving argv[] a terminating NULL), I don't know what they are. Instead, I suspect that either some C compilers on early non-Unix systems omitted the NULL at the end of their (made up) argv or that the ANSI C and POSIX people didn't want to explicitly require it.

Update: See above, POSIX does explicitly require NULL termination.

(Now you know why I was looking at exec() in early Unix and came to understand its argv size limit.)

The early Research Unix exec(2) argv size limit

By: cks
16 July 2026 at 02:47

When I wrote up how V7 gave us environment variables, I mentioned that up to V6, exec(2) had a limit of 510 bytes of command line arguments (including argv[0], the nominal name of your program). You can see the check in the V6 kernel exec() code in sys/ken/sys1.c (where it returns E2BIG in this case). You might wonder where this limit comes from and why.

When you exec() something, you discard your current process's memory and address space to create create a new one for the new program. Your current (user) memory includes the argv you're passing to exec(), so the kernel has to copy it from your user space into the kernel and then back, temporarily holding it in some sort of kernel memory. In a modern kernel you might dynamically allocate this kernel memory in exec() through the kernel equivalent of malloc(), but the Research Unix kernels were simple and didn't have that sort of thing. Instead, through Research Unix V6, they got their temporary scratch space for exec() by allocating a disk buffer, reusing a facility the kernel already needed. These disk buffers were 512 bytes long, which is more or less where the 510 byte limit on argument size comes from.

(I don't know why it's 510 bytes instead of 512; I've been unable to follow the code closely enough to see if it slips in a use of the last two bytes of the buffer for something else.)

You might innocently think that using a disk buffer just pushes the problem of dynamic allocation of (kernel) memory back one layer, to the disk buffer system. However, early Research Unix kernels are more brute force than that. The V6 kernel has a fixed (and limited) chunk of memory reserved for disk buffers, the buffers array in sys/dmr/bio.c, with its size set by NBUF in sys/param.h. The default NBUF isn't very large, but early Research Unix ran on small systems and had low limits in general (the same param.h sets a limit of 50 processes for the entire system).

This straightforward approach to exec() and disk buffers goes back to at least Research Unix V4 (I haven't looked earlier than that). In V7, the kernel implementation is rather more complex because it needs to handle environment variables too, but it still sort of uses the disk buffer trick. In order to get the extra space without using much extra RAM, V7 uses swap space, writing to it and reading back from it through V7's general disk buffer system (which probably often meant that the disk buffer you wrote to swap is still in RAM when you read it back shortly afterward as part of setting up the new process's memory). So to copy the exec() and exece() arguments, V7 allocates a disk buffer in swap space, copies from user space to the disk buffer until it fills up, flushes and releases the disk buffer, gets a new disk buffer for the new block of swap, and does it all over again.

(As an extra complication, V7 didn't have page based swapping, it only swapped whole programs. So during an execve(), V7 allocated swap space for a NCARGS sized 'program' and then used as much of it as necessary, one disk buffer at a time. If V7 couldn't allocate the necessary swap space during exece(), it paniced.)

PS: If you look at the V6 code for exec() carefully, you'll see one spot where it does 'suword(ap=+2, c);', which looks odd and wrong. That's because in V6 C, '=+' was how you wrote in-place arithmetic, instead of '+=' in V7 and the C we know today.

Systemd and your user D-Bus session bus

By: cks
15 July 2026 at 01:59

These days, a lot of things want you to have a (user) D-Bus session bus (to go with the system-wide one), which will listen for connections on some socket (the bus address). On a systemd based system, the normal D-Bus user session bus socket is /run/user/<uid>/bus, which you can see by logging in and doing, for example, 'echo $DBUS_SESSION_BUS_ADDRESS'. Suppose that you SSH in to some Linux machine that uses systemd, run this, see your expected D-Bus session bus address, and even use 'lsof' to see what's listening to it. Do you actually have a D-Bus session bus active?

Well, maybe, because these days your D-Bus session bus is a socket-activated systemd service. Specifically, it's a user socket and service that's managed by your per-user systemd instance, which is a systemd process running as 'systemd --user' under your uid. When this 'systemd --user' process starts, typically on your first login (including a SSH login), it will start listening on a bunch of sockets, including your standard D-Bus session bus socket, and it will insert a $DBUS_SESSION_BUS_ADDRESS into the 'systemd (user) service manager environment variables' with 'systemctl --user set-environment ...', where many things will then pull it back out (typically including your new SSH login).

Your actual D-Bus session bus and associated processes are only started by systemd if something actually tries to talk to the session bus. This will typically start 'dbus.service', but what that does varies from distribution to distribution. On Fedora, this runs dbus-broker-launch via /etc/systemd/user/dbus.service (which is actually a symlink to /usr/lib/systemd/user/dbus-broker.service), which I believe then starts dbus-daemon itself; on Ubuntu and Debian this directly runs dbus-daemon via /usr/lib/systemd/user/dbus.service. Your distance will likely vary on other distributions.

(The corollary to this is that 'systemctl --user set-environment' and friends aren't using your D-Bus session bus, because systemd does this without starting the the session bus. In Ubuntu 26.04 this communication is done through a systemd socket, /run/user/<uid>/systemd/private, that apparently uses a private API.)

If you SSH in to a server, look at your processes, and there's no dbus-daemon, I believe that you can be pretty sure that you don't have a D-Bus session bus operating yet. One corollary of this is that any surprising delays in logging in and starting your session definitely aren't D-Bus session bus problems, because clearly your session bus hasn't even been started.

(Well, assuming that you can deliberately start your session bus, for example by running 'dbus-monitor --session'. If your session bus refuses to start, that might be your problem. In my case, it's not.)

(This is the kind of thing that I want to write down in case I ever need it again, because I got confused about what was providing my session bus and whether it was activated or not.)

PS: Normally your session bus is shared between all logins, both on the local console and remotely over SSH, but this isn't required. It's possible to start another D-Bus session bus daemon and arrange for that session bus to be used by other processes. However I'm not sure you actually want to do this and it may be a mistake for some of my machines to (still) be set up this way.

Using Linux tc to limit the outgoing bandwidth of a web server

By: cks
7 July 2026 at 03:05

Suppose, not hypothetically, that you have a web server that's using as much of your server's bandwidth as it can get and you would like it to use less bandwidth than that, so that you can get a word in edgewise (for backups, for example) or just because you don't feel like donating 1/10th of your outgoing bandwidth in apparent perpetuity to people who should be building local caches. There are various ways you might do this, for example using FreeBSD pf on your perimeter firewall, but the lowest impact and risk option is to do it on the (Linux) web server itself with tc(8), the Linux traffic control system. Conveniently I've already done a tiny bit with tc to fight bufferbloat latency.

There are probably a variety of ways to do this in tc(8), but what I'm using right now is mostly pulled from the Arch wiki. It goes like this:

  1. We have to switch our device, which is eno1 for me, to using Hierarchy Token Bucket as its top level qdisc (queueing discipline), and in the process set a default class that otherwise unclassified packets will be assigned to.

    tc qdisc del dev eno1 root
    tc qdisc add dev eno1 root handle 1: htb default 30 r2q 1000
    

    Following the Arch example, the default class is 1:30 (the root handle of '1' combined with 'default 30'). Because I'm working with high bandwidth, I need to change r2q to make tc happy.

  2. Set up a child class to limit bandwidth, here with a limit of more or less half of a 1G Ethernet. Because we're only doing one level bandwidth limiting (ie, we're not sub-dividing it), this can go right under the root parent ('1:').

    tc class add dev eno1 parent 1: classid 1:10 htb rate 400mbit ceil 500mbit prio 10
    

    Pick the bandwidth numbers to taste depending on your irritation (and the interface speed of your server, your outgoing bandwidth in general, and so on).

    The classid is somewhat arbitrary but as the Arch Wiki example shows, there can be a use for setting a numbering hierarchy if you have multiple levels of parent and child classes. In the Arch example, the top level bandwidth limited class is '1:1', then it has child classes '1:10', '1:20', and '1:30' (the default class for traffic).

  3. Following the Arch Wiki example, we add a fair queueing qdisc below our bandwidth limit, so traffic flows that fall into this bandwidth limit are (hopefully) a bit better handled. I think this means that one HTTPS reply to a requester on a fast link won't starve all of the others.

    tc qdisc add dev eno1 parent 1:10 handle 10: sfq perturb 10
    

  4. Filter outgoing HTTPS traffic into our bandwidth limiting class:

    tc filter add dev eno1 protocol ip parent 1: prio 1 u32 match ip sport 443 0xffff flowid 1:10
    

    This is a u32 match, and it requires some decoding to understand. A u32 match like this is fundamentally 'match <value>/<mask> at <offset>', and if we dump the raw form of this with 'tc filter show dev eno1', we'll get "match 01bb0000/ffff0000 at 20". The 'ip sport 443' format is simply tc-u32's friendlier way of encoding that (well, technically 'ip sport 443 0xffff', since the 0xffff is a load-bearing part of the shorthand). The tc-u32(8) manual page has various cautions about this matching, so I think if you really care you want to use iptables (or nftables) rules to set a firewall mark and then match on that with tc-fw(8).

  5. Create our default catch-all class that effectively has no bandwidth limit, and as with our bandwidth limited class, also attach a tc-sfq(8) qdisc below it.

    tc class add dev eno1 parent 1: classid 1:30 htb rate 1gbit ceil 10gbit prio 1
    tc qdisc add dev eno1 parent 1:30 handle 30: sfq perturb 10
    

    We have two choices for 'prio'. The first option is that we can set this to 'prio 10', the same as our bandwidth limited class; in that case, I believe non-limited traffic will share bandwidth with the bandwidth limited HTTPS traffic, basically getting what's left over. Alternately, we can decide that we want non-limited traffic to have priority over bandwidth limited traffic, in which case we want a lower priority so its packets are sent first. That's what we're doing here.

    We need a classful qdisc, but we'd like one that will automatically use all of the bandwidth available to it. I've used tc-htb(8) here because it's what I was already using, but there are probably better options. The bandwidth I put here is simply 'really big', starting with the 1G interface rate.

This appears to work but the tc-htb(8) rate numbers may not correspond exactly to the wire bandwidth you (I) see. For our purposes, this is good enough; we're not trying to limit things to an exact MBytes/sec value, just something that's in the right ballpark.

Now that I've read the tc-u32(8) manual page, I'm pretty certain I wouldn't want to use it for anything significant where I cared deeply about what traffic was getting sorted into what class. Iptables or nftables is going to be much better at matching network traffic, especially in unusual and weird situations, and you can use that in traffic control rules through tc-fw(8). Here it doesn't matter too much if some unusual HTTPS traffic 'leaks' outside of my tc filter, as long as there's not too much of it (plus the whole server has an intrinsic bandwidth limit).

PS: For our purposes it would be nice to do something sophisticated to aggregate all HTTPS requests from a single IP address together in a single 'flow' for tc-sfq(8). In theory this is possible with tc-flow(8) but in practice I can't figure out a command line that works right (despite consulting eg tc-sfb(8)'s example). I'm sure the documentation makes sense to people who have a deep understanding of Linux traffic control, but I'm not such a person.

As expected, using kexec to switch to a new Ubuntu kernel works

By: cks
30 June 2026 at 03:10

For a long time, I ignored kexec both for my own personal machines and at work. I knew it existed but I never attempted to use it. That changed recently when I realized we could use kexec to start a network (re)install environment without needing our servers to actually have network booting enabled (which they mostly don't currently, for historical reasons). This has led me to do some additional experimentation with kexec.

The most recent experiment was updating to a new Ubuntu kernel and then using 'kexec' to switch to it instead of 'reboot'. On Ubuntu, this can be pretty simple due to some short symlinks, more or less:

kexec -l /boot/vmlinuz --initrd /boot/initrd.img --append "$(cat /proc/cmdline)"
systemctl kexec

But I'm not sure we're going to actually use this in anything except very unusual circumstances.

The good side of using kexec instead of reboot is that you don't have to sit through your BIOS slowly fiddling around with hardware and then GRUB doing GRUB things. This gets your system back on the air anywhere between 'somewhat faster' and 'much faster', depending on how slow your BIOS firmware is (and also your GRUB timeout). Some of our servers have firmware that is pretty close to 'agonizingly slow', which is part of why we often have network booting disabled on them (this often skips a slow BIOS setup process for network cards, even if network booting was low on the boot priority).

But this good side is also the issue with not using reboot, because if you don't use reboot, you haven't actually tested and verified a cold boot situation. You don't know that your new GRUB boot entry for your new kernel works, and you don't know if your firmware is going to discover some hardware problem at an inconvenient time later on, instead of now during a planned downtime when you're available to deal with the situation. Of course probably the GRUB entry works and probably there's not going to be any surprises from the firmware (and maybe you can inspect the GRUB entry yourself to be sure).

For us, verifying the cold boot behavior (and having a simpler and less error prone 'switch to new kernel' process) is almost always going to be more important than a fast reboot. Now that we know about it, we may kexec into new kernels in exceptional circumstances, but I doubt we're ever going to do it routinely.

BROJLERJI, FRIZIJKE, NESNICE, DAJTE ŠE VEČ MESA, MLEKA IN JAJC!

25 June 2026 at 13:13

Vsako leto na svetu zakoljemo več kot 80 milijard rejnih živali. Samo v Evropi več kot 300 milijonov kokoši, zajcev, svinj, krav, gosk in drugih živali živi v kletkah. 

V kapitalistični, intenzivni živinoreji se živali obravnava kot sredstvo za ustvarjanje dobička. Z načrtnim izborom za razmnoževanje, genskim poseganjem in umetnim osemenjevanjem se njihove lastnosti prilagaja tako, da proizvedejo čim več mesa, mleka ali volne. Živali so  proizvodne enote, katerih namen je čim večji gospodarski izkoristek.

Naštejmo le nekaj vrst, ki so nastale z agresivno umetno selekcijo v zadnjih nekaj stoletjih ali desetletjih – piščanci brojler, ki zrastejo do klavne teže v približno 5–7 tednih, pri njih pa so zelo pogoste težave s srcem, dihali in nogami zaradi izjemno hitre rasti. Kokoši nesnice, ki lahko znesejo več kot 300 jajc na leto, medtem ko divje kokoši znesejo le nekaj deset jajc na leto. Holstein frizijske krave kot glavna mlečna pasma, angus govedo z ekstremno mišičnostjo za meso, “Broad Breasted White” purani, ki imajo tako spremenjeno telesno zgradbo (kratke prsne kosti in povečano mišičnino), da se pogosto ne morejo več naravno razmnoževati.  

Kako kapitalizem z intenzivnim kmetijstvom spreminja biologijo teles živali, prekinja naravne tokove snovi in uničuje tradicionalne oblike kmetovanja, je zanimalo tudi Karla Marxa. V knjigi Narava proti kapitalu (Sophia, 2023) japonski filozof Kohei Saito raziskuje Marxovo ekologijo, ki jo najdemo v gori njegovih zapiskov, še do nedavnega neobjavljenih. Glavna teza Marxove ekologije po Saitu je, da je šele kapitalizem (in ne človeštvo nasploh) usodno pretrgal ravnovesje izmene snovi med ljudmi in naravo, naloga prihodnje družbe pa je prav ureditev te izmene snovi tako, da bo odgovarjala potrebam ljudi in narave, kar ni mogoče, dokler je edino vodilo povečevanje vrednosti in profita.

Z vami delimo nekaj izsekov iz knjige, ki jo priporočamo v poletno branje:

“Marx hlevsko krmljenje označi za zaporniški sistem in se vpraša: “Živali se rodijo v teh zapornih in v njih ostanejo, dokler jih ne ubijejo. Vprašanje je, ali ne bo ta sistem, povezan s sistemom reje, v katerem se živali nenormalno razvijajo, in ki prekomerno obtežuje njihove kosti z namenom, da bi te živali spremenil v gole mase mesa in maščobe, medtem ko so bile poprej (pred letom 1848) aktivne in se kar največ zadrževale pod milim nebom, posled ustvaril temelje za veliko izgubo vitalnosti.” (str. 196)

“Ko si je Marx leta 1865 delal zapiske iz te* knjige (*se nanaša na knjigo Rural economy of England, Scottland and Ireland, avtorja Leonce de Lavergn, 1855), je skrbno zabeležil Lavergnov opis tega, kako so v Angliji umetno spreminjali ovce in živino, da bi povečali proizvodnjo mesa ali skrajšali biološko evolucijo.  Primer “izboljšave” … / … je ovčja pasma bakewell, ki je dobila ime po Robertu Bakewellu, ki zaradi svojih vzrejnih uspehov šteje za enega izmed najuglednejših likov kmetijske revolucije 18. stoletja. Lavergne navdušen nad tem napredkom, ki ga vidi kot dokaz večvrednosti angleškega kmetijstva: … Po sistemu Bakewell jo je mogoče pitati že pri enem letu, tako da v vsakem primeru doseže polno zrelost, še preden dopolni dve leti. S pomočjo selekcije je zmanjšal velikost ovc. Ima le toliko kosti, kot je potrebnih za njen obstoj. Njegove ovce se imenujejo “new leicesters”. (str. 195)

“Od začetka 19. stoletja so na Irskem uvedli veliko Bakewellovih ovac new leicesters, jih križali z domačimi ovcami in nato vzrejali kot novi pasmi galway in roscommon… / … Ne gre za dobrobit in zdravje živali, temveč za njihovo koristnost za kapital.” (str. 196)

The post BROJLERJI, FRIZIJKE, NESNICE, DAJTE ŠE VEČ MESA, MLEKA IN JAJC! first appeared on Rdeča Pesa.

Aggressive caching for a Mastodon reverse proxy: what to cache, what to never cache, and why content negotiation will eventually betray you

5 June 2026 at 08:44

Aggressive caching for a Mastodon reverse proxy: what to cache, what to never cache, and why content negotiation will eventually betray you

I have written before about putting a cache in front of snac, and more recently about the HAProxy layer in front of FediMeteo. The general idea is always the same: the reverse proxy should absorb the repetitive, public work that has no business reaching the application server.

This post is the same idea applied to a much louder neighbour: a Mastodon instance. The instance is mastodon.bsd.cafe, the proxy is nginx on FreeBSD, and the configuration below is what I am currently running in production.

Mastodon is heavier than snac in every direction. It has Puma and Sidekiq behind it, more endpoints, more streaming, more federation patterns, and one specific characteristic that complicates everything: it serves multiple representations on the same URLs. The same path returns HTML to a browser, ActivityPub JSON to a remote instance, and sometimes plain JSON to an API client. If the proxy treats the URL as one thing, sooner or later it will return the wrong thing to the wrong client.

Most of the work below comes from that single observation.

If I had to summarize this whole post in a single sentence, it would be this:

Mastodon is not a website. It is a website, an API, and an ActivityPub server, all sharing the same URLs.

Everything else in this configuration - cache keys, variants, bypass rules, the diagnostic headers - is decoration around that one fact.

A popular toot from a friend gets boosted. Twenty federated instances ask for the same ActivityPub object within the same second. Browsers fetch the HTML version of the same URL. If the proxy sees only "a URL", it will eventually betray you: a remote instance will receive HTML, a browser will receive ActivityPub JSON, and you will spend an afternoon wondering why your timeline looks broken on three different servers. I have spent that afternoon. I do not recommend it.

Assumptions before anything else

Before any directive, this configuration assumes a few things about the instance. If any of these does not match your setup, the directives still make sense, but you must read the caveats at the end before adapting them.

The first assumption is that AUTHORIZED_FETCH (secure mode) is disabled. With secure mode off, all ActivityPub GET responses cached at the proxy layer are public and identical regardless of the requesting actor. With secure mode on, Mastodon can legitimately return different bodies depending on which remote actor is asking, and caching them blindly at the proxy becomes at best wasteful, at worst a cache-poisoning surface.

This is not a hypothetical. CVE-2026-25540, fixed in Mastodon 4.3.19, 4.4.13, and 4.5.6, is exactly this kind of mistake, but inside Mastodon's own Rails.cache: the pinned posts and featured hashtags endpoints had actor-dependent ActivityPub responses but were keyed without the actor. The CVE does not directly apply to nginx caches, but the underlying lesson does. Do not cache what depends on the caller unless the caller is part of the cache key. Keep this rule in mind every time you are tempted to cache a federation endpoint "just in case".

The second assumption is that no signed-URL storage backend sits behind /system/ or /media_proxy/. If those paths ever redirect to short-lived presigned S3 or SeaweedFS URLs, my TTLs below are too long: nginx will happily cache a redirect to a URL that has already expired.

The third assumption is that federation traffic uses HTTP Signatures, not the HTTP Authorization header. Mastodon signs federated GETs with the Signature header. The Authorization-based skip-cache rule further down catches API tokens, not signed federation traffic. If you enable AUTHORIZED_FETCH, you must add an explicit skip rule for $http_signature.

I am being deliberate about these assumptions because the configuration that follows is internally consistent only as long as they hold.

The proxy in front of mastodon.bsd.cafe has three jobs:

TLS termination, microcaching of expensive endpoints (especially federation-heavy collections and default public routes), and long-lived caching of immutable assets and user media.

The point is not to replace Mastodon's internal Rails cache. The point is to absorb spiky federation traffic and repetitive asset fetches that would otherwise hit Puma and Rails for every single request.

The strategy is deliberately layered: very long TTL on fingerprinted assets, medium TTL on user-uploaded media, very short microcache on dynamic pages and federation endpoints that get hammered, and explicit bypass rules for anything private, authenticated, actor-dependent, or otherwise unsafe.

Every cacheable layer is keyed correctly for content negotiation. That is the part that matters most.

The cache zone

A single cache zone is shared across all Mastodon locations:

proxy_cache_path /var/cache/nginx/mastodon
                 levels=1:2
                 keys_zone=mastodon_cache:200m
                 max_size=20g
                 inactive=24h
                 use_temp_path=off;

200m of keys zone holds metadata for roughly 1.6 million entries in RAM. The body can grow up to 20g on disk. The two numbers are independent: keys live in shared memory, bodies live on the filesystem, and the cache key is what links them.

inactive=24h evicts anything not requested for a day, even if there is free space. This is intentional. I do not want a long, cold tail of stale entries to squat in the cache forever. I want the working set to remain hot, and I want the rest to fade.

use_temp_path=off is small but important. By default nginx writes a cached response to a temporary file and then renames it into place. If the temp path and cache path are on different filesystems, that cheap rename becomes a real copy. Setting use_temp_path=off puts temporary files directly under the cache directory and avoids that trap. It is the kind of detail nobody mentions until something is suspiciously slow.

Of all the maps in this configuration, only one really earns its place. This one:

map $http_accept $mastodon_cache_variant {
    default                          "default";
    "~*application/activity\+json"   "activitypub";
    "~*application/ld\+json"         "activitypub";
    "~*application/json"             "json";
    "~*text/html"                    "html";
}

Mastodon serves the same URL with different bodies depending on the Accept header. A status URL like /@user/123456789 returns rendered HTML to a browser and an ActivityPub object to another federated instance. If you cache by URL alone, the first request that comes in wins and the next request receives the wrong content type. Instances start federating HTML, browsers start downloading JSON, and the failure is subtle enough to waste hours.

The map normalizes Accept into four buckets - activitypub, json, html, and default - and the result is folded into the cache key in every location that does content negotiation:

proxy_cache_key "$scheme$host$request_uri|accept=$mastodon_cache_variant";

Coalescing equivalent MIME types is intentional. application/activity+json and application/ld+json both map to activitypub, because splitting them across two cache buckets would fragment the cache for no useful operational gain.

A subtle point I want to be explicit about: I do not include $request_method in the cache key. nginx already converts HEADinto GET for caching purposes by default, which is what I want here. A HEAD request on /@user/123 should hit the same cache entry as a GET request on the same URL. Adding the method would only separate them for no benefit.

During rollout I also expose the selected variant as a response header:

add_header X-Cache-Variant $mastodon_cache_variant always;

The header is there to verify the behaviour in production. It can come off once the configuration has proved itself, but I tend to leave it on. A cache that works should be visible. A cache that is invisible can be correct, but it can also be silently wrong, and I would rather know.

This is the first real gotcha, and I want to spend a moment on it because it caught me out the first time I configured a similar setup.

nginx honors the upstream Vary response header in addition to proxy_cache_key. If Mastodon emits Vary: Accept, or worse, Vary: Accept, Cookie, ..., my carefully normalized variant key gets paired with nginx's native Vary handling. The result is that the cache may still fragment on the full, un-normalized Accept header - which defeats the entire point of the variant map.

There is another, very specific failure mode on older or unpatched nginx builds. nginx stores the Vary value in a fixed-size cache metadata field. Historically that field was 42 bytes, which is famously short and almost charmingly suspicious of being a Douglas Adams reference. Modern nginx raised the limit to 128 bytes, which is enough for the common cases but still surprisingly small. If your upstream emits a long Vary header, anything beyond the limit is treated as Vary: *, which means the response is not cached at all. The only signal you get is a critical line in the error log, and unless you are looking for it, you will not see it.

The operational lesson is the same in both cases: if you rely on your own normalized variant key, do not assume upstream Vary is harmless. Check your nginx version, check your error log, and verify cache behaviour via X-Cache-Statusand X-Cache-Variant.

On the locations where the variant map is the cache dimension I care about, I take responsibility explicitly:

proxy_ignore_headers Vary;

This tells nginx to stop using upstream Vary to protect me. That is fine only if my own cache key and request normalization cover every response dimension that matters. In particular, I make sure the backend is not also varying on Accept-Encoding in a way that would create compressed and uncompressed variants behind my back. The cleanest way to avoid that is not to forward Accept-Encoding to the backend at all, and let frontend nginx handle compression itself:

proxy_set_header Accept-Encoding "";

This is the kind of decision I prefer to be explicit about. Ignoring Vary is not magic. It is a responsibility, and it should be paired with the rules that take its place.

Rather than build one giant boolean to decide what bypasses cache, I prefer to decompose the logic into small orthogonal maps. Each map is 1 when caching must be skipped, and the final decision is an OR of all of them.

map $request_method $skip_cache_method {
    default 1;
    GET     0;
    HEAD    0;
}

map $http_authorization $skip_cache_auth {
    default 1;
    ""      0;
}

map $http_cookie $skip_cache_cookie {
    default 1;
    ""      0;
}

map $uri $skip_cache_uri {
    default                  0;
    ~^/auth                  1;
    ~^/oauth                 1;
    ~^/settings              1;
    ~^/admin                 1;
    ~^/api/v1/custom_emojis$ 0;
    ~^/api/v1/instance$      0;
    ~^/api/v2/instance$      0;
    ~^/api/v1/trends/tags$   0;
    ~^/api/oembed$           0;
    ~^/api/                  1;
}

The reasoning is straightforward. Only GET and HEAD are cacheable; everything else, including POST, DELETE, PUT, and ActivityPub deliveries, must pass through. Any request carrying an Authorization header is an API call with a token, and those are never public. Any request with a cookie is potentially logged-in traffic, and caching logged-in pages would leak personal timelines across users. Auth flows, settings, admin, and most of the API bypass the cache by URI, while a small, carefully chosen set of slow-changing public API endpoints is allowed through.

The important caveat I want to underline: the Authorization map does not catch signed federated GETs. Mastodon federation uses HTTP Signatures, which means the relevant request header is Signature. If AUTHORIZED_FETCH is enabled, you must add a parallel map:

map $http_signature $skip_cache_signature {
    default 1;
    ""      0;
}

and then include it in both proxy_cache_bypass and proxy_no_cache. Do this before enabling secure mode, not after.

The maps are used together in each cacheable location:

proxy_cache_bypass $skip_cache_method $skip_cache_auth $skip_cache_cookie $skip_cache_uri;
proxy_no_cache     $skip_cache_method $skip_cache_auth $skip_cache_cookie $skip_cache_uri;

Both directives are necessary. proxy_cache_bypass means "do not read from cache for this request". proxy_no_cache means "do not write this response to cache". Without proxy_no_cache, a logged-in user's response could still poison the anonymous cache. Without proxy_cache_bypass, a request that should have gone straight to the backend might still receive a cached anonymous response. I keep both, every time.

Most locations share a common proxy baseline. There is nothing clever here, but if any of these lines is missing the rest of the configuration quietly does less than expected.

proxy_http_version 1.1;
proxy_set_header Host $host;
proxy_set_header X-Real-IP $remote_addr;
proxy_set_header X-Forwarded-For $proxy_add_x_forwarded_for;
proxy_set_header X-Forwarded-Proto $scheme;
proxy_set_header Connection "";
proxy_set_header Accept-Encoding "";

proxy_http_version 1.1 and proxy_set_header Connection "" matter for upstream keepalive. Without them, nginx may use HTTP/1.0 semantics upstream and send Connection: close on every request, which makes the keepalive directive on the upstream block far less useful than it looks.

proxy_set_header Accept-Encoding "" keeps backend responses uncompressed so nginx can cache a single representation and handle client-facing compression itself. It also prevents accidental cache fragmentation through Vary: Accept-Encoding, which would otherwise creep in despite the variant map.

These settings are not exciting, and they should not be. The interesting parts of an infrastructure are not always the parts that should be unusual.

The Mastodon server block in my configuration ends up with seven distinct request profiles. Six of them cache; one explicitly does not, because streaming is not a cacheable workload.

I do not group them under one location / with a giant if block. I prefer to keep each profile in its own location, even if some of them look similar. When something goes wrong in production, I want to be able to point at one location and reason about it without holding the rest of the configuration in my head.

location ~ ^/(assets|packs|emoji)/ {
    proxy_cache mastodon_cache;
    proxy_cache_key "$scheme$host$request_uri";
    proxy_ignore_headers Vary;

    proxy_cache_valid 200 301 302 7d;
    proxy_cache_valid 404 10m;

    proxy_cache_lock on;
    proxy_cache_use_stale error timeout updating http_500 http_502 http_503 http_504;
    proxy_cache_background_update on;

    proxy_cache_bypass $skip_cache_method $skip_cache_auth $skip_cache_cookie $skip_cache_uri;
    proxy_no_cache     $skip_cache_method $skip_cache_auth $skip_cache_cookie $skip_cache_uri;

    proxy_pass http://$custom_upstream;
}

These paths are content-addressed. Webpack fingerprints filenames with hashes, so a new deploy publishes new URLs while the old URLs remain valid. A 7-day TTL is safe because /packs/js/common-abc123.js will never become different content under the same URL. If it does, it has a new URL.

404s get a short 10-minute TTL so a temporarily missing asset can recover quickly.

proxy_cache_lock on is the thundering-herd guard. When a popular asset is not cached and ten clients ask for it at once, nine wait for the first request to populate the cache instead of all ten hammering the backend. I like this directive a lot. It is the kind of small switch that quietly removes a class of problems.

proxy_cache_use_stale together with proxy_cache_background_update is the stale-while-revalidate pattern. If an entry has expired but Mastodon is slow or briefly down, nginx can serve the stale copy and refresh it asynchronously. For static assets this is almost always the right trade-off. The asset has not actually changed under the same URL, and a few extra hours of stale data hurt nobody.

location ~ ^/system/(accounts/avatars|media_attachments/files|custom_emojis/images)/ {
    proxy_cache mastodon_cache;
    proxy_cache_key "$scheme$host$request_uri";
    proxy_ignore_headers Vary;

    proxy_cache_valid 200 302 6h;
    proxy_cache_valid 404 5m;

    proxy_cache_lock on;
    proxy_cache_use_stale error timeout updating http_500 http_502 http_503 http_504;
    proxy_cache_background_update on;

    proxy_cache_bypass $skip_cache_method $skip_cache_auth $skip_cache_cookie $skip_cache_uri;
    proxy_no_cache     $skip_cache_method $skip_cache_auth $skip_cache_cookie $skip_cache_uri;

    proxy_pass http://$custom_upstream;
}

Avatars, attachment thumbnails, and custom emoji are also effectively content-addressed, because the file path contains an ID. They can still be replaced or deleted, so the TTL is more conservative than for assets: six hours instead of seven days.

The 302 status is also cached, because Mastodon may redirect to another storage location, and the redirect is usually stable enough to cache for hours.

This is also where the caveat about signed URLs really matters. If you ever put a signed-URL backend behind /system/, this TTL must be shorter than the signed URL lifetime, or nginx will eventually serve a redirect to a URL that no longer works. On mastodon.bsd.cafe I do not use signed URLs, so six hours is fine.

location ~ ^/(users|ap/users)/[^/]+/statuses/[0-9]+/replies {
    proxy_cache mastodon_cache;
    proxy_cache_key "$scheme$host$request_uri|accept=$mastodon_cache_variant";
    proxy_ignore_headers Vary;

    proxy_cache_valid 200 30s;
    proxy_cache_valid 404 10s;

    proxy_cache_lock on;
    proxy_cache_lock_timeout 1s;
    proxy_cache_lock_age 5s;

    proxy_cache_bypass $skip_cache_method $skip_cache_auth $skip_cache_cookie $skip_cache_uri;
    proxy_no_cache     $skip_cache_method $skip_cache_auth $skip_cache_cookie $skip_cache_uri;

    proxy_pass http://$custom_upstream;
}

This is the location I tuned most carefully. When a status starts going viral, dozens of federated instances poll /replies to build their thread view, often within the same second. The same URL must serve an HTML thread view to browsers and an ActivityPub OrderedCollection to remote instances, so the variant key is essential here.

A 30-second microcache absorbs the spike without serving meaningfully stale data. A reply that appears 30 seconds late in a federated thread is usually invisible to humans, while the backend relief is very visible.

The lock settings keep backend load and latency bounded. proxy_cache_lock_timeout 1s bounds how long queued requests wait behind the lock. If the timeout expires, they go to the upstream directly, but their responses are not stored in the cache, which prevents a runaway thundering herd from clogging the cache fill path. proxy_cache_lock_age 5s prevents one slow cache-populating request from monopolizing the fill path forever; if the request holding the lock has not completed after 5 seconds, nginx may let another request reach the upstream to retry.

I have currently left proxy_cache_use_stale off on this location while I am still validating the deployment. This is a deliberate debugging stance, not a permanent choice. Stale-while-revalidate is useful in production, but during rollout it can hide upstream issues while I am trying to understand the system. Once the behaviour is stable, the production version will be:

proxy_cache_use_stale error timeout updating http_500 http_502 http_503 http_504;
proxy_cache_background_update on;
location ^~ /media_proxy/ {
    proxy_cache mastodon_cache;
    proxy_cache_key "$scheme$host$request_uri";

    proxy_cache_valid 200 10m;
    proxy_cache_valid 301 302 10m;
    proxy_cache_valid 404 1m;

    proxy_ignore_headers Cache-Control Expires Vary;

    proxy_cache_lock on;
    proxy_cache_use_stale error timeout updating http_500 http_502 http_503 http_504;
    proxy_cache_background_update on;

    proxy_cache_bypass $skip_cache_method $skip_cache_auth $skip_cache_cookie $skip_cache_uri;
    proxy_no_cache     $skip_cache_method $skip_cache_auth $skip_cache_cookie $skip_cache_uri;

    proxy_pass http://$custom_upstream;
}

Mastodon's /media_proxy/ fetches remote media so clients do not leak their IP address to remote servers. The response is the same regardless of Accept, so the cache key intentionally omits the variant. Splitting media proxy responses across html, json, activitypub, and default buckets would only waste storage.

proxy_ignore_headers Cache-Control Expires Vary is deliberate here. Mastodon may emit conservative cache headers, or none at all, and I want the proxy to enforce a short local 10-minute policy regardless of what the backend says.

Set-Cookie is not in the ignore list. nginx's default refusal to cache responses carrying Set-Cookie still applies, and I want it to. It is a safety net I do not want to disable just to win a few cache hits.

The ^~ prefix is a small useful detail. Once this location matches, nginx stops evaluating regex locations. Media proxy traffic can be heavy, and skipping further regex matching is a tiny but free win.

location ~ ^/(users|ap/users)/[^/]+/(followers|following) {
    proxy_pass http://$custom_upstream;
}

This one is a pure proxy, no cache. I want to be explicit that this is a decision, not an omission.

/users/<name>/followers and /users/<name>/following are pagination-heavy, change frequently as people follow and unfollow, and are queried by federation crawlers in ways that would make the cache key proliferate through pages and cursors. The likely hit ratio is poor, the risk of serving stale social graph data is non-trivial, and the cost of caching them - in storage and in mental overhead - is not worth it.

If a remote instance starts hammering these endpoints, the right answer is rate limiting with limit_req_zone, not retrofitting cache as a rate limiter.

Default location: the microcache and streaming without cache

location / {
    proxy_cache mastodon_cache;
    proxy_cache_key "$scheme$host$request_uri|accept=$mastodon_cache_variant";
    proxy_ignore_headers Vary;

    proxy_cache_valid 200 10s;
    proxy_cache_valid 301 302 1m;
    proxy_cache_valid 404 10s;

    proxy_cache_lock on;
    proxy_cache_lock_timeout 5s;

    proxy_cache_bypass $skip_cache_method $skip_cache_auth $skip_cache_cookie $skip_cache_uri;
    proxy_no_cache     $skip_cache_method $skip_cache_auth $skip_cache_cookie $skip_cache_uri;

    proxy_next_upstream error timeout http_502 http_503 http_504;
    proxy_next_upstream_tries 2;

    proxy_pass http://$custom_upstream;
}

Everything not matched by a more specific location falls here: profiles, individual statuses, the about page, the public timeline, and many ActivityPub object fetches.

The TTL is only 10 seconds for 200 responses. That is enough to deduplicate the wave of requests when a popular toot gets boosted or linked from elsewhere, without making the page feel stale to a human visitor.

It is worth being honest that short TTLs still cost CPU. A 10-second microcache on a sustained-traffic URL means the backend regenerates the entry six times per minute. That is vastly better than serving every request from Rails, but it is not free. If your backend cannot comfortably handle that, raise the TTL, or enable stale-while-revalidate on these dynamic paths.

proxy_next_upstream with proxy_next_upstream_tries 2 is the failover trigger. If the primary returns 502, 503, 504, or times out, nginx retries on the backup. The chain is capped at two attempts so a sick upstream cannot hold the request indefinitely.

At the http level:

map $http_upgrade $connection_upgrade {
    default upgrade;
    ""      close;
}

In the server block:

location /api/v1/streaming {
    proxy_buffering off;
    proxy_set_header Upgrade $http_upgrade;
    proxy_set_header Connection $connection_upgrade;
    proxy_read_timeout 3600s;
    proxy_send_timeout 3600s;
    proxy_pass http://$custom_upstream;
}

Streaming is a WebSocket and SSE-style endpoint. Buffering must be off, otherwise the proxy may hold messages while waiting for buffers to fill. The Upgrade and Connection headers are driven by $connection_upgrade, which is upgradeonly when the client actually sent an Upgrade header. That way a non-WebSocket request to the same path does not get its Connection header mangled.

The hour-long read and send timeouts allow long-lived streams to stay open through quiet periods.

There is no cache here. Streaming is not a cacheable workload, and trying to make it one is one of those ideas that sounds clever for about thirty seconds.

Upstream and failover

upstream mastodonbsdcafe {
    server 192.168.123.33  max_fails=3 fail_timeout=30s;
    server 192.168.122.133 backup;
    keepalive 64;
}

The primary backend is on another VPS; the backup is in a jail next to the reverse proxy. After three consecutive failures, the primary is marked down for 30 seconds. Traffic flips to the backup, then nginx retries the primary after the window.

keepalive 64 holds up to 64 idle TCP connections to the upstream per worker. On a busy instance, this saves real handshake overhead, but only if the proxied connection can actually stay open. That is why the shared proxy settings include proxy_http_version 1.1 and proxy_set_header Connection "". Without those, upstream keepalive does much less than it looks like it should.

I also use an indirection layer:

map $remote_addr $custom_upstream {
    default mastodonbsdcafe;
}

Today everything defaults to the main upstream group. The map exists so that specific client IPs can be pinned to a specific upstream when I am debugging, or so an admin connection can be routed to the backup while the primary is being tested. It costs nothing to have it sitting there, and it has saved me time more than once.

What I log and why

log_format detailed '$remote_addr - $remote_user [$time_local] '
                    '"$request" $status $body_bytes_sent '
                    '"$http_referer" "$http_user_agent" '
                    'rt=$request_time '
                    'uct=$upstream_connect_time '
                    'uht=$upstream_header_time '
                    'urt=$upstream_response_time '
                    'us=$upstream_status '
                    'ua=$upstream_addr '
                    'cache=$upstream_cache_status '
                    'variant=$mastodon_cache_variant';

access_log /var/log/nginx/access.mastodon.bsd.cafe.log detailed;

add_header X-Cache-Status  $upstream_cache_status always;
add_header X-Cache-Variant $mastodon_cache_variant always;

This log format is purpose-built for the cache layer. For each request it records total request time, upstream connect time, upstream header time, upstream response time, upstream status, which backend served the request, cache status, and which content-negotiation variant was selected.

The cache status is one of the values nginx exposes through $upstream_cache_status: HIT, MISS, BYPASS, EXPIRED, STALE, UPDATING, or REVALIDATED. The response headers expose the same information to the client, which makes it trivial to verify behaviour with curl -I or browser dev tools.

The always qualifier matters. Without it, nginx only adds these headers to a subset of responses, so a 502 from the backend might arrive without the diagnostic headers you need most. I want them on every response, no exceptions.

There is also a small operational detail I find pleasant: a custom 502 page.

error_page 502 /502.html;
location = /502.html {
    root /usr/local/www/mastodon_errors;
    internal;
}

It is not part of the cache strategy, but it makes backend hiccups less ugly. And I block some abusive user agents with 444, which closes the connection without sending any response at all:

if ($http_user_agent ~* "bytespider") {
    return 444;
}

This is not a general bot strategy. It is just a cheap refusal path for traffic I know I do not want.

How I check it actually works

A configuration that I cannot verify is a configuration I do not trust. Here is the short set of commands I keep in a paste buffer for this proxy.

The first verification is variant separation. Three requests to the same URL with different Accept headers should produce three independent cache entries:

for v in 'text/html' \
         'application/activity+json' \
         'application/ld+json; profile="https://www.w3.org/ns/activitystreams"'; do
  printf '%-75s -> ' "$v"
  curl -s -o /dev/null -D - -H "Accept: $v" \
    https://mastodon.bsd.cafe/@someuser/123456789 \
    | awk '/^[Xx]-[Cc]ache/ { printf "%s ", $0 } END { print "" }'
done

On the first pass, every variant should be a MISS. On the second pass, every variant should be a HIT, with X-Cache-Variantshowing the expected bucket.

The second verification is that cookies and Authorization always trigger BYPASS:

curl -I -H 'Cookie: _mastodon_session=test' \
  https://mastodon.bsd.cafe/@someuser

curl -I -H 'Authorization: Bearer fake' \
  https://mastodon.bsd.cafe/api/v1/timelines/home

Both should return X-Cache-Status: BYPASS. If they do not, the skip-cache rules are wrong, and the entire setup is unsafe.

If you intend to enable AUTHORIZED_FETCH, the third verification is for signed GETs. A quick synthetic check that the nginx map fires correctly:

curl -I -H 'Signature: fake' \
       -H 'Accept: application/activity+json' \
       https://mastodon.bsd.cafe/users/someuser

If you added $skip_cache_signature, the result should be X-Cache-Status: BYPASS.

Finally, the logs themselves tell me how the cache is performing in production. Cache status distribution:

awk '{
  for (i = 1; i <= NF; i++)
    if ($i ~ /^cache=/) c[$i]++
}
END {
  for (k in c) print k, c[k]
}' /var/log/nginx/access.mastodon.bsd.cafe.log

A healthy instance shows cache=HIT and cache=BYPASS doing most of the work, with cache=MISS accounting for cold paths and short-TTL refreshes. The same trick works for the variant distribution:

awk '{
  for (i = 1; i <= NF; i++)
    if ($i ~ /^variant=/) v[$i]++
}
END {
  for (k in v) print k, v[k]
}' /var/log/nginx/access.mastodon.bsd.cafe.log

This tells me what my traffic actually looks like. A federation-heavy instance shows a lot of activitypub. An instance with many human visitors shows more html. On mastodon.bsd.cafe the balance shifts depending on what is happening in the wider Fediverse on any given day.

Caveats worth being honest about

I do not like presenting configurations as magic, so I want to be explicit about the conditions under which this one is appropriate.

Short TTLs cost CPU. A 10-second microcache on a sustained-traffic URL means six backend regenerations per minute. That is much better than no cache, but it is not free. If the backend cannot comfortably handle that, raise the TTL or enable stale-while-revalidate on the dynamic paths.

Dynamic stale-while-revalidate is powerful but it hides problems. I currently keep proxy_cache_use_stale off on the dynamic locations because I am still validating behaviour. In steady-state production, stale-while-revalidate is usually the right choice. During rollout, it can quietly hide upstream errors and make debugging harder. Be honest with yourself about which mode you are in.

AUTHORIZED_FETCH changes the threat model. With secure mode disabled, public ActivityPub GET responses are safe to cache as public content, provided your cache key handles content negotiation correctly. With secure mode enabled, ActivityPub responses can become actor-dependent. At that point you must either bypass cache for signed GETs or include the signing actor in the key. The latter usually destroys the hit ratio, so bypassing is the practical answer.

The variant map is a compromise. It covers application/activity+json, application/ld+json, application/json, and text/html. Everything else falls into the default bucket. That is intentional, but the default bucket is still a bucket. If you discover a real client type that matters on your instance, add it explicitly.

Ignoring Vary is a responsibility. proxy_ignore_headers Vary is not magic; it tells nginx to stop protecting you based on upstream Vary. That is fine only if your own cache key and request normalization cover every dimension Vary was protecting. For this configuration that means normalizing Accept into a variant, avoiding backend Accept-Encodingvariation, never caching cookies or authorization, and never caching signed GETs if secure mode is enabled.

Followers and following are uncached on purpose. They are pagination-heavy and change frequently. Caching them would create many low-value entries with questionable freshness. If a remote instance hammers these endpoints, use limit_req_zone. Do not retrofit cache as a rate limiter.

Signed-URL redirects require shorter TTLs. Caching 302s is useful when redirects are stable. It is dangerous when redirects point to short-lived signed URLs. If your media storage returns presigned URLs, your nginx redirect TTL must be shorter than the URL lifetime.

Set-Cookie must remain special. Do not add Set-Cookie to proxy_ignore_headers unless you are absolutely sure the location cannot produce user-specific responses. nginx's default refusal to cache Set-Cookie responses is a safety net. Keep it.

A good configuration is a written form of the assumptions behind a service. When the assumptions change, the configuration must change too.

There is no single brilliant directive in this configuration. The trick is combining long TTLs for immutable assets, medium TTLs for media, tiny TTLs for dynamic public pages, cache locking for thundering-herd protection, strict bypass rules for private or actor-dependent traffic, a normalized content-negotiation key, and enough logging to prove the system is doing what I think it is.

What this layer buys me, in one sentence: fewer requests reach Puma and Rails.

That is the metric I care about. Mastodon is not slow, but it is heavy, and the bigger the instance grows the more it benefits from a layer in front that quietly absorbs the work that does not need to be done by the application. A reverse proxy that caches Mastodon safely has to remember, with every request, that the same URL might mean three different things to three different clients. Once it does, even a very short microcache can remove a surprising amount of load without changing the user-visible behaviour of the instance.

No Privacy Impact Assessment Was Conducted of Grok Imagine Until After Launch, Finds Canadian Privacy Commissioner

By: Nick Heer
11 June 2026 at 23:25

The Office of the Privacy Commissioner of Canada:

An investigation by the Privacy Commissioner of Canada has found that Grok’s AI image-generation tool was launched without proper safeguards or sufficient consideration of potential privacy harms.

This lack of protections allowed users around the globe to create and share non-consensual, sexualized deepfakes, many targeting women and children.

In a report released today, Commissioner Philippe Dufresne found that X Corp. and xAI violated Canada’s federal private-sector privacy law.

According to the full report, while a privacy impact assessment was completed of the previous version of Grok’s image generation model, one was not done for Grok Imagine until March, well after its July 2025 launch. Even then, the assessment “did not accurately reflect […] risks to security, safety and privacy”.

Grok is now owned by SpaceX, which is going public tomorrow in extraordinary fashion. It is still generating abusive imagery.

⌥ Permalink

How your Ubuntu 26.04 server boots with a software RAID array root filesystem

By: cks
27 June 2026 at 03:28

One answer to how your Ubuntu 26.04 server boots when its root filesystem is on a software RAID array is that it just does and you don't need to think about it. Unfortunately this wasn't the case in the pre-beta version. That's been fixed since (contrary to what I thought until now), but that raises the question of what changed between 24.04 LTS and 26.04 LTS to cause and then fix this.

At some point between 24.04 and 26.04, Canonical switched from booting servers using initramfs-tools (and an initial ramdisk built with them) to booting them with Dracut. Initial ramdisks built with initramfs-tools will automatically assemble all software RAID arrays they see, or possibly anything they see in their embedded /etc/mdadm/mdadm.conf file (it's not clear to me right now). Initramfses using Dracut will normally only assemble software RAID arrays that are explicitly specified with rd.md.uuid= arguments, regardless of what's in their /etc/mdadm.conf. The 26.04 pre-beta server installer didn't add any such rd.md.uuid arguments to the kernel command line, causing the obvious problems.

(At the time our workaround was to create an /etc/default/grub.d file that explicitly added the right rd.md.uuid argument to the kernel arguments. This had the UUID of the root filesystem's software RAID array hard-coded, which is the style of these files.)

Now that 26.04 has been released, if you install a 26.04 server system with a mirrored root filesystem and inspect the resulting server's /proc/cmdline, you'll still find a striking lack of rd.md.uuid parameters (or rd.auto, cf dracut.cmdline(7)). However, if you peek into the initial ramdisk itself, what you'll find is an /etc/cmdline.d/20-mdraid.conf that contains an rd.md.uuid setting. For example:

rd.md.uuid=838c6235:90e967bb:8e64be9f:3c38b0f8

(/etc/cmdline.d in the initramfs also contains a '20-root-dev.conf', at least on a test system. This is partially redundant with the kernel command line itself.)

As covered in the Dracut manual page, when the initramfs boots, Dracut (in the initramfs) will look at /etc/cmdline.d/ and effectively take them as extra Dracut-directed parameters. So apparently the installer has been updated to write this file, fixing the problem without making the fix visible in /proc/cmdline.

(The initramfs also has an /etc/mdadm.conf, which probably opens you up to the traditional issues with it, although some of them may not be an issue any more.)

This 20-mdraid.conf file only exists in the initramfs, not on the booted system, but the overall Ubuntu kernel update system arranges for each new kernel and initramfs to get this 20-mdraid.conf, so your newly installed kernel boots just as your old one did. (I don't know which bit of the overall setup is responsible for this; it might be Dracut itself.)

Some things on 'systemctl kexec' as compared to 'kexec -e'

By: cks
25 June 2026 at 02:42

Suppose, unfortunately not hypothetically, that you have some machines that the Ubuntu 26.04 LTS installer kernel sometimes gets a kernel oops during a network based reinstall (we don't think this is a hardware flaw, but who knows; these machines were stable on 24.04). Further suppose that you're not network booting these machines but instead you're using kexec to boot them into the installer environment. This creates an awkward situation, where the over the network installer may have gotten far enough before the panic to have written over enough of the disk (with the previous install on it) so you can't reboot from it. Fortunately there is a way out, because you can contrive to kexec the installer environment again from within the installer environment.

(A kernel oops is not a kernel panic, and normally doesn't reboot the system unless you've made specific settings changes, which the Ubuntu 26.04 LTS installer environment hasn't done. In this case, that's a good thing for us.)

Once you've used 'kexec -l' to load the installer kernel and initrd with the required command line arguments, you have two choices for actually rebooting into the kexec kernel. You can use the plain and normal 'systemctl kexec', which will "shut down and reboot the system via kexec" (and is what you may have used to boot into the installer from the running system), or you can directly use 'kexec -e'. Based on our recent experiences, if you're rebooting the system because the kernel hit an oops, you probably want to use 'kexec -e', not 'systemctl kexec'.

The problem with a plain 'systemctl kexec' is that as the manual page tells you, it will try to go through the usual standard orderly shutdown process. If your system has hit a kernel oops, this process may not finish. Not even 'systemctl kexec --force' will necessarily finish, because that still tries to do some things in an orderly way. By contrast. 'kexec -e' proceeds immediately to the new kernel (as I believe 'systemctl kexec --force --force' also does, cf). Abruptly rebooting into the new kernel is not normally what you want to do when you're going to use things on the disk and so on later, but when you're already in the middle of the network installer environment, everything is going to get thrown away anyway and an orderly shutdown is pointless (and in this case, dangerous).

(An orderly shutdown at the end of the install process isn't pointless because the installer needs to finalize various things.)

We'll probably keep using 'systemctl kexec' when we're using kexec to go from an existing local install to booting the install environment over the network. It's always possible we'll change our mind and go back to the regular system (perhaps I made a mistake), and in that case an orderly shutdown is better.

How to correctly not wait for network carrier in Netplan

By: cks
18 June 2026 at 02:02

Yesterday I wrote an entry about why servers running Ubuntu can stall on boot for two minutes; the short version is that in 26.04, a network interface that either has no carrier or that has nothing else on it will cause systemd-networkd-wait-online to wait for two minutes in the hopes that this changes and the interface becomes healthy. My core diagnosis of the trigger for the problem was correct, but I had the wrong fix because in my testing, I made a classic mistake that's only really possible with virtual networking for virtual machines. There's an often invisible difference between an isolated virtual network interface and one that has no carrier, and I tested with an isolated interface, which stalls under some circumstances and fixed by some things, but not a virtual machine network interface with no carrier. The latter requires a more thorough fix.

I will put the answer at the front: you need to set every disconnected interface in your Netplan configuration to 'optional: true'. Setting 'ignore-carrier: true' isn't necessarily sufficient unless the interface has carrier. If you're mangling your 26.04 Netplan configuration anyway, I suggest you also set 'accept-ra: false' on every inactive interface (and maybe your active one too, unless you use IPv6 RAs). However, you should not set 'optional: true' on your main interface.

There are an assortment of things that will cause systemd-networkd-wait-online to think that it should wait until a particular interface is configured. A probably incomplete list of them is having a static IP address specified for an interface, having DHCPv4 or DHCPv6 enabled on the interface, and having IPv6AcceptRA=yes (to my surprise, although this is sort of covered in the documentation). Under normal circumstances, systemd-networkd will not do any of these things (or attempt them, for DHCP) if the interface has no carrier, which will cause the interface to not be configured. So it sounds like what you want is ConfigureWithoutCarrier=yes, so systemd-networkd configures the interface even without carrier and systemd-networkd-wait-online is happy. Unfortunately this has an important limitation spelled out in its documentation:

With this enabled, to make the interface enter the "configured" state, which is required to make systemd-networkd-wait-online work properly for the interface, all dynamic address configuration mechanisms like DHCP= and IPv6AcceptRA= (which is enabled by default in most cases) need to be disabled. [...]

(Although it's not really clear from the documentation, as far as I can see IPv6AcceptRA=yes is probably the default in many environments, as this manual page excerpt says.)

To disable this behavior when you have ConfigureWithoutCarrier=yes, in theory I believe you also need to set RequiredForOnline=no on the interface (or disable DHCP, IPv6 RA, and so on). Well, if you're working in a purely systemd-networkd world, which we're not on Ubuntu. Instead we're working in the world of Canonical Netplan.

Netplan doesn't simply run systemd-networkd-wait-online and let it decide what to do and what interfaces to consider. Instead, Netplan writes a drop in configuration file, /run/systemd/generator.late/systemd-networkd-wait-online.service.d/10-netplan.conf, and that configuration file tells systemd-networkd-wait-online specifically what interfaces to wait for and what (minimum) states they can be in; this minimum state is normally 'degraded' (as reported by networkctl. As far as I can see, Netplan will normally list and wait for every network interface that is mentioned in your Netplan configuration and that is not set as 'optional: yes'. Also, systemd-networkd-wait-online specifically waits for all of these interfaces to not be in the 'configuring' setup state (again, as reported by networkctl, and as more or less documented in its manual page).

If an interface has no carrier, it's permanently stuck in networkctl's 'no-carrier' state and will never reach the 'degraded' state. If this interface is listed in your Netplan configuration, Netplan's systemd-networkd-wait-online configuration file will say it has to reach 'degraded', and so systemd-networkd-wait-online will time out. This happens regardless of what other Netplan properties you have set for that no-carrier interface; if it's mentioned at all and is not 'optional: yes', you will always have a two minute timeout on boot. This includes an interface with just a do-nothing property like 'renderer: networkd'.

If you specify 'ignore-carrier: true' on an interface, Netplan will duly write ConfigureWithoutCarrier=yes to the applicable .network file. If an interface actually has carrier, this will make an interface with 'accept-ra: true' (or no mention of it) finish configuration immediately regardless of whether or not something responds; the interface will be "degraded" but also "configured" and the systemd-networkd-wait-online configuration Netplan has created will consider it ready. This is unlike the standard behavior covered in the manual page quote above, because Netplan likes to surprise people.

(If DHCP is on for the interface, systemd-networkd won't complete configuration until and unless it gets a DHCP answer, and systemd-networkd-wait-online will have to time out.)

Setting 'ignore-carrier: true' on an interface with a static IP in Netplan will allow that static IP to be configured even when there is no carrier, but it won't make that interface ready (by Netplan's standards) and so you'll still have that two minute timeout. The only way around the two minute timeout is to either not mention the interface at all in your Netplan configuration or to set it as 'optional: true'. Both of these will cause Netplan to not list the interface as an interface that has to reach the "degraded" state and "configured" status in the systemd-networkd-wait-online configuration file it writes.

(I don't think Netplan ever writes RequiredForOnline=no into a systemd-networkd .network file it creates.)

If you set all interfaces in your Netplan setup to 'optional: true', systemd-networkd-wait-online won't run at all under normal circumstances. This isn't obvious from the created configuration; Netplan will write a drop in configuration file for it that has no ExecStart= lines, which makes it seem like the standard .service file should take over and run systemd-networkd-wait-online in the standard way. However, the drop in file that Netplan writes does have a conditional dependency on /run/systemd/generator/network-online.target.wants/systemd-networkd-wait-online.service being a symbolic link, and Netplan doesn't set up that symbolic link, so the whole service is skipped. Given this, I think you almost certainly shouldn't set 'optional: true' on all interfaces, which means not setting it on your main one (the one you're actually using).

(That systemd-networkd-wait-online doesn't run at all is obvious if you look at the logs, which will report that it's not running because its conditions aren't met.)

Why servers running Ubuntu can stall on boot for two minutes

By: cks
17 June 2026 at 02:29

Suppose, not hypothetically, that you have some standard physical servers. As is typical, the servers have more than one network interface (two is usually the basics even for 1U servers, and maybe you put in a 10G-T card in some), but you're only using one network interface on one network; the others are just sort of there. Recently you've started putting Ubuntu 26.04 LTS on them, and to your surprise (and displeasure) these machines stall for two minutes on boot, which they report as waiting for systemd-networkd-wait-online.

The direct culprit is that you haven't told Canonical Netplan to ignore the state of network carrier for all of the network interfaces that you aren't using and don't have plugged in to anything. This is the 'ignore-carrier' property, listed in Properties for all device types, and you need to set it on every network interface that is listed in /etc/netplan/*.yaml. However, why this happens and how we got here is a little bit convoluted (and it can happen in versions other than 26.04, under the right circumstances).

Update: My fix is incomplete. See How to correctly not wait for network carrier in Netplan.

Famously, Netplan doesn't actually configure your networks itself. Instead it creates a configuration for something else (a 'backend'), and on servers this is systemd-networkd. For every network listed in your Netplan configuration, Netplan will write a '10-netplan-<name>.network' file to /run/systemd/network/, with the appropriate contents taken from whatever your configuration says. As sort of covered in systemd-networkd-wait-online's documentation (when carefully combined with the description of network states in networkctl), this will cause systemd-networkd-wait-online to wait for every such interface to have carrier (up to its timeout), unless the .network file specifies ConfigureWithoutCarrier=yes, which Netplan sets only if you put the ignore-carrier property on the interface in your Netplan configuration.

(Under some circumstances Netplan will also write .link files for one or more interfaces.)

At install time, the Ubuntu server installer gives you options for what to do with each network interface it detects. If you explicitly configure an IP address or set an interface to do DHCP (or the installer sets it to do DHCP and you don't explicitly turn that off), the interface will of course appear in your installed system's Netplan configuration because it has to. However, if you explicitly disable an interface (or in some versions of the installer, the installer disables it because it detected no carrier and/or no DHCP), the Ubuntu server installer has traditionally not written any information about that interface to your installed server Netplan configuration. Since these additional interfaces weren't mentioned in Netplan at all, Netplan never wrote out .network files for them and systemd-networkd-wait-online never waited for carrier for them. Your server's Netplan file contained only the interfaces you actually used and you were happy even if there were no 'ignore-carrier: true' settings.

What's changed in Ubuntu 26.04 is that the Ubuntu server installer appears to write out an 'accept-ra: false' property for every interface it detects, even if you disabled the interface during network configuration in the installer. Since the installer itself now mentions every interface in your generated Netplan configuration, Netplan writes .network files for all of them to /run/systemd/network and you wind up 'waiting' for carrier on every interface on boot, causing a two minute delay, which is the default timeout used by systemd-networkd-wait-online (it's the --timeout option's default value). You can fix this either by setting 'ignore-carrier: true' on every such interface or by deleting all of those interfaces from your Netplan configuration.

(To confuse you, systemd will report during boot that systemd-networkd-wait-online has no timeout and it's technically correct. What systemd really means is that the systemd-networkd-wait-online.service file doesn't specify a TimeoutStartSec= setting and as 'Type=oneshot service, it doesn't get a default one. Instead the timeout is inside the systemd-networkd-wait-online program and is opaque to systemd (the PID 1 daemon that is trying to 'start' this weird service).)

Because I had to wrangle this, here is how to list every network interface and then set them to ignore carrier, assuming you're using Ubuntu 26.04 where they are already all listed in your Netplan configuration:

ifnames="$(ip --json link show | jq -r '.[] | select(.link_type == "ether") | .ifname')"
for i in $ifnames; do
    netplan set "ethernets.$i.ignore-carrier=true"
done

This isn't perfect and will match some virtual interfaces, but I leave dealing with that as an exercise to the reader, along with excluding interfaces that currently have carrier. For our purposes at install time, this is good enough. And yes, we turn off detecting carrier even on our active interface because we would rather have the machine come up to the extent that maybe we can log in on the console or the like.

(It would be nice to have a way to delete a particular interface entirely, but Netplan's command line interface doesn't provide any good way to do that.)

What the new Linux NFS mount option 'fatal_neterrors' is

By: cks
16 June 2026 at 02:07

If you have NFS mounts on a client using a sufficiently recent kernel, such as that shipped with Ubuntu 26.04 LTS, and you inspect /proc/mounts (or 'mount -t nfs'), you'll probably discover a new NFS mount option that is listed for your mounts. For example:

[...]:/h/281 /h/281 nfs4 rw,[...],fatal_neterrors=none,[...]

You might be curious what this option is, especially if you have code that parses NFS (v4) options and sorts options into ones you care about and ones you don't (as we do). Unfortunately, as I write this about a year after the option was added to the Linux kernel, 'fatal_neterrors' isn't documented in any manual page that I can readily find. As far as I know, the only accessible documentation for it is in the commit that added it, which I'm just going to quote:

NFS: Add a mount option to make ENETUNREACH errors fatal

If the NFS client was initially created in a container, and that container is torn down, there is usually no possibility to go back and destroy any NFS clients that are hung because their virtual network devices have been unlinked.

Add a flag that tells the NFS client that in these circumstances, it should treat ENETDOWN and ENETUNREACH errors as fatal to the NFS client.

The option defaults to being on when the mount happens from inside a net namespace that is not "init_net".

As you can see in that commit, currently the only two values you can see for this are 'fatal_neterrors=none' or 'fatal_neterrors=ENETDOWN:ENETUNREACH'. As a mount option that you provide manually, you can also ask for 'default' or 'ENETUNREACH:ENETDOWN'.

If I'm reading the tea leaves correctly, this commit first appeared in Linux 6.15.0 (and so a 'fatal_neterrors' option for NFS mounts first started being reported in /proc/mounts then). This specific commit seems to be merely one of a whole series of net/sunrpc and fs/nfs commits that make ENETDOWN and ENETUNREACH errors as 'fatal' under the right magic circumstances, and I think that by 'fatal' what it means is that any client NFS request fails immediately and isn't ever retried. I don't think it makes the NFS mount itself disappear. Hopefully it will allow you to unmount the now permanently non-functional NFS mount.

(The current state of affairs is that all NFS mounts will report some value for the 'fatal_neterrors' option, although the value of 'none' is effectively the pre-6.15 state of affairs.)

PS: Probably the place where documentation will appear at some point is the upstream source for nfs(5), which will then wind up on man7.org as nfs(5).

Systemd-resolved and sticking (or not) to what distributions do

By: cks
15 June 2026 at 02:50

We have a long established approach for configuring our Linux systems, and specifically our Ubuntu systems (since these days the only Linux we run is Ubuntu). Part of that has been that we use a standard /etc/resolv.conf that points to our local DNS resolvers (which have our split horizon DNS setup). However, as people may have noticed, Linux distributions these days are moving to systemd-resolved instead of a straight /etc/resolv.conf setup.

There are good reasons for this switch in general. Systemd-resolved can cope with a variety of situations and problems that trip up the standard resolv.conf setup and it cooperates better with other programs. Almost none of these apply in our particular situation for our own servers, which have a static network configuration, a static DNS resolution search domain, and our DNS resolvers already handle all of the split resolution (and we had to make this work well before systemd-resolved existed).

(The one aspect of systemd-resolved that matters to us is that if you have multiple DNS resolvers, as we do, resolved will rapidly fail over from one that isn't responding to one that is. Resolved can also cache answers locally but for us this isn't a feature and we'd turn it off.)

Although I switched to systemd-resolved on my own desktops (cf), our servers have traditionally stuck with our static /etc/resolv.conf setup and entirely turned off systemd-resolved (which means even its D-Bus interface isn't available, because we'd rather have D-Bus based DNS lookups fail entirely than have them return different results). This isn't the Ubuntu default (which has been systemd-resolved for a number of LTS releases). So far we've been able to get Ubuntu to accept this without complaint, but as time goes on I've been feeling more and more nervous about going the /etc/resolv.conf path, especially without a working D-Bus systemd-resolved setup.

The reason I'm nervous is the traditional issue of people writing and testing software only to and against the default system environment. Some day we're going to find some piece of software that simply assumes that it can make D-Bus DNS queries to systemd-resolved; if we're lucky, the software will explicitly state this as a requirement. And some day there will probably be software that relies on some aspect of systemd-resolved's behavior even while doing traditional non-D-Bus name resolution, such as expecting the special '_outbound' name to resolve (although that's not universally available even on systemd-resolved hosts).

It's possible to configure systemd-resolved so that it only handles DNS resolution for people who ask over D-Bus. But if you're going to do that, you need to make sure that the systemd-resolved configuration (for DNS resolvers and DNS search path) matches your /etc/resolv.conf, and once you have a matching configuration, perhaps it's simpler and less error-prone to use systemd-resolved for everything. That gets you (us) on to the theoretical happy path of using the setup that Ubuntu expects (at the cost of having to care about the DNS settings in /etc/netplan files, and possibly having to update them if you ever, say, change or add a DNS resolver).

Through Ubuntu 24.04 LTS, we explicitly masked and disabled systemd-resolved and used our /etc/resolv.conf. In our current experimental Ubuntu 26.04 LTS setup, we first arranged to configure systemd-resolved (via /etc/netplan) to match our resolv.conf so that D-Bus resolution would work if anyone explicitly tried to use it, and now we're trying out having systemd-resolved be the normal resolution method. This makes our 26.04 machines more like Ubuntu expects at the cost of being different from our 24.04 machines, and maybe exposing them to oddities in systemd-resolved's behaviour. We'll have to see how it goes (and we may go back to our /etc/resolv.conf ways).

(The one thing we don't do is have nss-resolve be used in /etc/nsswitch.conf. I don't even know if putting it there is stock Ubuntu 26.04 behavior, and I don't even use it on my desktops so I have no experience with it.)

PS: We're not planning to make any use of systemd-resolved DNS server delegations. All of that DNS steering is going to continue to live only on our DNS resolvers.

Linux distribution packaging and third party 'package' systems

By: cks
14 June 2026 at 03:20

If you look at it from the right angle, the existence of third party package systems that sit on top of Linux distributions is rather odd. After all, these distributions already have packaging systems, yet here people are, ignoring them and writing new ones. A while back on the Fediverse, I said something on this general topic:

I have feelings and some of the feelings are that everyone screwed this up, for actually natural reasons. I don't think any distro solved the 'how do we let people easily build and deploy software on us' problem, and so programmers do what programmers do and built themselves another layer of indirection to solve their immediate problem.

(I mean, ship an entire container running a web server to do what you could do with a CGI or some PHP files or ... this is my face, etc.)

(There are two sides of this, the system side (what I was talking about) and the user side.)

On the one hand this is perfectly natural for Linux distributions to do. They built their package system to manage their own components, with all of the features that are important for that, not to make it easy for programmers to create a package for something that was the contents of '/opt/<whatever>' and specified a few entry points and system dependencies. On the other hand, this is part of how we got Docker and also a bunch of third party package managers for things, because programmers really do want and need something that is that simple, and they're quite willing to write it themselves.

(I'm using Docker as an example because it has a simple system for specifying how to build your software and then declaring various entry points to it. This is a lot of what a package manager does but almost all of them are more complex.)

At the same time, what I said is too harsh on Linux distributions, because the two problems containerization solves are hard, complex ones. Containers provide a hard isolation boundary for changes to the system and avoid the need for a huge API for system things. My aside of 'a CGI or some PHP files' elides a huge level of complication for what a hypothetical programmer built system package of the same application would have to specify, and the API that specification implies. If you can hermetically package and then deploy a web application as some PHP files in /opt/whatever, the system has to have already specified a lot about how that's connected to everything, how installing your package may trigger dependencies of installing a web server and maybe configuring it for TLS and so on.

You could do a simple 'package and deploy' system, but it would be limited in what it could deploy, specifically in how it could connect the raw files it stuck in /opt/whatever to the system (because raw files on their own aren't all that useful). These limits would probably have driven programmers to reinvent many or all of the third party package and container systems that we have today.

(You absolutely would need 'easy and simple', because programmers voted with their feet that system package managers were too complicated to deal with. You've always been able to build your own local software as RPMs or .debs and manage them that way, but almost no one actually did that because it was too much of a pain.)

With that said, I do wonder how far you could get today on Linux if you had people provide 'entry points' in the form of systemd units in some standard place in their '/opt/<whatever>' directory tree tarball. Systemd units give you service activation, service dependencies, the equivalent of cron entries in timer units, and let you expose network services as socket units. You can't create fixed users and groups but you can ask for dynamic ones that are created on the fly, and systemd could probably have something to put all of your units under some UID that's not root and has less powers.

(Systemd has some general features for this such as portable services, but it envisions a container like experience where you build and ship a full OS image, even if it's a small one.)

(Sometimes I find that my off the cuff gut reactions aren't quite as well baked as I thought.)

'Vim' has many faces

By: cks
7 June 2026 at 02:32

One of the problems I have when talking about 'vim' is that in practice, there are several versions of 'vim'. I don't mean 'version' in the sense of release numbers (although Vim has lots of releases and things change in them over time), but more in how people approach and use Vim. Even more than GNU Emacs, I feel that Vim has turned into an editor that has multiple faces, so the 'vim' that you use may not be the 'vim' that I use.

(Which version or face of Vim you see depends in part on what your system decided to set as Vim defaults, unless you're advanced enough in Vim things to have a personal configuration that overrides them all.)

I've seen people talk about at least three broad versions of Vim:

  • The Vim with a bunch of plugins that is a full blown code editor or even IDE environment with LSP support (eg, also) and everything else you'd expect from such a thing. My impression is that this is surprisingly popular version of Vim, and I can see why; if you like the Vim editing style and find that LSP stuff fits into it for you, why not?

  • The Vim with syntax highlighting, smart indentation (including language dependent things), and other features that you'd expect of a competent programming editor (one without IDE style integration and features).

  • The Vim that's only slightly different from true original Vi, 'merely' fixing the things that make Vi a product of its time, such as only having a single level of undo. This is the Vim that I use.

    (People disagree about what in the original Vi needs fixing, and also how, cf undo.)

The Vim I use doesn't have syntax highlighting or smart indentation and I wouldn't use it if it did (or at least if those were on by default). But the Vim that other people experience does sometimes have those things, not necessarily by their decision but because that's how Vim comes set up on that system. Someday, someone may ship a system where Vim is pre-configured to provide the full IDE experience with LSP support already added and so on.

One of the issues with this is that because Vim can be configured to be quite different things, it's not necessarily obvious to people (me included, cf, also) how to change the Vim they get by default on a system to a Vim they want. People new to Vim may not even know it's possible, and people who know it's vaguely possible may conclude that it's too much work and they might as well switch editors, either to another version of Vi or to an entirely different editor.

A wish for automatic or semi-automatic disk setup in Linux server installers

By: cks
3 June 2026 at 02:44

An extremely common pattern for our Ubuntu servers is that they have exactly two disks and we want those two disks to be set up as mirrored system disks, with a UEFI boot partition in each and the root filesystem in a mirrored RAID array taking up all of the rest of the space (and for /boot/efi to come from the first disk). If a system has a single disk, we want the single-disk, non-mirrored version of this; if the system has more than one or two disks, the installer shouldn't try to do anything because we have an unusual system that needs hand holding; it should either stop to ask for help or abort.

As far as I can tell, this isn't something you can readily express in Ubuntu's server installer or really anything else that Canonical offers, although the server installer is entirely capable of creating this layout if you set it up by hand. I'm not sure it's very available in any Linux server installer, although I haven't looked outside of Ubuntu.

(Some installers can run scripts that can rewrite the installer instructions, so you could in theory write a script that sniffed around the system, detected everything, possibly did some initial setup, and then rewrote the installer instructions to exactly have what you wanted. This is what I will politely call a little bit too intricate for us to want to try to build our own trustworthy set of scripts to do this.)

Why I care about this is that by hand disk partitioning is probably the biggest time consumer when installing machines using our customized server ISO (and it's tediously boring). It's also probably the most critical thing that stops us from having a fully hands-off network booting installer. It would be nice if installers would someday do better with built in, fully supported and tested code (as opposed to a dangerous script we have to write ourselves and that's hard to thoroughly test).

Unfortunately I don't expect that to happen any time soon. My strong impression is that Canonical's focus is on cloud installation, where people don't use mirrored system disks and typically have very simple and uniform disk names, so you can predict (for example) that your entire fleet will have its system disk on /dev/sda or on disks from a particular maker. (Or perhaps you automatically generate a per-system installer configuration using knowledge of that system's hardware that's pulled from your inventory tracking system.)

PS: I'm relatively confident that I could write a suitable dangerous script to rewrite the Canonical server installer configuration file to do this under the right circumstances. I'm also confident that my co-workers would rightfully reject us using that script, because the various dangers aren't worth it at our scale. Always remember, cleverness is a trap.

Sidebar: Our assorted disk naming

Our systems are increasingly split between systems that have SATA SSDs and systems with NVMe SSDs (and then I test on virtual machines with virtio 'vdX' disks), which means that some systems will have 'sda' and 'sdb' and some systems will have 'nvme0n1' and 'nvme1n1'. An extra complication for all systems is that if we're installing from a USB stick (instead of, say, network booting), the USB stick will appear as an unpredictable /dev/sdX name. So even with all sdX disks, it's not actually true that 'sda' and 'sdb' are the system disks; one of them might be the USB stick.

Checking in on Some Pro-Hate-Speech Social Networks

By: Nick Heer
28 May 2026 at 02:58

The Agence France-Presse reporting on the U.S. president’s social-media-and-cryptocurrency-and-maybe-nuclear-fusion operation:

Trump Media & Technology Group (TMTG) reported revenue of less than US$1 million for the three months ending March 31, according to a company filing.

Under $4 million in annual revenue is less than how much Twitter was earning in 2009 — unadjusted for inflation — an amount Steven Levy described as “modest”.

Speaking of Twitter, let us check in on SpaceX which, after a series of totally normal business deals, now owns the company and is preparing to trade publicly. Mike Masnick, of Techdirt:

Remember, the plan was $26.4 billion [in Twitter/X revenue] by 2028. We’re more than halfway there. How’s it going? Well… when he combines xAI (grok) revenue with X revenue (so not even just breaking out X’s ad revenue)… we get… a total of $3.201 billion in 2025. So, just to put this in perspective… when he took over in 2022 he laid out a five year plan to take the company that had $4.5 billion in ad revenue the year before he bought it up to $12 billion in five years. Three years in and… it’s now somewhere pretty far below $3 billion. […]

Earlier this year, a judge found against Elon Musk in a lawsuit filed by X against advertisers claiming they staged an illegal boycott.

The SpaceX prospectus, by the way, is one of the funniest documents to ever live on the sec.gov domain. It is lucky the business it is known for is so damn photogenic because it is, at present, a profitable satellite internet provider with side businesses of space exploration and artificial intelligence that each lose money. (How it internally accounts for the cost of sending Starlink satellites into orbit is a fantastic question.) And the present business model of the latter is something Patrick Boyle described as “renting GPUs to a competitor on terms that can vanish in a fiscal quarter”. Yet the company still claims the size of its total addressable market is over $28 trillion, or over one-fifth of the entire world’s GDP.

Even so, a $1.75–2 trillion valuation is plausible simply because of Musk. Similarly, and back to that AFP article:

According to its filing, TMTG generated US$900,000 in revenue during the first quarter, a paltry amount for a company valued at US$2.47 billion on the stock market.

That valuation is not much; at time of writing, it is worth about as much as Central Garden & Pet, owners of Nylabone and McKenzie plant seeds. That company last quarter posted revenues one thousand times greater than TMTG, with profit margins of over 12%. Nevertheless, TMTG has a connection to the U.S. president, so it is similarly valued. Lots of good, normal stuff happening in the world’s largest and most powerful economy.

⌥ Permalink

When su replaced login for becoming another Unix login

By: cks
2 June 2026 at 01:19

I recently read Simon Tatham's Nitpicking the shell history scene in Tron: Legacy, where one thing that surprised Tatham was the film using 'login -n root' to become root instead of 'su. This surprised me because I found that perfectly ordinary, and this turns up both a bit of Unix history and a difference between modern Unixes.

Plain 'su' can let you become another user, including root, but what it explicitly doesn't do by default is create a new login shell for that user. If you do 'su root', the new root shell normally inherits most of your environment, your current directory, and so on. Sometimes this is what you want and sometimes you really want a new login environment, and originally in Unix how you got the latter was to run 'login' from your existing shell session (and this meant that login was setuid root, like su).

This split usage of su(1) and login(1) is present in Research Unix V7 (and for login goes back to at least V3), where the respective manual pages clearly say that su doesn't change your environment or your current directory, while login's normal use (from a shell) is to 'change from one user to another'. Similar wording remains in the 4.2 BSD su(1), but in System III, su(1) picked up an option to make the new shell a login shell (and it even describes the mechanism) and login(1) lost the ability to be run from a normal shell. The 4.3 BSD su(1) picked up the System III su change, but login(1) can still be used from a normal shell, and I believe this continued on the BSD lineage in general.

As you might expect, all of the modern versions of su across Linux and the free BSDs support starting a login shell (cf the normal Linux su (also), FreeBSD su(1), NetBSD su(1), and OpenBSD su(1)). On Linux and OpenBSD, login isn't setuid root and so can't be used from a regular shell environment to become a new user; your only option is su. On FreeBSD and NetBSD, login is still setuid root and can be used to switch to another account with a login shell, although this usage doesn't seem to be explicitly documented in either's manual page. Illumos (the open source successor of Solaris) also still supports using login from a command shell, and explicitly documents this in login(1).

(OpenBSD making login not be setuid fits their general security posture, since a setuid login has been a vector for security issues in the past. I can't easily find out if Linux versions of login were ever setuid.)

PS: It's possible that login is still setuid on some Linux distributions. The normal util-linux login specifically says that it doesn't work from a shell session, but the shadow-utils login may still, and some distributions might enable that.

(This sort of elaborates on a Fediverse post I made.)

Sidebar: The early history of su

The su command goes back to V1 Unix, but at the time it was only used to let you become root ('superuser', likely the source of the 'su' command name). We don't have much from V2 (well, sort of [PDF]), but in V3 su's manpage moves to section 8 (for 'administrative commands') as su(8), where it stayed in Research Unix V4, V5 (per the V5 manual [PDF]), and V6. Only in V7 does su gain the ability to change to any user and its manual page was moved to section 1 (for general commands) as su(1).

(Potentially of interest is this reconstruction of old Unix manual pages.)

I'm not sure we'd use AppArmor much even if we could

By: cks
1 June 2026 at 02:47

The news of the time interval is a string of local privilege escalation vulnerabilities in Linux (in part in the kernel). We very much need the security boundary of Unix logins, and some of these vulnerabilities are mitigated or blocked by various Linux kernel security modules ('LSMs') (cf), so I've recently been thinking if we'd use AppArmor, the LSM that Ubuntu supports.

(AppArmor didn't block as many of the vulnerabilities as a proper SELinux setup did, but SELinux needs distribution buyin and that's not what Canonical provides.)

We've traditionally disabled AppArmor because it's had issues in our environment of NFS home directories in our own locations for them (also). So let's assume that AppArmor magically works now for NFS home directories and other directories (or can easily be set with tuning knobs), and still provides meaningful security afterward. Setting up AppArmor for our environment will take some amount of work (cf), so the question is how much protection against local privilege escalation we get.

Roughly speaking, our systems fall into two categories; systems that normal people can access and run programs on, and systems that are purely for services (including things such as IMAP mail). For services, in theory we (or the people writing AppArmor profiles) can work out what the services should be allowed to do and not do, and thus lock things down against local privilege escalations in kernel systems that the services shouldn't be touching anyway (and other vulnerabilities, such as information disclosure from reading files the service shouldn't be accessing). However, this protects against an unlikely set of chained issues, where there's both a vulnerability in a service itself and then an additional vulnerability in the kernel.

(If these issues aren't unlikely, we have bigger problems.)

That leaves the systems where normal people can run their own programs (which are the ones where we really need the security boundary of logins). On these systems we have to assume that an attacker can gain the ability to run relatively arbitrary programs, either by compromising an account outright or through, for example, a compromised package that people are using in the code they're writing for their research (or a compromised editor extension, or etc; there are lots of ways in). Since people are effectively running arbitrary code, we can't protect ourselves by having AppArmor restrict what specific programs can do the way we can on service-based machines. Instead, we have to find and inventory kernel features that people will never legitimately use, and then block them through AppArmor rules.

(This is how a strict SELinux setup appears to protect against the recent vulnerabilities; a normal login is simply not allowed to use, eg, RDS sockets.)

The Linux kernel has a lot of features and facilities, although some of them are blocked off because we don't allow user namespaces, and people doing CS research do a lot of things, some of them at least unusual. Could an AppArmor profile (or a set of them) be written so that people would be allowed access to what they use and not allowed access to things that they don't? Probably (although AppArmor is more focused on programs than on people, well, logins). Would we be able to find an out of the box set of AppArmor rules and so on that worked? Maybe, and this depends on exploits not being found in areas that people pretty much have to be given access to.

If we had a reliable set of AppArmor or SELinux profiles, we might well use them because it would be easy enough. Without a reliable set of AppArmor profiles, I'm not sure we'd try to build some ourselves unless we were desperate. And if we were going to do the work, it appears that we might get more results for less effort through things like explicitly blocking all the loadable kernel modules for Linux socket types that we don't use.

(Some people even block all kernel modules that their current configuration doesn't use. I'm not sure I'd go that far, but I suppose you can always un-block things like the netfilter modules if you turn out to want to add some nftables rules later.)

Unix has been changing, but in places where I don't see it

By: cks
21 May 2026 at 01:57

For reasons beyond the scope of this entry, I've wound up thinking about how stable or unstable the Unix landscape has been 'recently' (which means for more than a decade, and especially as compared with the 1990s and early 00s). I've written about aspects of this before, such as the fading out of multi-architecture Unix environments. In thinking about it more after my Fediverse post, I've come to feel that the Unix environment has still been changing but in places where I'm not as conscious of it.

The biggest change is probably the growth of cloud Unix, which I could characterize as "Unix machines on demand". In practice, cloud Unix is a whole new Unix environment that is quite different from traditional Unix, with different tools and especially different practices. Some of the practices are (sort of) extensions from old fashioned large scale Unix administration but many aren't really. I'm aware of cloud Unix and this gulf between operating it and what we do if I think about it, but I don't usually.

Cloud Unix practices spill over into what people want to do outside of the cloud, in the form of things like containers. Operating software through containers is quite different from traditional Unix system administration, especially if responsibility for the containers themselves gets moved from the system administration team to other people.

(There's also the idea of immutable systems created through declarative means, which isn't mainstream but also isn't a tiny corner any more. You can find plenty of people using Unix this way on servers and even desktops.)

I think that all of this has led to a significant change in how people experience Unix. Increasingly, Unix is either a desktop environment (not necessarily a graphical one, consider WSL in Windows) or a backend target; it's not something you explicitly (remotely) log in to very much. We've seen less and less direct use of our login servers and more use that is, for example, modern desktop IDEs starting remote sessions to run development tools on our servers. If VSCode could start SLURM jobs for people, some people here might never explicitly log in to our compute servers. I personally still log in to lots of remote Unix machines, but I'm increasingly an exception.

(I can't throw stones here since I recently carefully set up my desktop GNU Emacs so I could run remote LSP servers (and Git) through Tramp.)

A quiet but significant development is that after narrowing to x86 in practice for a while, Unix is moving back to being multi-architecture. There are a steadily increasing number of ARM servers and ARM devices that run Linux and other Unixes and that you'll find in the wild, primarily in clouds and as small Unix computers that you might put on your network to do specific jobs. It's plausible that some day we'll also get RISC-V servers and devices, or see ARM on general (Unix) desktops. People now routinely care about multi-architecture support for languages, compilers, distributions, and so on, where I think ten or twenty years ago that was a relatively niche concern.

(We've actually looked at small ARM-based Unix devices repeatedly and passed on trying to actually operate any of them for various reasons. Moderate sized, general purpose ARM servers don't seem to really be a thing so far, but maybe someday.)

In Linux, systemd is a drastic (and good) change on how init systems worked and how you interact with them, and makes that part of system administration relatively different from the pre-systemd days. Although I don't know when exactly it happened, the BSDs have gone through a similar evolution that regularized and improved the old ad-hoc BSD init system, making it rather easier to operate. This is probably the most dramatic change a system administrator from 2006 would notice if you jumped them 20 years ahead to today (and had them work with on premise servers without containerization).

There are certainly things that are part of my day to day use or at least administration of Unix that weren't there a decade or two ago. Even on old fashioned on premise servers, there's a lot more JSON and YAML than there used to be, partly because JSON has become the universal program-readable output format that everyone can agree on (and good tools, such as jq, have become widely available). But broadly, I feel that Unix has carried on being Unix and the experience of logging in and using the environment hasn't changed dramatically. If anything, different Unixes have become more similar, partly because lots of Unixes use the same programs (such as Bash and vim) and partly because Unixes have converged on common options for common programs (through both POSIX and pressure from people using them).

(Bash and vim aren't necessarily the default experience on all Unixes, but they're commonly available, partly because people want them.)

PS: The switch from X to Wayland is (still) a change that's in progress, but at the same time it's broadly supposed to be an invisible one to most people. Whether it should count as a change in Unix I will leave up to you.

Sidebar: My history with universal dotfiles

A long time ago I tried to have universal dotfiles for my shell environment across all of the multiple Unixes that I then had accounts on. The result was complicated, with lots of per-Unix and per-group settings. Today, I'm relatively certain that I could do a version for the surviving Unixes and system environments (and accounts) that had almost no conditionals. Some of this is through Unixes converging, some of it is through vendors with weird Unixes going away or becoming irrelevant to me (I'm unlikely to ever log in to another AIX machine, or a Solaris family one), and some of it through a relative convergence in how to administer machines.

Getting C code navigation even for Debian (or Ubuntu) packages

By: cks
16 May 2026 at 02:00

Every so often, I want (or need) to make modifications to programs in an Ubuntu package, and often the programs are written in C (and these days I'm using dgit to manipulate the package). One of my challenges when I do this is that I generally don't start out knowing where and how to change the code to do what I want; instead, I have to navigate around an unfamiliar code base and work out enough of its structure to find the specific bit of code I need to change.

These days, the dominant way to get smart code navigation and other code knowledge things is through LSP servers and clients. A variety of modern and semi-modern languages have LSP servers that you can immediately use in your editor of choice and then navigate around random code bases with handy features like 'find definition' and 'find references' (for example, Go, Python, and Rust). Unfortunately, C isn't such a language. In the general case, understanding C code requires knowing how it's compiled, and that means you often have to tell C LSP servers this information. Well, specifically you have to tell this stuff to clangd, the dominant LSP server for C and C++.

(There's also ccls, which may work out part of this information on its own, but it seems to be less popular and I have no experience with it.)

Fortunately for people like me, there is a simple way to gather this compilation information even if the program's build system doesn't do it for you, and that's Bear (which is available as a standard Ubuntu package for extra convenience). Bear operates as a front-end on however you normally build your program; you build your program (or collection of programs) with 'bear -- <build command>', and Bear monitors compiler execution and records everything. This is slower than a normal build (sometimes significantly so), but you get a compilation database out of it and then you can use LSP tooling to jump around the source code.

(My understanding is that gcc, clang, and so on can generate this compilation information if they're asked, and modern build systems often ask them to do so, but an old fashioned build system using things like 'make' won't include the magic compiler options necessary. Possibly you can include them yourself by hand, but Bear takes care of the work for you.)

Somewhat to my surprise, Bear not only works with programs built by 'make', it also works when you build Debian or Ubuntu packages under Bear with 'bear -- dpkg-buildpackage -uc -b'. If you're building a substantial package (such as Dovecot), you're definitely going to notice the slowdown, but you do get LSP based code intelligence out of it (and you only have to do this once, not every time you change the code).

(Under some circumstances you may have to edit the generated compile_commands.json to take out gcc options that clang doesn't support, but fortunately the JSON file is in a human friendly format where each compiler option is on its own line. Possibly there's a way to manipulate the Debian/Ubuntu package build process to not use such options in the first place.)

Building Debian and Ubuntu packages contaminate your source directory, so once you've run a build under Bear to generate the compile_commands.json file, you need to move the file to safety and then reset your source directory somehow. If you're using dgit (which I very much think you should be), I believe this can be done with a variant of the standard dgit source directory reset instructions:

git clean -xdf -e compile_commands.json
git reset --hard

The process I suspect I'm going to follow in future dgit modifications of Ubuntu packages is to set up the package with dgit, build it once under Bear in unmodified state, rm the generated .deb and .ddeb files, and then start poking around the source code with LSP intelligence to find where I need to make my modifications (and then commit them and do a dgit build as usual).

(This elaborates on some Fediverse posts.)

In praise of the Linux kernel netconsole (in the right circumstances)

By: cks
13 May 2026 at 00:29

The Linux kernel's netconsole is a kernel module that will "log kernel printk messages over UDP" to a remote system, which makes it another form of kernel (message) console. These days it can be activated either on boot or after boot, and in the past I've had mixed views of it. However, I recently had a nice experience with netconsole that's left me more well inclined to it in specific situations.

A while back, my home desktop started locking up every once in a while. Several years ago my home desktop had a somewhat similar problem that was due to hardware issues, but the lockups this time were different, in that the machine would lock up for a bit and then reboot on its own. Local logs showed nothing, but I happen to have another machine sitting around so I thought I might as well try netconsole again. These days netconsole can be enabled on the fly:

modprobe netconsole
cd /sys/kernel/config/netconsole
mkdir heedra
cd heedra
echo em0 >dev_name
echo 192.168.X.Y >remote_ip
echo 1 >enabled

(This other machine is called heedra for obscure reasons.)

On the other machine I ran a simple script to capture output inside a screen session:

#!/bin/sh
while :; do
   nc --recv-only -u -l 6666 |
      tee $HOME/work/h-logs/netconsole
done

(The advantage of --recv-only is that nc won't complain if I hit CR a few times in the screen session to create blank lines, so new messages are more obvious.)

After a while, my home desktop locked up again and rebooted soon afterward. When I checked the netconsole log file on the other machine, I discovered that I had actually captured kernel log messages, and reasonably useful ones at that.

The kernel logs revealed that this appears to be a kernel 'soft lockup', where all cores had gone to 100% system usage during what appears to be TLB flushes or cross-core kernel communication. In several of the kernel stack backtraces, bpf_trace_run4 appears, so I suspect that there's an uncommon eBPF locking race or issue that's infrequently tickled by the eBPF metrics gathering programs I normally run on my desktop.

(It's probably not from the eBPF programs systemd uses for network access control, since those are used widely.)

Capturing these kernel messages doesn't give me a solution, but at least it gives me a way forward if the lockups get too frequent and annoying (I can try disabling my eBPF metrics collectors). And I couldn't have gotten these messages with anything else except a serial console, which I don't have available on my home desktop and anyway would have needed a second machine in physical proximity (which is awkward in my home setup).

My understanding is that netconsole isn't quite as reliable as a serial console for getting last gasp kernel panic messages out, since you need more kernel pieces to still be working to transmit network packets. But it's more reliable than anything short of a serial console, and serial consoles are generally in short supply on modern desktops and desktop-like things (including hand-built SLURM nodes). For one off, small scale use my listening script would be fine, although if we needed to use it on a larger scale, we'd need some infrastructure to collect netconsole logs from multiple machines.

(Some suggestions for that are in the comments on my earlier entry.)

Detecting (or not) the use of -l and -c together in Bourne shells

By: cks
8 May 2026 at 03:31

Many Bourne shells go slightly beyond the POSIX sh specification to also support a '-l' option that makes the shell act as a 'login shell'. POSIX's omission of -l isn't only because it doesn't really talk about login shells at all, it's also because Unix has a special way of marking login shells that goes back very far in its history. The -l option isn't necessarily what login and sshd and so on use, it's something that you can use if you specifically want to get a login shell in an unusual circumstance.

Bourne shells also have a '-c <command string>' option that causes the shell to execute the command string rather than be interactive (this is a long standing option that is in POSIX). It may surprise you to hear that most or all Bourne shells that support -l also allow you to use -l and -c together. Basically all Bourne shells interpret this as first executing your .profile and so on, then executing the command string instead of going interactive. One use for this is to non-interactively run a command line in the context of your fully set up shell, with $PATH and other environment variables ready for use.

Now, suppose (not hypothetically) that you have some things in your .profile that you would like to not run in this situation. Perhaps they're unnecessary and expensive, or perhaps they cause problems in the rest of your environment if they're run outside the context of a genuine login shell. It would be nice for your .profile to be able to detect this. Unfortunately, as far as I know at the moment this is impossible in general.

If you're using Bash specifically (and /bin/sh is Bash), Bash will set '$BASH_EXECUTION_STRING' in this case when invoked as either 'bash -l -c ...' or 'sh -l -c'. As far as I know, this is the only common Bourne compatible shell that provides any way to detect this. I've been unable to find any other shell that provides any indicator of this, neither as environment variables nor as, for example setting '$*' or '$0' to any special values.

(I checked Dash on Ubuntu LTS, which is their standard /bin/sh, the OpenBSD ksh (which is also /bin/sh), and FreeBSD /bin/sh (also a descendant of Kenneth Almquist's shell, like Dash. Fedora Linux uses Bash as /bin/sh.)

If you use Bash as your login shell but /bin/sh is something else (and things are specifically doing '/bin/sh -l -c ...'), you can rename your .profile to be .bash_profile, so it will only be read by Bash. If you have common setup stuff, you could put it in .profile and source that from your .bash_profile (although Bash has some complicated tangles around startup files, also).

If what you really care about is running your .profile a second time inside a first session, you can set a marker environment variable at the end of your .profile and then have your .profile look to see if the environment variable is set. If it is, you can skip re-doing things. This doesn't help if some clever program is doing 'ssh yourhost sh -l -c ....' in order to run some command line with your full environment set up (or if a graphical login environment does this, partly because of the Unix shell initialization problem). Under some circumstances you can detect this in your .profile because it won't be connected to a tty and you can check this with, for example, 'test -t 0'. Under other circumstances, you may have a tty despite being 'non interactive' in practice.

(It's possible that there is some generally available marker that I'm not aware of. If so, I'd be happy to hear about it.)

Your Linux distribution may no longer auto-generate new SSH host keys

By: cks
7 May 2026 at 03:03

All Linux distributions (and all systems) face the need to generate SSH host keys when your system gets installed. One traditional way this was done was if the system started and discovered it had no SSH host keys, it would generate new ones. One way this was handy was that if you wanted to generate new SSH host keys for some reason, you could remove the existing ones and either reboot or restart the SSH daemon (which would usually trigger this).

As I found out the hard way the other day, some Linux distributions don't do this any more. In particular, Ubuntu doesn't. If you remove your SSH host keys, your SSH daemon will refuse to (re)start, and as far as I know there's no convenient, simple way to regenerate the necessary keys. If you make this mistake (as I did), you'll get to have fun looking up the ssh-keygen arguments you need (and then typing them in on the system console or a serial connection).

Before I started writing this entry, I would have guessed that this was common behavior across multiple distributions, because in this day and age it makes sense for your SSH keys to be set up in the installer rather than (possibly) on system boot, in a situation where the kernel's random number generation may not have accumulated much entropy. However, it turns out that Fedora doesn't behave like this.

Fedora's OpenSSH package has an entire set of systemd units and a script to generate SSH host keys if any of them are missing. Fedora has a templated sshd-keygen@service, which uses /usr/libexec/openssh/sshd-keygen to generate a host key of the appropriate type if it doesn't exist. Then Fedora's sshd.service unit 'wants' sshd-keygen.target, which in turn wants sshd-keygen@rsa.service, sshd-keygen@ecdsa.service, and sshd-keygen@ed25519.service, so before sshd starts, any missing host keys will be generated (whether or not your specific SSH server configuration uses them).

Since Ubuntu usually follows Debian, I assume Debian also doesn't automatically regenerate SSH host keys (and if it does, it doesn't seem to use the approach Fedora does). Fedora derived enterprise distributions probably follow Fedora, but I'm not even going to look. Other distributions may go either way, there probably isn't anything you could describe as a standard approach for this.

In the future, if I want to reset an Ubuntu machine's SSH host keys, the simplest thing for me will be to copy the Fedora sshd-keygen over to the system and run it (since my desktops are Fedora, I have convenient access to it). On a quick scan, the script itself is distribution-independent, so in theory you (I) could fish it out of Fedora in advance and stash a copy somewhere.

(Especially for servers, there's an argument that a missing SSH host key should be a fatal error for sshd, not something you should automatically fix up, since something is obviously badly wrong. If you generate new SSH host keys anyway so maybe people can SSH in to check the server, what you're effectively doing is training people to accept mismatched host keys in times of problems.)

Update: In a comment, Andreas pointed out 'ssh-keygen -A', which does exactly this system host key regeneration.

The easy way to switch my libvirt-based virtual machines to UEFI

By: cks
28 April 2026 at 03:27

I mentioned before that I've been switching some libvirt-based virtual machines to UEFI. I've recently had to do some more things there, which has led me to discover what's important about the XML parts of your libvirt machine definitions for this. Or at least, what's important if you use virt-manager to change things.

(There's a long story that boils down to libvirt external snapshots not playing well with virtual CD-ROMs, BIOS PXE booting being annoying, and UEFI Secure Boot causing the Ubuntu 26.04 GRUB to refuse to touch the Ubuntu 22.04 installer kernel.)

As mentioned in the previous entry, what determines whether the machine boots into UEFI or BIOS is whether or not the <os> XML node has a "firmware='efi'" attribute set on it. Once you have UEFI firmware, the <os> XML node can have a '<firmware>' node with some '<feature>' nodes that tell it what to do about Secure Boot:

 <os firmware='efi'>
   <type arch='x86_64' machine='pc-q35-9.2'>hvm</type>
   <firmware>
     <feature enabled='yes' name='enrolled-keys'/>
     <feature enabled='yes' name='secure-boot'/>
   </firmware>
 </os>

By itself this isn't a fully specified UEFI set of attributes, because you need <loader> and <nvram> elements as well, and these vary based on your secure-boot and enrolled-keys settings.

Conveniently for me, if you edit your XML in virt-manager, don't have (or remove) the <loader> and <nvram> elements, and then pick the 'Apply' button, virt-manager will pick appropriate values for you based on your settings for Secure Boot (or the lack of it). This can be used when you're turning off Secure Boot (or turning it on), or when you're moving from BIOS to UEFI.

(This might also happen if you use 'virsh edit', but I haven't tested that. But I suspect it's virt-manager doing some convenient magic for you.)

So the easy way to convert a machine from BIOS booting to UEFI, with or without secure boot, is to add "firmware='efi'" to the <os> attribute and past in an appropriate <firmware> block. The block above is for full Secure Boot. For full lack of Secure Boot, I want:

   <firmware>
     <feature enabled='no' name='enrolled-keys'/>
     <feature enabled='no' name='secure-boot'/>
   </firmware>

Apparently if you flip around between Secure Boot and non-Secure Boot, you may want to reset your NVRAM file. One way to do this is to remove the relevant NVRAM file that I will find in /var/lib/libvirt/qemu/nvram/. Another way is to use --reset-nvram with 'virsh start', eg 'virsh start foo --reset-nvram'. You can also use --reset-nvram with 'virsh snapshot-revert', and I may be doing that someday.

(You don't need to reset the NVRAM file when going from BIOS to UEFI because BIOS doesn't have a NVRAM file. If you go from UEFI to BIOS and then back to UEFI, probably you want to reset your NVRAM, but also maybe you want two separate VMs instead of switching between BIOS and UEFI all the time.)

Understanding the Ubuntu server installer initramfs

By: cks
26 April 2026 at 02:48

I recently wrote about all of the various steps of a UEFI network install, where you have a whole collection of DHCP, GRUB fetching things via TFTP and HTTP, and so on, all to boot into your Ubuntu server install ISO image. Specifically, all of the GRUB stuff and much of the complicated DHCP stuff is there because we have to load the installer's kernel and initial ramdisk. Our primary usage for UEFI network installs is to reinstall physical servers that are now in inconvenient locations, so eventually it occurred to me that if we already have running Linux systems, there are simpler ways to boot into a specific kernel and initramfs with specific command line arguments. One way is to add new GRUB boot entries, and another way is kexec.

If we're already using a local kernel and initramfs, it might be convenient to get rid of the need for a DHCP server too, by copying the network parameters from the currently running server and embedding them in both the kernel boot parameters and, more importantly, the cloud-init files that the installer will use. To do this, we need to embed the cloud-init files in the initramfs (and then point to them with 'ds=nocloud;s=/whatever' in the kernel command lines). Well, that's the theory, but it turns out that this is not quite the practice.

The problem is that contrary to what you (I) might think, the Ubuntu server installer is not running from the initramfs. Instead, the initramfs constructs an in-memory root filesystem from various squashfs filesystem images that it gets from /casper on the installer ISO. As part of the initramfs boot, Casper mounts the ISO image (either via NFS or via a HTTP copy), finds those files on it in /casper, and then uses these files to construct the root filesystem that will then have the ISO image (still) mounted in it when Casper pivots the system into running from it. This means that while it's readily possible to add files to the initramfs, your added files are immediately discarded when Casper pivots to its pre-built root filesystem. Since the squashfs filesystem images come from the ISO image, they're generic across your systems and you can't use them to embed per-system configurations.

(In the process of this pivot, Casper will do things like switch to a standard systemd init environment.)

To deal with Casper dropping the initramfs, we must arrange to copy our injected initramfs contents into the root filesystem that Casper builds before Casper pivots into it and discards the initramfs (as far as I know, there's no way to access the initramfs after this, especially with it pre-mounted so that your cloud-init file can be immediately read). Sadly Casper makes this complicated and potentially specific to the Ubuntu server installer you're using.

As part of the Casper initramfs process, Casper will run a collection of scripts from /scripts/casper-bottom, so ideally we can just add our own script to that and have it copy things from the initramfs to appropriate places in /root (the real root filesystem to be). Unfortunately, Casper doesn't scan this directory for scripts to run; instead what scripts to run (in what order) is handled by /scripts/casper-bottom/ORDER (this is the standard Casper way and is used for other Casper 'directories of scripts'). So we have to add our script and also replace the ORDER file from the ISO's initrd with one that includes our script.

A Linux kernel initramfs is a collection of cpio archives, with the last archive (usually) compressed. You can put your own uncompressed cpio archive on the front, or (usually) compress your own cpio archive with the same compression method as the compressed archive and stick it on at the end. Files in later cpio archives overwrite files from earlier cpio archives, and since we need to overwrite /scripts/casper-bottom/ORDER, we have to put our cpio archive at the end. Starting no later than Ubuntu 22.04 LTS, the standard installers all have the last cpio archive compressed with zstd, so that's also what we need to compress our own cpio archive.

(I believe there are potentially tricky issues with sticking compressed archives together this way, which I will leave to others to investigate. I made a 26.04 version work without problems but that could have been luck.)

To make this less annoying, we can use two local cpio archives. One archive contains only our additions and changes to /scripts/casper-bottom; it's zstd compressed and goes on the end of the initramfs, and we can even prepare generic, amended initramfs images with this already pre-built. Then the only per-machine addition we need to build is our cloud-init configuration files, which can go into an uncompressed cpio archive that we put on the front of our initramfs (perhaps the prepared, modified initramfs). This will give us a full initramfs that we can use as kexec's '--initrd' argument (or set up in a GRUB entry).

(This is not quite enough by itself to enable a DHCP-less network boot and install, because we also have to configure the system's IP address and other details in Casper itself via the 'ip=' command line argument; see casper(7) for the format of that. With a proper ip= setting, Casper can find the ISO image and mount it, and with a proper cloud-init injected into the initramfs and then the installer root filesystem, the server installer will properly set up networking and keep it up so that you can go through the normal over the network installer operation.)

PS: Apparently I will go through quite a lot to not have to maintain and update DHCP server entries, even through scripts that the future me might have fun writing.

The various steps of a UEFI network install from an Ubuntu server ISO

By: cks
23 April 2026 at 03:28

Suppose, not hypothetically, that you have a locally customized Ubuntu server install ISO image (and have for a while), and you also now have a number of UEFI based machines that it would be convenient to (re)install over the network without having to visit them in person (and they don't have IPMIs/BMCs that support virtual media). It turns out that you can take an Ubuntu ISO and install from it over the network, but how the various steps and stages connect together isn't obvious. Here are my notes on this, before I forget them all. I'll assume that you already have a modern Ubuntu server installer configuration setup, but you can also do this with a stock ISO image that will walk you through the full set of server installer questions.

The process of booting your ISO over the network goes like this (including recommended things):

  1. Your UEFI based server sends out a DHCP request that includes, among other things, its request for one of the UEFI network booting options.
  2. Your DHCP server answers with the server's IP and either a HTTP URL (for UEFI HTTP boot) to shimx64.efi, or a TFTP server and the (TFTP) path to shimx64.efi. Most of your machines will probably want the TFTP option. Provided that your DHCP server gave the server you're installing a usable gateway, this TFTP and HTTP server doesn't have to be on the same network as the server you're network installing.
  3. Shimx64.efi will load grubx64.efi (which must be the signed grubnetx64.efi) from the same server and (relative) path as it was loaded, eg if shimx64.efi was loaded from '/inst/2604/grub/shimx64.efi', it will load '/inst/2604/grub/grubx64.efi'.

    The shimx64.efi and grub(net)x64.efi don't have to be from the Ubuntu version you're booting, but your grubx64.efi should match the GRUB modules you're going to use with it. You probably want to use the latest GRUB you can conveniently get your hands on.

  4. GRUB will load '/grub/grub.cfg' and various other things in '/grub' from your TFTP or HTTP server. Unlike the shimx64 to grubx64 transition, GRUB (at least the Ubuntu version) insists on using an absolute path, not one relative to the directory it was loaded from. GRUB will expect to find various things in, for example, '/grub/x86_64-efi/'.

    In your /grub/grub.cfg, you can switch all future accesses to HTTP by using '(http)' in future references to things, perhaps with a prefix:

    set http=(http)/inst/
    

    Your grub.cfg can be universal for all of your machines, or you can go on to load a machine-specific one using some GRUB variables:

    source $http/grub/by-net/$net_default_ip
    

    (This trick comes from a co-worker, not me.)

    Some GRUB documentation will claim that GRUB will automatically search for a variety of grub.cfg names that are derived from the machine's IP address and other parameters. This is experimentally false for the Ubuntu 26.04 UEFI grubnetx64.efi; my server logs show no attempts for anything other than '/grub/grub.cfg'.

  5. Whatever GRUB configuration file you use now loads the appropriate installer ISO's kernel and initrd, ideally over HTTP instead of TFTP because you switched above. You can get both of these from the /casper directory on the ISO (along with things you don't need). Once you've put these where you want them, you can specify them as, say:

    linux $http/casper/vmlinuz ip=dhcp [other options to come] ---
    initrd $http/casper/initrd
    

    Because the Ubuntu ISO's initrd contains kernel modules, it's specifically tied to the ISO's kernel; you have to use a matching pair and can't just swap in a more modern kernel with better hardware support for your hardware.

  6. GRUB boots the installer kernel with the installer initrd, which makes its own DHCP request (and hopefully gets the same IP back), because once booted into Linux you no longer get to use UEFI services and the UEFI-obtained DHCP stuff. If you forgot to put 'ip=dhcp' into the kernel command line, the Ubuntu server installer initrd won't do DHCP, won't set up any networking, and everything else will fail.

    (It would be nice if the kernel automatically inherited all of the UEFI IP settings, including the TFTP or HTTP server information, but as far as I can tell it doesn't.)

  7. The initrd 'mounts' the ISO. You have two options for how this is done, which are covered in the casper(7) manual page. Either the .iso image itself can be fetched over HTTP, stuffed into RAM, and mounted as a ramdisk image, or you can NFS mount an extracted directory tree version of it from a suitable server (perhaps the very install server that you've been TFTP'ing and HTTP'ing from so far; GRUB's $net_default_server variable may be convenient for this).

    The simpler option is configuring a NFS mount. This is done with the (kernel) command line options:

    netboot=nfs nfsroot=W.X.Y.Z:/some/path/
    

    To fetch the ISO from a URL, the kernel command line parameter is 'iso-url=http://...', but by itself this will probably fail because the default ramdisk is too small. So instead you need to also specify a bigger ramdisk (the size appears to be superstition, cf, but it works for Ubuntu 26.04 beta):

    root=/dev/ram0 ramdisk_size=1500000 iso-url=....
    

    A potential advantage of directly loading the ISO is that once it's loaded, you don't really have to care about the network connection to the install server. With a NFS mount, if something resets the networking you're really up the creek. On the other hand, the NFS mount starts quickly and means you don't have to care about things like ramdisk sizes and how much RAM your servers have.

  8. Something fetches your your installer configuration quite early on (I think it may be the installer proper, not the initrd). If you don't provide a configuration, all you've done is network booted the stock install ISO and it's now going to sit there asking you to interact with the installer on the system console (which might be good enough if the server has a BMC with KVM over IP support). To either automatically install your system or to allow you remote SSH access to the installer, you need a cloud-init configuration. I believe that you can use the version you've embedded in your ISO image with your regular ds= parameter, but you may find it more convenient to fetch it via HTTP with more kernel command line parameters:

    "ds=nocloud-net;s=http://..."
    

    (You have to put this in quotes or GRUB will break it at the ';'.)

    If your install isn't fully automated and you want remote access to it to configure the interactive sections, your cloud-init user-data must include a chpasswd section for the user 'installer', or a ssh_authorized_keys with an appropriate key (which will again be used for 'installer').

    (I found this long ago from here.)

    (It's possible that you can configure a kernel serial console and then use IPMI Serial Over LAN to talk to the installer, if you have an IPMI with SoL support but no KVM over IP.)

  9. The Ubuntu server installer will start up as normal, just as if it was booted from a real ISO, except that when the installer gets to configuring the network, it will reset networking and proceed according to your default configured networking, if any. This makes it critical to set 'dhcpv4: true' (or 'dhcpv6: true' if you're that sort of person) in your installer configuration, because otherwise your server will drop off the network, probably breaking its (network) install, especially if you opted to NFS-mount the ISO image's directory tree instead of fetching the ISO into RAM.

Provided that you've configured an appropriate cloud-init password or SSH key, you can SSH in to your network-booted server as 'installer' and be put in the regular server ISO installer environment, where you can go through whatever interactive steps you normally would with an in-person install. You'll want to use a big window and it needs to be a modern terminal program like gnome-terminal (don't try this with xterm). If you set 'network' as one of your interactive sections and you don't want to keep using DHCP in the installed system, you can switch from getting networking through DHCP to the same networking being set statically.

(You can also switch from DHCP to a static networking setup after the system has booted into its new local Ubuntu install; your install DHCP server is probably not going anywhere.)

Some of the kernel parameters here are confusing, because some of the time they can be interpreted by the kernel and some of the time they're ignored by the kernel and interpreted by things like casper(7). This is the case with the 'ip=' parameter, which in theory can be interpreted by the kernel but in practice is interpreted by Casper, with a different syntax. Since I just went on an extended digging session to find this out, I will tell you that the syntax Casper actually accepts for 'ip=' is the extended syntax used for klibc's ipconfig in its -d argument, because if your 'ip=' is something complicated, Casper winds up more or less passing it to ipconfig.

(This contradicts the Casper manual page but I extracted the 26.04 /casper/initrd to find this out. Not that it really matters, because in practice you mostly have to have DHCP working to get UEFI to network boot and then to keep your running install ISO on the network so you can talk to it.)

The minimal-changes version of going from an Ubuntu (server) ISO image to a booting it over the network is the iso-url option, although you will need to extract /casper/vmlinuz and /casper/initrd from the ISO. This avoids setting up NFS service on your install server, and also avoids having to unpack the ISO (which is easy enough with the right tools, but you have to know what the right tools are). My personal view is that I prefer the NFS option, and if you're the right kind of person you can use Apache Alias directives to serve /casper right out of the ISO's extracted directory tree rather than copy them into your web server area.

PS: It's possible to do much the same with a BIOS PXE booting server, but you have to use PXELINUX instead of GRUB (in practice you'll want to use the 'lpxelinux.0' variant that understands HTTP). Once you're at the stage of loading and booting the kernel, everything is the same; you need to boot the /casper vmlinuz and initrd, with the same kernel command line options as in the UEFI case. The one gotcha is that you can't use the syslinux INITRD directive because it messes up the kernel command line.

Vim and 'forward delete' (in modern terminal programs)

By: cks
13 April 2026 at 01:31

On the Fediverse, I had a learning experience:

Another what the heck moment in Fedora 43. In Gnome-terminal (only, not xterm), hitting 'Delete' in vim insert mode no longer deletes characters to the left of the cursor, only characters to the right. Delete is generating ^? in both gnome-terminal and xterm, and Delete works to delete characters in vim in g-t on the ':' command prompt.

Whatever vim / gnome-terminal combined stupidity this is, I want it gone. Now.

Actually I got the name of the key wrong. The key I was hitting is BackSpace (in X keysym terminology). I thought of it as Delete because that's what it generates, but the real Delete key is another key, and this turns out to be relevant. What I described happening is what I think is normally called as 'forward delete', as opposed to 'backward delete', the normal BackSpace behavior (and what I want).

I will skip ahead to the fix: for historical reasons, I had Gnome-terminal set to generate ASCII DEL for both the BackSpace and the Delete keys (it's in a per-profile 'Compatibility' tab). The modern proper setting for Delete is 'escape code'. Setting that cured the problem, but how we got here is the interesting bit.

Unix has long had both a stty setting for 'what is your backspace character' and also a termcap/terminfo parameter for 'what does the backspace key generate' (in terminfo, this is 'kbs'). Things such as readline, vim and GNU Emacs can use those to determine the character sequence they should recognize as backspace, or they can ignore both settings and use hard-coded values. This has historically been important because there used to be a great split of what this key generated on serial terminals, and this split propagated into X and people's X configurations.

(Interestingly, terminfo databases aren't consistent across systems about what BackSpace is expected to generate in xterm. Linux and OpenBSD terminfo appears to expect it to generate ^?, but FreeBSD expects ^H. You can check with 'infocmp | fgrep kbs'. Vim appears to take its setting from your backspace character from stty, not terminfo, which is the correct approach.)

Unix has never had a stty setting for 'forward delete', but it did soon get a terminfo and termcap distinction between the 'backspace' and 'delete' keys (well, between what character sequences each sends). In terminfo, what the delete key sends is 'kdch1', and I don't know when it appeared; in termcap, it is 'kd', which appeared no latter than 4.3 BSD in 1985, per the 4.3 BSD termcap(5) manual page. If your program wants to support forward delete at all (which vim does) and you can't see the physical keys being hit, you have to use 'kdch1'. Well, sort of. You're theoretically supposed to use kdch1, but in practice kdch1 doesn't necessarily correspond to the reality of your terminal program and its current settings.

(Termcap was invented first, in BSD Unix. Terminfo came later and apparently was first generally available in System V Release 2, in 1984. It's possible that terminfo had 'kdch1' from the start, since I believe that by 1984 there were Unix machines with 'full' keyboards with both BackSpace and Delete. Plus the DEC VT-100 serial terminal also had both Backspace and Delete keys, and it was introduced in 1978.)

Vim handles keyboard keys through an internal notion of terminal capabilities and key sequences, and for forward delete the internal capability is called t_kD. Vim can get its t_kD value from a number of places; it can get the value from the regular terminfo kdch1 value, it can derive it from your regular backspace value (as is done by :fixdel), or it can ask your terminal program what the various physical keys generate (this is controlled by the xtermcodes option). When vim does the last, it will get whatever your terminal program is reporting about its current settings, not whatever official settings (for 'kdch1' and other things) are published in the system's terminfo database. This is useful when these settings are controlled through preferences, instead of being fixed values.

(Specifically, vim and other programs will use xterm's XTGETTCAP request to read out various live terminfo settings. This is why it matters that there is a terminfo thing for the delete key as separate from the backspace key.)

Vim's xterm-codes behavior officially happens on 'xterm patchlevel 141 or higher'. In practice a lot of other terminal emulators imitate xterm here, and in particular recent enough versions of gnome-terminal do. If you're curious to see what your terminal program is reporting for itself, you can start vim and use ':echo v:termresponse' (or you can run 'tput RV; cat >/dev/null' at your shell command line, then Ctrl-C it once whatever has echoed). Currently xterm reports its patchlevel and gnome-terminal reports some sort of VTE library version, which on modern versions of Gnome-terminal is (much) larger than '141' (mine reports '8203'), and triggers vim's behavior of asking the terminal program for its actual keyboard mapping.

(Technically 'RV' is send device attributes, not XTVERSION. You can find programs that query XTVERSION specifically, such as xtver.)

When Gnome-terminal reported its keyboard mapping to vim, it apparently reported that both my BackSpace and Delete keys generate ASCII DEL, which was true (at the time). When vim received this report, it set both t_kb and t_kD to ASCII DEL (this is visible with eg ':set t_kb'), and then apparently vim decides that the <Del> version should take priority over the <BS> version so that when I hit a key that generates ASCII DEL, vim will do forward delete instead of backward delete.

(Actual xterm apparently reports something different to vim. Although both BackSpace and Delete generate ASCII DEL in my xterm setup, vim reports that t_kD is '^[[3;*~', the normal escape sequence for it that gnome-terminal will also generate when it's set that way. This means I have no access to forward delete in vim in xterm, but that's okay with me; I basically never use it.)

Gnome-terminal support for xterm's XTGETTCAP stuff was apparently added in mid 2025 through VTE in this feature request and this commit. Fedora 42 shipped with a version of gnome-terminal and VTE before this change, and the Fedora 43 versions are afterward, so now vim can actually find out what the current key mappings are and trigger this behavior.

There are at least two ways to fix this through vim in your .vimrc, and also two ways that don't work. In working ways, if you unset t_RV ('set t_RV='), vim never makes the version query and never goes on to ask for keyboard stuff. If you disable xtermcodes ('set noxtermcodes'), vim will also never ask for the keyboard mapping, but now it knows the nominal xterm version number (which isn't necessarily very useful, given that different projects report wildly different numbers).

The two ways that don't work in your .vimrc are unsetting t_kD and using ':fixdel', although both of them work after vim has finished starting. I assume that both of them don't work because their effects are being overridden when vim asks the terminal program for its key bindings. There may be vim magic that you can use to get around this, but it's better to change your (my) historical gnome-terminal profile settings so that all profiles have their 'Delete key generates' setting in the Compatibility tab set to 'Escape sequence'.

(There is probably some way to set this preference for all profiles through the command line but I just did it by hand through the GUI.)

PS: My view is that vim is the party with the bug. Given the behavior of :fixdel, I think that if vim detects that t_kb and t_kD are both set to ASCII DEL in the terminal response, it should either unset t_kD or make it Ctrl-H.

PPS: Since I checked, urxvt (aka rxvt-unicode) does respond to the xterm RV sequence but reports a version number of '95' as of version 9.31, which is far too low to trigger vim asking for termcap stuff (and I don't know if urxvt supports that). The Fedora 43 konsole reports a version number of 115 (for konsole 25.12.3), and I will leave it up to interested parties to investigate what other terminal programs report.

I'm now using nftables for (new) static rulesets

By: cks
11 April 2026 at 01:54

Over on the Fediverse, I said:

I feel I've now written enough Linux nftables configurations that I've come to like it. It's a more pf-like experience than iptables, that's for sure (and that's a good thing when you're writing a coherent ruleset instead of manipulating things on the fly).

I've had to write a few static IP filtering rulesets recently (on Ubuntu), and in each case I immediately reached for nftables and enjoyed the experience. The nftables documentation isn't what I consider great but I can navigate through it and get things done, and I even managed to get NAT working on a recent machine. I'm now mostly considering my iptables knowledge to be a legacy thing that I'll expect to use less and less in the future, although I'm not going to go out and convert iptables rulesets to nftables rulesets.

(Partly this is a conservation of attention thing. Both iptables and nftables have a lot of dim corners that I have to remember if I'm doing anything complicated with them, and I only have so much of a brain.)

One of the ways that nftables is nicer for me is that the natural way to write a nftables ruleset is to edit /etc/nftables.conf (or some other file). This lets you (me) see all of your rules in one place, think about all of them before you try to use them, revise them, and so on. You can even pre-write a nftables.conf elsewhere (in your home directory or whatever), and it's natural to put comments in. Nftables also has an acceptably PF-like concept of symbolic variables and 'anonymous sets' that can be used to write compact rules in straightforward cases in your nftables.conf; as far as I know there's no equivalent of this in iptables.

(In iptables you can use actual sets that you define and populate, or you can write shell scripts with 'for' loops and so on, but neither of these are entirely fun and as far as I know there's no great way to populate sets from nicely formatted files.)

However, this is only for whole, static rulesets. As I expected before, iptables is going to stay what I use if I need to add and remove rules on the fly, for example to block access to a service on startup or to add and remove some rules as network interfaces come and go. I know that you can do on the fly rule changes with nftables (and many of the nft examples in the manual page are of on the fly changes), but this is an area of nftables that I haven't explored and don't really want to. Unless I need to flip back and forth between two (or more) entire sets of rules, I'm going to keep using iptables for on the fly stuff.

(If I'm moving between several rulesets, 'nft -f /etc/some-file' is the easy way to flush and reload a coherent set of rules all at once, and I can write each ruleset as a coherent thing all in one place with helpful comments and so on.)

This is also only for new rulesets. Even with my new fondness for nftables, I'm not likely to rewrite existing, stable collections of iptables rules into nftables rules even if they can be expressed as a static collection of things. The one case where I can imagine doing a conversion is if I need to change existing iptables rules around substantially and rewriting them as nftables rules is easier than recovering iptables stuff that I may have forgotten by then.

PS: In fact the /etc/nftables.conf experience is sufficiently like the BSD pf experience that it fooled my mind recently. When I was working on the rules for the system with NAT, I kept adding filtering rules for the host to the 'forward' chain and then being confused when they didn't work. BSD pf doesn't have an input versus forward distinction, so my mind drifting into 'I'll just put the host rules here along with the forwarding rules'.

Some quick notes to myself on nftables 'symbolic variables'

By: cks
9 April 2026 at 23:40

Nftables is the current generation Linux firewall rule system, supplanting iptables (which supplanted ipchains). As covered in the nft manual page, nftables has the concept of 'symbolic variables'. Since I'm used to BSD PF, I will crudely describe these as a combination of some parts of pf tables and PF macros. I personally feel that the nft manual page doesn't do a good job of documenting what's possible in these, so here are some notes.

The simple case is simple values:

define tundev = "tun0";
define outdev = "eno1";
define natip = 128.100.x.y
define tunnet = 172.29.0.0/16

(It turns out that the ';' here is decorative and I put it in out of superstition, judging from actually reading the "Lexical Conventions" section.)

I'm not sure of the rules of when you have to quote things and when you don't. As covered in the manual page, you use these symbolic values in the relevant nftables bits, for example a SNAT rule:

ip saddr $tunnet oifname $outdev counter snat to $natip;

Nftables also has the concept of 'anonymous sets', which are written in the obvious PF-like syntax of '{ ..., ..., ... }'. You can use symbolic variables to define anonymous sets, and if you do they can span multiple lines and have embedded comments, and of course you can have multiple elements on one line (not shown in this example):

define allowed_udp_ports = {
        # DNS
        53,
        # NTP
        123,
        # for HTTP/3 aka QUIC
        443
}

(I suspect that symbolic values written directly in nftables rules can also span multiple lines and have embedded comments, but I haven't checked.)

A comma on the last entry is optional. Unlike in BSD PF, elements must be separated by commas.

You can use this to define port numbers, IP address ranges, and no doubt other things. However, I don't know how efficient it is if you're defining large numbers of things, and of course you can't update your defined things without reloading your entire ruleset. If you need either of features, you're going to have to figure out named nftables sets or maps.

There's no direct equivalent of the BSD PF syntax for defining a table from a file with eg 'table <SSH_IN> persist file "/etc/pf/SSH-ALLOWED"'. The closest you can come is to define an anonymous set in a file you 'include' in your nftables rules.

(I believe this is also the best you can do for loading named sets and maps from files.)

PS: Apparently there are also anonymous maps, to go with named ones.

Sidebar: Named sets in nftables

Since I just worked this out, well, found an example, here is how you write a set in your nftables.conf:

table inet filter {
    set allowed_tcp_ports {
       typeof tcp dport
       elements = { 22, 25, 80, 443 }
    }

    chain input {
       [...]
       meta iifname $outdev tcp dport @allowed_tcp_ports counter accept;
[...]

Now that I understand the use of 'typeof', I'll probably use it for all sets and maps rather than trying to look up the specific type involved (although nft can help with that with 'nft describe').

Systemd v258's 'systemctl -v restart' and its limitations

By: cks
9 April 2026 at 02:43

If you've done much work with systemd services, you've probably gotten entirely used to the traditional dance of 'systemctl restart something; journalctl -f -u something' so you can see the shutdown and restart log messages of what you just theoretically restarted, assuming it's happy with life. In systemd v258, systemctl gained a new feature to help with this, systemctl -v. The help describes it reasonably well:

Display unit log output while executing unit operations.

(This means any unit operation; you can use it with 'systemctl stop', 'systemctl start', and 'systemctl reload' too.)

All of this is nice and I'm certainly going to enjoy using this feature on our future Ubuntu 26.04 machines and on my Fedora machines. However, it has an obvious limitation for 'restart', 'start', and 'reload' that in many cases is going to have me still using the the journalctl stuff as well.

That limitation is right there in the description: 'while executing unit operations'. If you do 'systemctl -v restart something', systemctl stops following your service's log output the moment it considers your service to have started. In some services, this will be when the service has genuinely started and reported this to systemd, for example for a Type=notify service. In many others, for example 'Type=exec' services where you directly run some binary and it sits there doing things, systemd will consider the service started the moment your binary is running. Since systemd considers the service started, it will stop following the logs in 'systemctl -v restart'.

This is often not sufficient. Many services have a certain amount of post-exec work to do before they've genuinely started, such as loading configuration files, opening databases, initializing internal services, and so on. Some services can error out at this point, so that (as systemd sees it) they were successfully started but then immediately failed. Sometimes, the service itself intrinsically is only 'up' after it has talked to the outside world and established something, such as a DSL PPPoE link.

All of this isn't systemd's fault, but it means that 'systemctl -v restart' may only tell you the very early part of the story. And that's why for a lot of services I need to keep doing the 'journalctl' part too.

Users and session classes in Systemd v258 and later (and a gotcha)

By: cks
8 April 2026 at 00:14

So I upgraded my home desktop from Fedora 42 to Fedora 43 and sound stopped working. Having your audio stop working is practically a rite of passage for Linux people, so I've been through the drill, but things rapidly turned weird when trying to restart sound daemons through 'systemctl --user restart ...' failed with systemd errors about not being able to contact the (systemd) user service manager.

Let me skip ahead and show you the culprit:

systemd-logind[2524]: New session '1' of user 'cks' with class 'user-light' and type 'tty'.

Establishing your user service manager when you log in is one of the jobs of pam_systemd. One of the things pam_systemd decides about your session is its class. In System v258 and later, one of the possible classes is 'user-light', for which systemd notes:

Similar to user, but sessions of this class will not pull in the user@.service(5) of the user, and thus possibly have no service manager of the user running.

(Emphasis mine.)

This 'possibly' is understated. What it means in practice is that a 'user-light' class session won't have a systemd user service manager running unless something else started it for you, for example another session that wasn't a 'user-light' one (because you only ever have one user service manager; it normally starts with your first session and exits after your last one). In turn, anything that runs as a systemd user service won't start and can't be started indirectly through, for example, systemd socket activation. And in modern Fedora, all of the sound infrastructure is handled as systemd user services (as is your user D-Bus session).

So how did we get here? Well, as the rest of the section notes:

If no session class is specified via either the PAM module option or via the $XDG_SESSION_CLASS environment variable, the class is automatically chosen, depending on various session parameters, such as the session type (if known), whether the session has a TTY or X11 display, and the user disposition.

(The 'user disposition' comes from systemd-userdbd and its JSON User Records. For normal /etc/passwd accounts, the user disposition is determined from their UID.)

The actual process pam_systemd follows is somewhat arcane. To simplify, all SSH logins are 'class=user', root is always 'user-early', and system users on the console are 'user-light'. So if you log in on the console (as I do, also) and you're considered a 'system user', you don't get a user service manager started automatically (and then things break).

Systemd is more or less hard coded to consider all UIDs up to SYS_UID_MAX in /etc/login.defs to be 'system users' (cf). On many machines, this will be all UIDs up to 999, and this number has been drifting upward over time. At various times in the past the first non-system UID and GID has been 200, and then later it was 500, so if you have logins created this long ago, systemd now considers them system users who get special handling. I have been using my Fedora desktops for a very long time, so even without even weirder things I would have fallen victim to this.

(Even on our servers, my UID is 915 and we have a significant number of people with UIDs under 1000. If pam_systemd ever stops forcing all SSH logins into class 'user', we're going to have a whole collection of problems. On my desktops, my 'natural' UID would be either 200 or 500, based on the GIDs that were created to go with it on my home and work desktops.)

Unfortunately there's no way to set a single account parameter in systemd-userdbd, so there's no way to keep using /etc/passwd but tag your historical, low-UID account to be a regular account. There's also no direct way to manipulate pam_systemd's hard coded class (re)mapping process; your only option is to completely override all class assignments with a 'class=' option on pam_systemd. This is made extra difficult on Fedora because (of course) pam_systemd is invoked in a number of generic PAM stacks such as 'system-auth', and you may not want to force all uses of pam_systemd through them to force a 'user' class for all accounts in all situations.

It's possible to work around this with sufficiently complex PAM conditionals (also). Or I could make /etc/pam.d/login use a different version of system-auth that's customized for it, although that would force root logins into class 'user' instead of 'user-early' unless I engaged in other PAM hacks.

PS: Given how much breaks without a user service manager, it feels like either pam_systemd or the 'login' PAM stack should specifically make it so that everyone who logs in on a console tty has one, with all system UIDs being class 'user-early', not just root.

PPS: I won't be working around this by changing my local UID, however peculiar it is. Partly this is because I can't fix it by adopting the same UID as we have on our servers, which would let me usefully NFS mount my home directory from our fileservers on my work desktop; as mentioned, that UID is also under the current Fedora SYS_UID_MAX.

(You can't truly fix NFS UID mapping issues with NFS v4 without Kerberos.)

Sidebar: Why my work machine didn't experience this

One reason I was willing to impulsively upgrade my home desktop last night was that the upgrade to Fedora 43 had gone fine on my work desktop, and it certainly had no sound problems afterward. My console login on my work machine was still a 'user-light' session, but the reason it had a systemd user service manager was that one had been created earlier and was sticking around. To cut a long story short, on my work desktop I was set up as a loginctl 'linger' account (/var/lib/systemd/linger says this happened May 21st 2021). Such a 'linger' account creates a session at system boot, which creates a user service manager as the result, and that session and user service manager remains until system shutdown.

Regardless of how many times you log in, you only ever have one systemd user service manager. So once a user service manager is created for any reason, including the user service manager that's started at boot for a 'linger' account, your console 'user-light' logins will still get access to that user service manager, Pipewire and other things will start normally, sound will work, and you (I) won't notice anything different.

In theory I could work around this today by setting myself up as a 'loginctl linger' account on my home machine too, and skip any PAM changes. In practice, I'm reluctant to assume that pam_systemd will always create systemd user service managers for system UIDs that are set 'linger'. It strikes me as rather the kind of thing that might get optimized some day, much as 'user-light' was optimized into systemd v258 (cf, also, also).

Finding out what your big RPMs are, in two different 'sizes'

By: cks
6 April 2026 at 02:50

Suppose, not hypothetically, that you have an old Fedora system with a lot of packages installed and a 70 GByte root filesystem, which is now awkwardly small during system upgrades and so on. You would like to find out which of your roughly 7,500 packages are contributing the most to your space usage.

(The real solution is to move to a bigger pair of NVMe drives, but that involves various yak shaving and you want to upgrade to Fedora 43 today.)

The simple version of 'how big are your RPMs' is to ask rpm for the ordinary (binary) size of all of your installed binary RPMs:

rpm -qa --qf '%{SIZE:humaniec} %{N}-%{V}-%{R}.%{ARCH}\n' | sort -hr

This will tell you interesting things, like how the Fedora 43 version of wine-core-11.0-2.fc43.x86_64 is 1.3 GBytes all by itself. However, it's not necessarily the full answer for what is using up your disk space, because a single (source) package can create many binary packages (often these mostly get installed together and it's hard to split them apart in any useful way). For instance, on my work machine with the 70 GByte root partition, there are 263 'texlive' packages and 101 'perl' packages (and 66 'qemu' packages).

Often a more useful way to break down packages is by the total installed size for a particular source package. This is where I turn to my 'sumup' script, and also to 'numfmt', to get the following:

rpm -qa --qf '%{SIZE} %{SOURCERPM} %{N}-%{V}-%{R}.%{ARCH}\n' |
  sumup 2 1 | numfmt --format '%8.1f' --to iec 

This may reveal surprises that you didn't know. For example, my home desktop has 847 MBytes of packages derived from 'rocm-compilersupport', despite my home machine having no AMD GPU (it uses the integrated Intel GPU). These appear to be present as dependencies of Blender (based on what 'dnf remove' told me it wanted to do).

(It can also tell you that lots of binary packages derived from a single source package don't necessarily result in a lot of disk space being consumed. All of those 263 texlive packages amount to 289 Mbytes, and those 101 Perl packages, 43 Mbytes.)

I preserved the binary name, version, release, and architecture in the second command, even though it's not used, so that I can later copy and paste the 'rpm' command snippet to grep its output to find out all of the binary packages derived from a source package of interest. A smart approach to this would be to split this up into two commands:

rpm -qa --qf '%{SIZE} %{SOURCERPM} %{N}-%{V}-%{R}.%{ARCH}\n' >/tmp/foo
sumup 2 1 </tmp/foo | numfmt --format '%8.1f' --to iec

Putting the initial output in a file is useful because 'rpm -qa --qf ...' is not necessarily the fastest thing in the world, at least if you're asking it for the 'size' of RPMs. With the initial output saved in a file, I can just grep the file, which is going to be very fast.

PS: If your install of Fedora has been around for a while, this may also reveal various obsolete packages. I have llvm-libs packages that seem to go all the way back to Fedora 32. I probably don't need those any more, or at least I hope I don't. But cleaning up old RPMs from past Fedora releases is its own subject and doesn't at all fit in the margins of this entry.

Using 'pkg' for everything on FreeBSD 15 has been nice

By: cks
3 April 2026 at 03:00

Traditionally, the FreeBSD base system was managed through freebsd-update (also), which I would call primarily a patch-based system, while third party software was (usually) managed through pkg, a package manager. This was a quite traditional split, but it had some less than ideal aspects, and as of FreeBSD 15 you can choose to manage FreeBSD through pkg using what is called freebsd-base (which is also known as 'pkgbase'). If you're installing FreeBSD 15 from scratch, the installer will let you choose (and I believe it recommends the pkg based approach). If you upgrade from FreeBSD 14 to FreeBSD 15, there's a post-upgrade conversion process using pkgbasify (also, also).

(Technically you can use pkgbasify on FreeBSD 14, but pkgbase is officially experimental on FreeBSD 14.)

At this point I've been running a pkg based FreeBSD 15 system from more or less when FreeBSD 15 was released, first on a machine that I upgraded from 14 to 15 and then used pkgbasify on, and then on a second machine that I installed FreeBSD 15 on from scratch (partly because I wanted to move my test machine to less valuable hardware). In both cases, things have been fine. Over time the system has gone from FreeBSD 15.0 release to FreeBSD 15.0-p5, and each pkg-based update has been painless.

(Now that I look, the one thing that pkg-based updates haven't done is make ZFS snapshots. I honestly can't remember if freebsd-update did that for patch releases. I don't know how I feel about that, since I never made use of the ZFS snapshots that I believe got made in FreeBSD 14 for at least point upgrades, when going from 14.0 to 14.1 and so on.)

That FreeBSD's pkgbase is a bunch of separate packages means that those packages now have a range of versions from '15.0' through '15.0p5' (and now that I look, I have no '15.0p4' packages, which it turns out is because 15.0-p4 was a kernel update that was replaced by 15.0-p5's kernel updates). Fortunately 'freebsd-version' will let me more or less keep straight which patch level my current setup corresponds to.

We installed another FreeBSD 15 system recently and when we did, I recommended picking the pkg option. It's easier to keep everything straight, since we're already used to that sort of experience with Linux.

(I often had to look up the specific options I wanted to use with freebsd-update depending on what I was using it for this time around. Although I have no clear picture yet of how one goes from point release to point release in the pkgbase world (from 15.0 to a future 15.1), or even to the next major release (from 15.x to a future 16.0).)

Updating Ubuntu packages that you have local changes for with dgit

By: cks
31 March 2026 at 22:07

Suppose, not entirely hypothetically, that you've made local changes to an Ubuntu package using dgit and now Ubuntu has come out with an update to that package that you want to switch to, with your local changes still on top. Back when I wrote about moving local changes to a new Ubuntu release with dgit, I wrote an appendix with a theory of how to do this, based on a conversation. Now that I've actually done this, I've discovered that there is a minor variation and I'm going to write it down explicitly (with additional notes because I forgot some things between then and now).

I'll assume we're starting from an existing dgit based repository with a full setup of local changes, including an updated debian/changelog. Our first step, for safety, is to make a branch to capture the current state of our repository. I suggest you name this branch after the current upstream package version that you're on top of, for example if the current upstream version you're adding local changes to can be summarized as 'ubuntu2.6':

git branch cslab-2.6

Making a branch allows you to use 'git diff cslab-2.6..' later to see exactly what changed between your versions. A useful thing to do here is to exclude the 'debian/' directory from diffs, which can be done with 'git diff cslab-2.6.. -- . :!debian', although your shell may require you to quote the '!' (cf).

Then we need to use dgit to fetch the upstream updates:

dgit fetch -d ubuntu

We need to use '-d ubuntu', at least in current versions of dgit, or 'dgit fetch' gets confused and fails. At this point we have the updated upstream in the remote tracking branch 'dgit/dgit/jammy,-security,-updates' but our local tree is still not updated.

(All of dgit's remote tracking branches start with 'dgit/dgit/', while all of its local branches start with just 'dgit/'. This is less than optimal for my clarity.)

Normally you would now rebase to shift your local changes on top of the new upstream, but we don't want to immediately do that. The problem is that our top commit is our own dgit-based change to debian/changelog, and we don't want to rebase that commit; instead we'll make a new version of it after we rebase our real local changes. So our first step is to discard our top commit:

git reset --hard HEAD~

(In my original theory I didn't realize we had to drop this commit before the rebase, not after, because otherwise things get confused. At a minimum, you wind up with debian/changelog out of order, and I don't know if dropping your HEAD commit after the rebase works right. It's possible you might get debian/changelog rebase conflicts as well, so I feel dropping your debian/changelog change before the rebase is cleaner.)

Now we can rebase, for which the simpler two-argument form does work (but not plain rebasing, or at least I didn't bother testing plain rebasing):

git rebase dgit/dgit/jammy,-security,-updates dgit/jammy,-security,-updates

(If you are wondering how this command possibly works, as I was part way through writing this entry, note that the first branch is 'dgit/dgit/...', ie our remote tracking branch, and then second branch is 'dgit/...', our local branch with our changes on it.)

At this point we should have all of our local changes stacked on top of the upstream changes, but no debian/changelog entry for them that will bump the package version. We create that with:

gbp dch --since dgit/dgit/jammy,-security,-updates --local .cslab. --ignore-branch --commit

Then we can build with 'dpkg-buildpackage -uc -b', and afterward do 'git clean -xdf; git reset --hard' to reset your tree back to its pristine state.

(My view is that while you can prepare a source package for your work if you want to, the 'source' artifact you really want to save is your dgit VCS repository. This will be (much) less bulky when you clean it up to get rid of all of the stuff (to be polite) that dpkg-buildpackage leaves behind.)

Canonical's Netplan is hard to deal with in automation

By: cks
28 March 2026 at 03:10

Suppose, not entirely hypothetically, that you've traditionally used /etc/resolv.conf on your Ubuntu servers but you're considering switching to systemd-resolved, partly for fast failover if your normal primary DNS server is unavailable and partly because it feels increasingly dangerous not to, since resolved is the normal configuration and what software is likely to expect. One of the ways that resolv.conf is nice is that you can set the configuration by simply copying a single file that isn't used for anything else. On Ubuntu, this is unfortunately not the case for systemd-resolved.

Canonical expects you to operate all of your Ubuntu server networking through Canonical Netplan. In reality, Netplan will render things down to a systemd-networkd configuration, which has some important effects and creates some limitations. Part of that rendered networkd configuration is your DNS resolution settings, and the natural effect of this is that they have to be associated with some interface, because that's the resolved model of the world. This means that Netplan specifically attaches DNS server information to a specific network interfaces in your Netplan configuration. This means that you must find the specific device name and then modify settings within it, and those settings are intermingled (in the same file) with settings you can't touch.

(Sometimes Netplan goes the other way, separating interface specific configuration out to a completely separate section.)

Netplan does not give you a way to do this; if anything, Netplan goes out of its way to not do so. For example, Netplan can dump its full or partial configuration, but it does so in YAML form with no option for JSON (which you could readily search through in a script with jq). However, if you want to modify the Netplan YAML without editing it by hand, 'netplan set' sometimes requires JSON as input. Lack of any good way to search or query Netplan's YAML matters because for things like DNS settings, you need to know the right interface name. Without support for this in Netplan, you wind up doing hacks to try to get the right interface name.

Netplan also doesn't provide you any good way to remove settings. The current Ubuntu 26.04 beta installer writes a Netplan configuration that locks your interfaces to specific MAC addresses:

  enp1s0:
    match:
      macaddress: "52:54:00:a5:d5:fb"
    [...]
    set-name: "enp1s0"

This is rather undesirable if you may someday swap network cards or transplant server disks from one chassis to another, so we would like to automatically take it out. Netplan provides no support for this; 'netplan set' can't be given a blank replacement, for example (and 'netplan set "network.ethernets.enp1s0.match={}"' doesn't do anything). If Netplan would give you all of the enp1s0 block in JSON format, maybe you could edit the JSON and replace the whole thing, but that's not available so far.

(For extra complication you also need to delete the set-name, which is only valid with a 'match:'.)

Another effect of not being able to delete things in scripts is that you can't write scripts that move things out to a different Netplan .conf file that has only your settings for what you care about. If you could reliably get the right interface name and you could delete DNS settings from the file the installer wrote, you could fairly readily create a '/etc/netplan/60-resolv.conf' file that was something close to a drop-in /etc/resolv.conf. But as it is, you can't readily do that.

There are all sorts of modifications you might want to make through a script, such as automatically configuring a known set of VLANs to attach them to whatever the appropriate host interface is. Scripts are good for automation and they're also good for avoiding errors, especially if you're doing repetitive things with slight differences (such as setting up a dozen VLANs on your DHCP server). Netplan fights you almost all the way about doing anything like this.

My best guess is that all of Canonical's uses of Netplan either use internal tooling that reuses Netplan's (C) API or simply re-write Netplan files from scratch (based on, for example, cloud provider configuration information).

(To save other people the time, the netplan Python package on PyPI seems to be a third party package and was last updated in 2019. Which is a pity, because it theoretically has a quite useful command line tool.)

One bleakly amusing thing I've found out through using 'netplan set' on Ubuntu 26.04 is that the Ubuntu server installer and Netplan itself have slightly different views on how Netplan files should be written. The original installer version of the above didn't have the quotes around the strings; 'netplan set' added them.

(All of this would be better if there was a widely agreed on, generally shipped YAML equivalent of 'jq', or better yet something that could also modify YAML in place as well as query it in forms that were useful for automation. But the 'jq for YAML' ecosystem appears to be fragmented at best.)

Considering mmap() verus plain reads for my recent code

By: cks
26 March 2026 at 23:05

The other day I wrote about a brute force approach to mapping IPv4 /24 subnets to Autonomous System Numbers (ASNs), where I built a big, somewhat sparse file of four-byte records, with the record for each /24 at a fixed byte position determined by its first three octets (so 0.0.0.0/24's ASN, if any, is at byte 0, 0.0.1.0/24 is at byte 4, and so on). My initial approach was to open, lseek(), and read() to access the data; in a comment, Aristotle Pagaltzis wondered if mmap() would perform better. The short answer is that for my specific case I think it would be worse, but the issue is interesting to talk about.

(In general, my view is that you should use mmap() primarily if it makes the code cleaner and simpler. Using mmap() for performance is a potentially fraught endeavour that you need to benchmark.)

In my case I have two strikes against mmap() likely being a performance advantage: I'm working in Python (and specifically Python 2) so I can't really directly use the mmap()'d memory, and I'm normally only making a single lookup in the typical case (because my program is running as a CGI). In the non-mmap() case I expect to do an open(), an lseek(), and a read() (which will trigger the kernel possibly reading from disk and then definitely copying data to me). In the mmap() case I would do open(), mmap(), and then access some page, triggering possible kernel IO and then causing the kernel to manipulate process memory mappings to map the page into my address space. In general, it seems unlikely that mmap() plus the page access handling will be cheaper than lseek() plus read().

(In both the mmap() and read() cases I expect two transitions into and out of the kernel. As far as I know, lseek() is a cheap system call (and certainly it seems unlikely to be more expensive than mmap(), which has to do a bunch of internal kernel work), and the extra work the read() does to copy data from the kernel to user space is probably no more work than the kernel manipulating page tables, and could be less.)

If I was doing more lookups in a single process, I could possibly win with the mmap() approach but it's not certain. A lot depends on how often I would be looking up something on an already mapped page and how expensive mapping in a new page is compared to some number of lseek() plus read() system calls (or pread() system calls if I had access to that, which cuts the number of system calls in half). In some scenarios, such as a burst of traffic from the same network or a closely related set of networks, I could see a high hit rate on already mapped pages. In others, the IPv4 addresses are basically random and widely distributed, so many lookups would require mapping new pages.

(Using mmap() makes it unnecessary to keep my own in-process cache, but I don't think it really changes what the kernel will cache for me. Both read()'ing from pages and accessing them through mmap() keeps them recently used.)

Things would also be better in a language where I could easily make zero-copy use of data right out of the mmap()'d pages themselves. Python is not such a language, and I believe that basically any access to the mmap()'d data is going to create new objects and copy some bytes around. I expect that this results in as many intermediate objects and so on as if I used Python's read() stuff.

(Of course if I really cared there's no substitute for actually benchmarking some code. I don't care that much, and the code is simpler with the regular IO approach because I have to use the regular IO approach when writing the data file.)

Early notes on switching some libvirt-based virtual machines to UEFI

By: cks
26 March 2026 at 03:09

I keep around a small collection of virtual machines so I don't have to drag out one of our spare physical servers to test things on. These virtual machines have traditionally used traditional MBR-based booting ('BIOS' in libvirt instead of 'UEFI'), partly because for a long time libvirt didn't support snapshots of UEFI based virtual machines and snapshots are very important for my use of these scratch virtual machines. However, I recently discovered that libvirt now can do snapshots of UEFI based virtual machines, and also all of our physical server installs are UEFI based, so in the past couple of days I've experimented with moving some of my Ubuntu scratch VMs from BIOS to UEFI.

As far as I know, virt-manager and virsh don't directly allow you to switch a virtual machine between BIOS and UEFI after it's been created, partly because the result is probably not going to boot (unless you deliberately set up the OS inside the VM with both an EFI boot and a BIOS MBR boot environment). Within virt-manager, you can only select BIOS or UEFI at setup time, so you have to destroy your virtual machine and recreate it. This works, but it's a bit annoying.

(On the other hand, if you've had some virtual machines sitting around for years and years, you might want to refresh all of their settings anyway.)

It's possible to change between BIOS and UEFI by directly editing the libvirt XML to transform the <os> node. You may want to remove any old snapshots first because I don't know what happens if you revert from a 'changed to UEFI' machine to a snapshot where your virtual machine was a BIOS one. In my view, the easiest way to get the necessary XML is to create (or recreate) another virtual machine with UEFI, and then dump and copy its XML with some minor alterations.

For me, on Fedora with the latest libvirt and company, the <os> XML of a BIOS booting machine is:

 <os>
   <type arch='x86_64' machine='pc-q35-6.1'>hvm</type>
 </os>

Here the 'machine=' is the machine type I picked, which I believe is the better of the two options virt-manager gives me.

My UEFI based machines look like this:

 <os firmware='efi'>
   <type arch='x86_64' machine='pc-q35-9.2'>hvm</type>
   <firmware>
     <feature enabled='yes' name='enrolled-keys'/>
     <feature enabled='yes' name='secure-boot'/>
   </firmware>
   <loader readonly='yes' secure='yes' type='pflash' format='qcow2'>/usr/share/edk2/ovmf/OVMF_CODE_4M.secboot.qcow2</loader>
   <nvram template='/usr/share/edk2/ovmf/OVMF_VARS_4M.secboot.qcow2' templateFormat='qcow2' format='qcow2'>/var/lib/libvirt/qemu/nvram/[machine name]_VARS.qcow2</nvram>
 </os>

Here the '[machine-name]' bit is the libvirt name of my virtual machine, such as 'vmguest1'. This nvram file doesn't have to exist in advance; libvirt will create it the first time you start up the virtual machine. I believe it's used to provide snapshots of the UEFI variables and so on to go with snapshots of your physical disks and snapshots of the virtual machine configuration.

(This feature may have landed in libvirt 10.10.0, if I'm reading release notes correctly. Certainly reading the release notes suggests that I don't want to use anything before then with UEFI snapshots.)

Manually changing the XML on one of my scratch machines has worked fine to switch it from BIOS MBR to UEFI booting as far as I can tell, but I carefully cleared all of its disk state and removed all of its snapshots before I tried this. I suspect that I could switch it back to BIOS if I wanted to. Over time, I'll probably change over all of my as yet unchanged scratch virtual machines to UEFI through direct XML editing, because it's the less annoying approach for me. Now that I've looked this up, I'll probably do it through 'virsh edit ...' rather than virt-manager, because that way I get my real editor.

(This is the kind of entry I write for my future use because I don't want to have to re-derive this stuff.)

PS: Much of this comes from this question and answers.

Fedora's virt-manager started using external snapshots for me as of Fedora 41

By: cks
24 March 2026 at 02:51

Today I made an unpleasant discovery about virt-manager on my (still) Fedora 42 machines that I shared on the Fediverse:

This is my face that Fedora virt-manager appears to have been defaulting to external snapshots for some time and SURPRISE, external snapshots can't be reverted by virsh. This is my face, especially as it seems to have completely screwed up even deleting snapshots on some virtual machines.

(I only discovered this today because today is the first time I tried to touch such a snapshot, either to revert to it or to clean it up. It's possible that there is some hidden default for what sort of snapshot to make and it's only been flipped for me.)

Neither virt-manager nor virsh will clearly tell you about this. In virt-manager you need to click on each snapshot and if it says 'external disk only', congratulations, you're in trouble. In virsh, 'virsh snapshot-list --external <vm>' will list external snaphots, and then 'virsh snapshot-list --tree <vm>' will tell you if they depend on any internal snapshots.

My largest problems came from virtual machines where I had earlier internal snapshots and then I took more snapshots, which became external snapshots from Fedora 41 onward. You definitely can't revert to an external snapshot in this situation, at least not with virsh or virt-manager, and the error messages I got were generic ones about not being able to revert external snapshots. I haven't tested reverting external snapshots for a VM with no internal ones.

(Not being able to revert to external snapshots is a long standing libvirt issue, but it's possible they now work if you only have external snapshots. Otherwise, Fedora 41 and Fedora 42 defaulting to external snapshots is extremely hard to understand (to be polite).)

Update: you can revert an external snapshot in the latest libvirt if all of your snapshots are external. You can't revert them if libvirt helpfully gave you external snapshots on top of internal ones by switching the default type of snapshots (probably in Fedora 41).

If you have an external snapshot that you need to revert to, all I can do is point to a libvirt wiki page on the topic (although it may be outdated by now) along with libvirt's documentation on its snapshot XML. I suspect that there is going to be suffering involved. I haven't tried to do this; when it came up today I could afford to throw away the external snapshot.

If you have internal snapshots and you're willing to throw away the external snapshot and what's built on it, you can use virsh or virt-manager to revert to an internal snapshot and then delete the external snapshot. This leaves the external snapshot's additional disk file or files dangling around for you to delete by hand.

If you have only an external snapshot, it appears that libvirt will let you delete the snapshot through 'virsh snapshot-delete <vm> <external-snapshot>', which preserves the current state of the machine's disks. This only helps if you don't want the snapshot any more, but this is one of my common cases (where I take precautionary snapshots before significant operations and then get rid of them later when I'm satisfied, or at least committed).

The worst situation appears to be if you have an external snapshot made after (and thus on top of) an earlier internal snapshot and you to keep the live state of things while getting rid of the snapshots. As far as I can tell, it's impossible to do this through libvirt, although some of the documentation suggests that you should be able to. The process outlined in libvirt's Merging disk image chains didn't work for me (see also Disk image chains).

(If it worked, this operation would implicitly invalidate the snapshots and I don't know how you get rid of them inside libvirt, since you can't delete them normally. I suspect that to get rid of them, you need to shut down all of the libvirt daemons and then delete the XML files that (on Fedora) you'll find in /var/lib/libvirt/qemu/snapshot/<domain>.)

One reason to delete external snapshots you don't need is if you ever want to be able to easily revert snapshots in the future. I wouldn't trust making internal snapshots on top of external ones, if libvirt even lets you, so if you want to be able to easily revert, it currently appears that you need to have and use only internal snapshots. Certainly you can't mix new external snapshots with old internal snapshots, as I've seen.

(The 5.1.0 virt-manager release will warn you to not mix snapshot modes and defaults to whatever snapshot mode you're already using. I don't know what it defaults to if you don't have any snapshots, I haven't tried that yet.)

Sidebar: Cleaning this up on the most tangled virtual machine

I've tried the latest preview releases of the libvirt stuff, but it doesn't make a difference in the most tangled situation I have:

$ virsh snapshot-delete hl-fedora-36 fedora41-preupgrade
error: Failed to delete snapshot fedora41-preupgrade
error: Operation not supported: deleting external snapshot that has internal snapshot as parent not supported

This VM has an internal snapshot as the parent because I didn't clean up the first snapshot (taken before a Fedora 41 upgrade) before making the second one (taken before a Fedora 42 upgrade).

In theory one can use 'virsh blockcommit' to reduce everything down to a single file, per the knowledge base section on this. In practice it doesn't work in this situation:

$ virsh blockcommit hl-fedora-36 vda --verbose --pivot --active
error: invalid argument: could not find base image in chain for 'vda'

(I tried with --base too and that didn't help.)

I was going to attribute this to the internal snapshot but then I tried 'virsh blockcommit' on another virtual machine with only an external snapshot and it failed too. So I have no idea how this is supposed to work.

Since I could take a ZFS snapshot of the entire disk storage, I chose violence, which is to say direct usage of qemu-img. First, I determined that I couldn't trivially delete the internal snapshot before I did anything else:

$ qemu-img snapshot -d fedora40-preupgrade fedora35.fedora41-preupgrade
qemu-img: Could not delete snapshot 'fedora40-preupgrade': snapshot not found

The internal snapshot is in the underlying file 'fedora35.qcow2'. Maybe I could have deleted it safely even with an external thing sitting on top of it, but I decided not to do that yet and proceed to the main show:

$ qemu-img commit -d fedora35.fedora41-preupgrade
Image committed.
$ rm fedora35.fedora41-preupgrade

Using 'qemu-img info fedora35.qcow2' showed that the internal snapshot was still there, so I removed it with 'qemu-img snapshot -d' (this time on fedora35.qcow2).

All of this left libvirt's XML drastically out of step with the underlying disk situation. So I removed the XML for the snapshots (after saving a copy), made sure all libvirt services weren't running, and manually edited the VM's XML, where it turned out that all I needed to change was the name of the disk file. This appears to have worked fine.

I suspect that I could have skipped manually removing the internal snapshot and its XML and libvirt would then have been happy to see it and remove it.

(I'm writing all of the commands and results down partly for my future reference.)

Wayland has good reasons to put the window manager in the display server

By: cks
18 March 2026 at 02:26

I recently ran across Isaac Freund's Separating the Wayland Compositor and Window Manager (via), which is excellent news as far as I'm concerned. But in passing, it says:

Traditionally, Wayland compositors have taken on the role of the window manager as well, but this is not in fact a necessary step to solve the architectural problems with X11. Although, I do not know for sure why the original Wayland authors chose to combine the window manager and Wayland compositor, I assume it was simply the path of least resistance. [...]

Unfortunately, I believe that there are excellent reasons to put the window manager into the display server the way Wayland has, and the Wayland people (who were also X people) were quite familiar with them and how X has had problems over the years because of its split.

One large and more or less core problem is that event handling is deeply entwined with window management. As an example, consider this sequence of (input) events:

  1. your mouse starts out over one window. You type some characters.
  2. you move your mouse over to a second window. You type some more characters.
  3. you click a mouse button without moving the mouse.
  4. you type more characters.

Your window manager is extremely involved in the decisions about where all of those input events go and whether the second window receives a mouse button click event in the third step. If the window manager is separate from whatever is handling input events, either some things trigger synchronous delays in further event handling or sufficiently fast typeahead and actions are in a race with the window manager to see if it handles changes in where future events should go fast enough or if some of your typing and other actions are misdirected to the wrong place because the window manager is lagging.

Embedding the window manager in the display server is the simple and obvious approach to insuring that the window manager can see and react to all events without lag, and can freely intercept and modify all events as it wishes without clients having to care. The window manager can even do this using extremely local knowledge if it wants. Do you want your window manager to have key bindings that only apply to browser windows, where the same keys are passed through to other programs? An embedded window manager can easily do that (let's assume it can reliably identify browser windows).

(An outdated example of how complicated you can make mouse button bindings, never mind keyboard bindings, is my mouse button bindings in fvwm.)

X has a collection of mechanisms that try to allow window managers to manage 'focus' (which window receives keyboard input), intercept (some) keys at a window manager level, and do other things that modify or intercept events. The whole system is complex, imperfect, and limited, and a variety of these mechanisms have weird side effects on the X events that regular programs receive; you can often see this with a program such as xev. Historically, not all X programs have coped gracefully with all of the interceptions that window managers like fvwm can do.

(X also has two input event systems, just to make life more complicated.)

X's mechanisms also impose limits on what they'll allow a window manager to do. One famous example is that in X, mouse scroll wheel events always go to the X window under the mouse cursor. Even if your window manager uses 'click (a window) to make it take input', mouse scroll wheel input is special and cannot be directed to a window this way. In Wayland, a full server has no such limitations; its window manager portion can direct all events, including mouse scroll wheels, to wherever it feels like.

(This elaborates on a Fediverse post of mine.)

Cleaning old GPG RPM keys that your Fedora install is keeping around

By: cks
17 March 2026 at 01:56

Approximately all RPM packages are signed by GPG keys (or maybe they're supposed to be called PGP keys), which your system stores in the RPM database as pseudo-packages (because why not). If your Fedora install has been around long enough, as mine have, you will have accumulated a drift of old keys and sometimes you either want to clean them up or something unfortunate will happen to one of those keys (I'll get to one case for it).

One basic command to see your collection of GPG keys in the RPM database is (taken from this gist):

rpm -q gpg-pubkey --qf '%{NAME}-%{VERSION}-%{RELEASE}\t%{SUMMARY}\n'

On some systems this will give you a nice short list of keys. On others, your list may be very long.

Since Fedora 42 (cf), DNF has functionality (I believe more or less built in) that should offer to remove old GPG keys that have actually expired. This is in the 'expired PGP keys plugin' which comes from the 'libdnf5-plugin-expired-pgp-keys' if you don't have it installed (with a brief manpage that's called 'libdnf5-expired-pgp-keys'). I believe there was a similar DNF4 plugin. However, there are two situations where this seems to not work correctly.

The first situation is now-obsolete GPG keys that haven't expired yet, for various reasons; these may be for past versions of Fedora, for example. These days, the metadata for every DNF repository you use should list a URL for its GPG keys (see the various .repo files in /etc/yum.repos.d/ and look for the 'gpgkey=' lines). So one way to clean up obsolete keys is to fetch all of the current keys for all of your current repositories (or at least the enabled ones), and then remove anything you have that isn't among the list. This process is automated for you by the 'clean-rpm-gpg-pubkey' command and package, which is mentioned in some Fedora upgrade instructions. This will generally clean out most of your obsolete keys, although rare people will have keys that are so old that it chokes on them.

The second situation is apparently a repository operator who is sufficiently clever to have re-issued an expired key using the same key ID and fingerprint but a new expiry date in the future; this fools RPM and related tools and everything chokes. This is unfortunate, since it will often stall all DNF updates unless you disable the repo. One repository operator who has done this is Google, for their Fedora Chrome repository. To fix this you'll have to manually remove the relevant GPG key or keys. Once you've used clean-rpm-gpg-pubkey to reduce your list of GPG keys to a reasonable level, you can use the RPM command I showed above to list all your remaining keys, spot the likely key or keys (based on who owns it, for example), and then use 'rpm -e --allmatches gpg-pubkey-d38b4796-570c8cd3' (or some other appropriate gpg-pubkey name) to manually scrub out the GPG key. Doing a DNF operation such as installing or upgrading a package from the repository should then re-import the current key.

(This also means that it's theoretically harmless to overshoot and remove the wrong key, because it will be fetched back the next time you need it.)

(When I wrote my Fediverse post about discovering clean-rpm-gpg-pubkey, I apparently thought I would remember it without further prompting. This was wrong, and in fact I didn't even remember to use it when I upgraded my home desktop. This time it will hopefully stick, and if not, I have it written down here where it will probably be easier to find.)

UEFI-only booting with GRUB has gone okay on our (Ubuntu 24.04) servers

By: cks
12 March 2026 at 01:24

We've been operating Ubuntu servers for a long time and for most of that time we've booted them through traditional MBR BIOS boots. Initially it was entirely through MBR and then later it was still mostly through MBR (somewhat depending on who installed a particular server; my co-workers are more tolerant of UEFI than I am). But when we built the 24.04 version of our customized install media, my co-worker wound up making it UEFI only, and so for the past two years all of our 24.04 machines have been UEFI (with us switching BIOSes on old servers into UEFI mode as we updated them). The headline news is that it's gone okay, more or less as you'd expect and hope by now.

All of our servers have mirrored system disks, and the one UEFI thing we haven't really had to deal with so far is fixing Ubuntu's UEFI boot disk redundancy stuff after one disk fails. I think we know how to do it in theory but we haven't had to go through it in practice. It will probably work out okay but it does make me a bit nervous, along with the related issue that the Ubuntu installer makes it hard to be consistent about which disk your '/boot/efi' filesystem comes from.

(In the installer, /boot/efi winds up on the first disk that you set as the boot device, but the disks aren't always presented in order so you can do this on 'the first disk' in the installer and discover that the first disk it listed was /dev/sdb.)

The Ubuntu 24.04 default bootloader is GRUB, so that's what we've wound up with even though as a UEFI-only environment we could in theory use simpler ones, such as systemd-boot. I'm not particularly enthused about GRUB but in practice it does what we want, which is to reliably boot our servers, and it has the huge benefit that it's actively supported by Ubuntu (okay, Canonical) so they're going to make sure it works right, including with their UEFI disk redundancy stuff. If Ubuntu switches default UEFI bootloaders in their server installs, I expect we'll follow along.

(I don't know if Canonical has any plans to switch away from GRUB to something else. I suspect that they'll stick with GRUB for as long as they support MBR booting, which I suspect will be a while, especially as people look more and more likely to hold on to old hardware for much longer than normally expected.)

PS: One reason I'm writing this down is that I've been unenthused about UEFI for a long time, so I'm not sure I would have predicted our lack of troubles in advance. So I'm going to admit it, UEFI has been actually okay. And in its favour, UEFI has regularized some things that used to be pretty odd in the MBR BIOS era.

(I'm still not happy about the UEFI non-story around redundant system disks, but I've accepted that hacks like the Ubuntu approach are the best we're going to get. I don't know what distributions such as Fedora are doing here; my Fedora machines are MBR based and staying that way until the hardware gets replaced, which on current trends won't be any time soon.)

Installing Void Linux on ZFS with Hibernation Support

22 December 2025 at 08:43

Installing Void Linux on ZFS with Hibernation Support

Introduction

FreeBSD continues to make strides in desktop support, but Linux still holds an advantage in hardware compatibility. After running openSUSE Tumbleweed on my mini PC for several months, I decided it was time to switch to a solution I could control more closely. Not because Tumbleweed doesn't work well - it works great! - but I prefer having direct control over what happens on my machine. And I want native ZFS, because I prefer it over btrfs and it allows me to manage snapshots, backups, and rollbacks just as I do on FreeBSD, using the same tools and procedures.

The choice of Void Linux comes from its BSD-like approach: modular and free of unnecessary complexity. This makes it an excellent solution for this type of setup.

ZFSBootMenu is an extremely powerful tool. It provides an experience similar to FreeBSD's boot loader and natively supports ZFS. I strongly recommend reading the documentation and exploring its features, as some of them - like the built-in SSH daemon - can be genuine lifesavers in recovery scenarios.

Prerequisites and Audience

This guide is not for absolute beginners. If you're new to Linux or Unix-like operating systems, you'd be better served by a ready-to-use distribution like openSUSE Leap (or Tumbleweed for a rolling distribution), Linux Mint, Debian, Ubuntu, or Manjaro. The purpose of this article is to demonstrate a stable, upgradeable, and reasonably secure base setup for users already comfortable with system administration. It uses the glibc variant of Void Linux. The musl version requires different commands, for example for locale generation.

Use at your own risk.

This guide synthesizes instructions from several sources:

If your setup differs from what's described here (NVMe disk, UEFI boot, Secure Boot disabled), consult the linked guides for explanations and variations.

Installation Script (Optional)

If you want to reproduce this setup quickly, I maintain a script that automates the procedure described in this guide: disk partitioning, ZFS pool and dataset creation, encrypted swap for hibernation resume, dracut configuration, and ZFSBootMenu EFI setup. An optional KDE Plasma desktop installation is also supported.

The script is interactive and will ask for the required parameters (target disk, timezone and keymap, passphrases, desktop options). Requirements, usage instructions, and known limitations are documented in the repository README

That said, I still recommend going through the manual process at least once. Understanding each step is part of the value of this setup, especially when troubleshooting or adapting it to different hardware.

Boot Environment

Since ZFS isn't supported by the base Void Linux image, we'll use hrmpf, an excellent rescue system based on Void Linux that includes ZFS support out of the box.

After booting, you can either proceed directly or SSH into the machine to continue remotely. I generally prefer SSH since it makes copy-paste operations much easier - especially when dealing with UUIDs and long commands. To enable SSH access, set a root password and allow root login:

passwd

Edit /etc/ssh/sshd_config and enable:

PermitRootLogin yes

Restart the SSH daemon:

sv restart sshd

Find the machine's IP address:

ip addr

You can now connect via SSH from another device.

Initial Setup

Set up the environment variables and generate a host ID - we need it for ZFS:

source /etc/os-release
export ID

zgenhostid -f 0x00bab10c

Disk Configuration

Identify your target disk and set up the partition variables. This approach keeps everything consistent and reduces errors:

# Set the base disk - adjust this to match your system
export DISK="/dev/nvme0n1"

# For NVMe disks, partitions are named like nvme0n1p1, nvme0n1p2, etc.
# For SATA/SAS disks (sda, sdb), partitions are named sda1, sda2, etc.
# Set the partition separator accordingly:
export PART_SEP="p"  # Use "p" for NVMe, empty string "" for SATA/SAS

# Define partition numbers
export BOOT_PART="1"
export SWAP_PART="2"
export POOL_PART="3"

# Build full device paths
export BOOT_DEVICE="${DISK}${PART_SEP}${BOOT_PART}"
export SWAP_DEVICE="${DISK}${PART_SEP}${SWAP_PART}"
export POOL_DEVICE="${DISK}${PART_SEP}${POOL_PART}"

Verify your configuration before proceeding:

echo "Boot device: $BOOT_DEVICE"
echo "Swap device: $SWAP_DEVICE"
echo "Pool device: $POOL_DEVICE"

Wipe the Disk

Warning: This operation will irreversibly destroy all data on the selected disk. Double-check that you've selected the correct disk and be sure to have a complete backup of your system!

zpool labelclear -f "$DISK"

wipefs -a "$DISK"
sgdisk --zap-all "$DISK"

Create Partitions

EFI System Partition

If you're not using UEFI boot, adapt this procedure following the appropriate guide linked at the beginning of this post:

sgdisk -n "${BOOT_PART}:1m:+512m" -t "${BOOT_PART}:ef00" "$DISK"

Swap Partition

The swap partition should be slightly larger than your RAM to support hibernation. When you hibernate, the entire contents of RAM are written to swap, so you need enough space to hold it all plus some overhead. In this example, I have 16 GB of RAM, so I'm creating an 18 GB swap partition:

sgdisk -n "${SWAP_PART}:0:+18g" -t "${SWAP_PART}:8200" "$DISK"

ZFS Pool Partition

sgdisk -n "${POOL_PART}:0:-10m" -t "${POOL_PART}:bf00" "$DISK"

Set Up ZFS Encryption

Encrypting the disk is strongly recommended, especially for laptops. Replace SomeKeyphrase with a strong passphrase that's easy to type. Keep in mind that during early boot, the keyboard layout might default to US, so choose a passphrase that's easy to type on a US keyboard layout:

echo 'SomeKeyphrase' > /etc/zfs/zroot.key
chmod 000 /etc/zfs/zroot.key

Create the ZFS Pool

Create the pool with conservative, well-tested options:

zpool create -f -o ashift=12 \
 -O compression=lz4 \
 -O acltype=posixacl \
 -O xattr=sa \
 -O relatime=on \
 -O encryption=aes-256-gcm \
 -O keylocation=file:///etc/zfs/zroot.key \
 -O keyformat=passphrase \
 -o autotrim=on \
 -o compatibility=openzfs-2.2-linux \
 -m none zroot "$POOL_DEVICE"

Create ZFS Datasets

zfs create -o mountpoint=none zroot/ROOT
zfs create -o mountpoint=/ -o canmount=noauto zroot/ROOT/${ID}
zfs create -o mountpoint=/home zroot/home

zpool set bootfs=zroot/ROOT/${ID} zroot

Export and Reimport for Installation

zpool export zroot
zpool import -N -R /mnt zroot
zfs load-key -L prompt zroot

zfs mount zroot/ROOT/${ID}
zfs mount zroot/home

udevadm trigger

Install the Base System

XBPS_ARCH=x86_64 xbps-install \
  -S -R https://mirrors.servercentral.com/voidlinux/current \
  -r /mnt base-system

Copy Host Configuration

Copy the files we generated earlier to the new system:

cp /etc/hostid /mnt/etc
mkdir -p /mnt/etc/zfs
cp /etc/zfs/zroot.key /mnt/etc/zfs

Configure Encrypted Swap

Now we'll set up the encrypted swap partition. This is where the hibernation magic happens - by using a separate LUKS-encrypted partition instead of a ZFS zvol, we can properly resume from hibernation.

Format the swap partition with LUKS:

cryptsetup luksFormat --type luks1 "$SWAP_DEVICE"

Open the encrypted partition, create the swap filesystem, and activate it:

cryptsetup luksOpen "$SWAP_DEVICE" cryptswap
mkswap /dev/mapper/cryptswap
swapon /dev/mapper/cryptswap

Preserve Variables for Chroot

Before entering the chroot, save the disk variables so they remain available inside the new environment:

cat << EOF > /mnt/root/disk-vars.sh
export DISK="$DISK"
export PART_SEP="$PART_SEP"
export BOOT_PART="$BOOT_PART"
export SWAP_PART="$SWAP_PART"
export POOL_PART="$POOL_PART"
export BOOT_DEVICE="$BOOT_DEVICE"
export SWAP_DEVICE="$SWAP_DEVICE"
export POOL_DEVICE="$POOL_DEVICE"
export ID="$ID"
EOF

Enter the Chroot Environment

xchroot /mnt

From this point forward, all commands are executed inside the new system.

First, load the saved variables:

source /root/disk-vars.sh

Configure fstab

Add the swap entry to /etc/fstab:

/dev/mapper/cryptswap   none            swap            defaults        0 0

Set Up Automatic Swap Unlock

To avoid entering the swap password separately after unlocking the ZFS pool, we'll create a keyfile stored on the encrypted ZFS dataset. This is secure because the keyfile only becomes accessible after the ZFS pool is unlocked.

First, install cryptsetup in the new system:

xbps-install -S cryptsetup

Generate a random keyfile and add it to the LUKS partition:

dd bs=1 count=64 if=/dev/urandom of=/boot/volume.key

cryptsetup luksAddKey "$SWAP_DEVICE" /boot/volume.key

chmod 000 /boot/volume.key
chmod -R g-rwx,o-rwx /boot

Add the keyfile to /etc/crypttab:

echo "cryptswap   $SWAP_DEVICE   /boot/volume.key   luks" >> /etc/crypttab

Include the keyfile and crypttab in the initramfs. Create /etc/dracut.conf.d/10-crypt.conf:

install_items+=" /boot/volume.key /etc/crypttab "

Basic System Configuration

Configure keyboard layout and hardware clock. Adjust the keymap and timezone to match your location:

cat << EOF >> /etc/rc.conf
KEYMAP="us"
HARDWARECLOCK="UTC"
EOF

ln -sf /usr/share/zoneinfo/Europe/Rome /etc/localtime

Configure locales:

cat << EOF >> /etc/default/libc-locales
en_US.UTF-8 UTF-8
en_US ISO-8859-1
EOF

echo "LANG=en_US.UTF-8" > /etc/locale.conf

xbps-reconfigure -f glibc-locales

Set the root password:

passwd

Configure ZFS Boot Support

cat << EOF > /etc/dracut.conf.d/zol.conf
nofsck="yes"
add_dracutmodules+=" zfs "
omit_dracutmodules+=" btrfs "
install_items+=" /etc/zfs/zroot.key "
EOF

Install ZFS:

xbps-install -S zfs

Configure ZFSBootMenu

Set the basic boot properties:

zfs set org.zfsbootmenu:commandline="quiet" zroot/ROOT
zfs set org.zfsbootmenu:keysource="zroot/ROOT/${ID}" zroot

The Critical Step: Hibernation Support

Now we need to configure hibernation resume. This is the key insight that makes this setup work: normally, the encrypted ZFS root mounts first, and then it unlocks the swap partition. But when resuming from hibernation, the kernel needs to read the hibernation image from swap before mounting the root filesystem - otherwise, the saved state would be lost.

To solve this, we tell ZFSBootMenu to unlock the swap partition early, before mounting ZFS, by specifying its LUKS UUID.

Get the UUID of your swap partition:

blkid "$SWAP_DEVICE"

You'll see output like:

/dev/...: UUID="xxxxxxxx-xxxx-xxxx-xxxx-xxxxxxxxxxxx" TYPE="crypto_LUKS" PARTUUID="..."

Store the UUID in a variable for the next step:

SWAP_UUID=$(blkid -s UUID -o value "$SWAP_DEVICE")
echo "Swap UUID: $SWAP_UUID"

Now set the boot parameters using the captured UUID:

zfs set org.zfsbootmenu:commandline="rd.luks.uuid=$SWAP_UUID resume=/dev/mapper/cryptswap" zroot/ROOT/${ID}

Set Up EFI Boot

Create and mount the EFI partition:

mkfs.vfat -F32 "$BOOT_DEVICE"

mkdir -p /boot/efi

Add the EFI partition to /etc/fstab using its UUID:

BOOT_UUID=$(blkid -s UUID -o value "$BOOT_DEVICE")
echo "UUID=$BOOT_UUID    /boot/efi    vfat    defaults    0 0" >> /etc/fstab

Mount it:

mount /boot/efi

Install ZFSBootMenu

xbps-install -S curl

mkdir -p /boot/efi/EFI/ZBM
curl -o /boot/efi/EFI/ZBM/VMLINUZ.EFI -L https://get.zfsbootmenu.org/efi
cp /boot/efi/EFI/ZBM/VMLINUZ.EFI /boot/efi/EFI/ZBM/VMLINUZ-BACKUP.EFI

Configure the EFI boot entries:

xbps-install -S efibootmgr

efibootmgr -c -d "$DISK" -p "$BOOT_PART" \
  -L "ZFSBootMenu (Backup)" \
  -l '\EFI\ZBM\VMLINUZ-BACKUP.EFI'

efibootmgr -c -d "$DISK" -p "$BOOT_PART" \
  -L "ZFSBootMenu" \
  -l '\EFI\ZBM\VMLINUZ.EFI'

Microcode updates

Void Linux is modular, so you may need to install additional packages for your specific hardware. For the Intel microcode, you need the non-free repo: For example:

# For Intel CPUs
xbps-install -S void-repo-nonfree 
xbps-install -S intel-ucode

# For AMD CPUs/GPUs
xbps-install -S linux-firmware-amd

After installing microcode updates, regenerate the boot images and exit:

xbps-reconfigure -fa

Desktop Installation (Optional)

If all you need is a minimal system or a server, you're done and ready to reboot. For a complete desktop environment, continue with the following steps.

Install Core Desktop Packages

xbps-install -S vim nano dbus elogind polkit xorg xorg-fonts xorg-video-drivers xorg-input-drivers dejavu-fonts-ttf terminus-font NetworkManager pipewire alsa-pipewire wireplumber xdg-user-dirs unzip gzip xz 7zip

Install KDE Plasma

xbps-install -S kde-plasma dolphin konsole firefox kdegraphics-thumbnailers ffmpegthumbs vlc ark kwrite discover kf6-purpose

Enable Services

ln -s /etc/sv/NetworkManager /etc/runit/runsvdir/default/
ln -s /etc/sv/dbus /etc/runit/runsvdir/default/
ln -s /etc/sv/udevd /etc/runit/runsvdir/default/
ln -s /etc/sv/polkitd /etc/runit/runsvdir/default/
ln -s /etc/sv/sddm /etc/runit/runsvdir/default/

Configure PipeWire Audio

mkdir -p /etc/xdg/autostart
ln -sf /usr/share/applications/pipewire.desktop /etc/xdg/autostart/

mkdir -p /etc/pipewire/pipewire.conf.d
ln -sf /usr/share/examples/wireplumber/10-wireplumber.conf /etc/pipewire/pipewire.conf.d/
ln -sf /usr/share/examples/pipewire/20-pipewire-pulse.conf /etc/pipewire/pipewire.conf.d/

mkdir -p /etc/alsa/conf.d
ln -sf /usr/share/alsa/alsa.conf.d/50-pipewire.conf /etc/alsa/conf.d
ln -sf /usr/share/alsa/alsa.conf.d/99-pipewire-default.conf /etc/alsa/conf.d

Enable Additional Repositories and Flatpak (Optional)

xbps-install -S void-repo-nonfree void-repo-multilib void-repo-multilib-nonfree

xbps-install -S flatpak
flatpak remote-add --if-not-exists flathub https://dl.flathub.org/repo/flathub.flatpakrepo

Create a Regular User and exit

For desktop use, create a non-root user with appropriate group memberships. Replace username with your desired username.

useradd -m username
passwd username
usermod username -G video,wheel,plugdev,kvm,audio,network
exit

Fix for NetworkManager

xchroot will bind mount /etc/resolv.conf and leave an empty file. Network Manager won't like it. So let's clean it up:

umount -l /mnt/etc/resolv.conf 2>/dev/null || true

rm -f /mnt/etc/resolv.conf
ln -s /run/NetworkManager/resolv.conf /mnt/etc/resolv.conf

Exit and Reboot

umount -n -R /mnt
zpool export zroot
reboot

Post-Installation

If everything went well, after entering your ZFS encryption password, you'll be greeted by the SDDM login screen.

Testing Hibernation

To verify that hibernation works correctly, you can clock the "Hibernate" button or:

loginctl hibernate

The system should power off. When you turn it back on, ZFSBootMenu will prompt for the password, unlock the swap partition, detect the hibernation image, and resume your session exactly where you left off.

If resume fails, check that: 1. The LUKS UUID in the ZFS commandline property matches your swap partition 2. The swap partition is large enough for your RAM 3. The dracut configuration includes the crypttab and keyfile

Conclusion

You now have a fully functional Void Linux system with native ZFS, full disk encryption, and working hibernation. The system is rolling, lightweight, and easy to maintain. Enjoy!

Restricting IP address access to specific ports in eBPF: a sketch

By: cks
8 March 2026 at 03:04

The other day I covered how I think systemd's IPAddressAllow and IPAddressDeny restrictions work, which unfortunately only allows you to limit this to specific (local) ports only if you set up the sockets for those ports in a separate systemd.socket unit. Naturally this raises the question of whether there is a good, scalable way to restrict access to specific ports in eBPF that systemd (or other interested parties) could use. I think the answer is yes, so here is a sketch of how I think you'd this.

Why we care about a 'scalable' way to do this is because systemd generates and installs its eBPF programs on the fly. Since tcpdump can do this sort of cross-port matching, we could write an eBPF program that did it directly. But such a program could get complex if we were matching a bunch of things, and that complexity might make it hard to generate on the fly (or at least make it complex enough that systemd and other programs didn't want to). So we'd like a way that still allows you to generate a simple eBPF program.

Systemd uses cgroup socket SKB eBPF programs, which attach to a cgroup and filter all network packets on ingress or egress. As far as I can understand from staring at code, these are implemented by extracting the IPv4 or IPv4 address of the other side from the SKB and then querying what eBPF calls a LPM (Longest Prefix Match) map. The normal way to use an LPM map is to use the CIDR prefix length and the start of the CIDR network as the key (for individual IPv4 addresses, the prefix length is 32), and then match against them, so this is what systemd's cgroup program does. This is a nicely scalable way to handle the problem; the eBPF program itself is basically constant, and you have a couple of eBPF maps (for the allow and deny sides) that systemd populates with the relevant information from IPAddressAllow and IPAddressDeny.

However, there's nothing in eBPF that requires the keys to be just CIDR prefixes plus IP addresses. A LPM map key has to start with a 32-bit prefix, but the size of the rest of the key can vary. This means that we can make our keys be 16 bits longer and stick the port number in front of the IP address (and increase the CIDR prefix size appropriately). So to match packets to port 22 from 128.100.0.0/16, your key would be (u32) 32 for the prefix length then something like 0x00 0x16 0x80 0x64 0x00 0x00 (if I'm doing the math and understanding the structure right). When you query this LPM map, you put the appropriate port number in front of the IP address.

This does mean that each separate port with a separate set of IP address restrictions needs its own set of map entries. If you wanted a set of ports to all have a common set of restrictions, you could use a normally structured LPM map and a second plain hash map where the keys are port numbers. Then you check the port and the IP address separately, rather than trying to combine them in one lookup. And there are more complex schemes if you need them.

Which scheme you'd use depends on how you expect port based access restrictions to be used. Do you expect several different ports, each with its own set of IP access restrictions (or only one port)? Then my first scheme is only a minor change from systemd's current setup, and it's easy to extend it to general IP address controls as well (just use a port number of zero to mean 'this applies to all ports'). If you expect sets of ports to all use a common set of IP access controls, or several sets of ports with different restrictions for each set, then you might want a scheme with more maps.

(In theory you could write this eBPF program and set up these maps yourself, then use systemd resource control features to attach them to your .service unit. In practice, at that point you probably should write host firewall rules instead, it's likely to be simpler. But see this blog post and the related VCS repository, although that uses a more hard-coded approach.)

Your terminal program has to be where xterm's ziconbeep feature is handled

By: cks
7 March 2026 at 03:26

I recently wrote about things that make me so attached to xterm. One of those things is xterm's ziconbeep feature, which causes xterm to visibly and perhaps audibly react when it's iconified or minimized and gets output. A commentator suggested that this feature should ideally be done in the window manager, where it could be more general. Unfortunately we can't do the equivalent of ziconbeep in the window manager, or at least we can't do all of it.

A window manager can sound an audible alert when a specific type of window changes its title in a certain way. This would give us the 'beep' part of ziconbeep in a general way, although we're treading toward a programmable window manager. But then, Gnome Shell now does a lot of stuff in JavaScript and its extensions are written in JS and the whole thing doesn't usually blow up. So we've got prior art for writing an extension that reacts to window title changes and does stuff.

What the window manager can't really do is reliably detect when the window has new output, in order to trigger any beeping and change the visible window title. As far as I know, neither X nor Wayland give you particularly good visibility into whether the program is rendering things, and in some ways of building GUIs, you're always drawing things. In theory, a program might opt to detect that it's been minimized and isn't visible and so not render any updates at all (although it will be tracking what to draw for when it's not minimized), but in practice I think this is unfashionable because it gets in the way of various sorts of live previews of minimized windows (where you want the window's drawing surface to reflect its current state).

Another limitation of this as a general window manager feature is that the window manager doesn't know what changes in the appearance of a window are semantically meaningful and which ones are happening because, for example, you just changed some font preference and the program is picking up on that. Only the program itself knows what's semantically meaningful enough to signal for people's attention. A terminal program can have a simple definition but other programs don't necessarily; your mail client might decide that only certain sorts of new email should trigger a discreet 'pay attention to me' marker.

(Even in a terminal program you might want more control over this than xterm gives you. For example, you might want the terminal program to not trigger 'zicon' stuff for text output but instead to do it when the running program finishes and you return to the shell prompt. This is best done by being able to signal the terminal program through escape sequences.)

How I think systemd IP address restrictions on socket units works

By: cks
6 March 2026 at 04:43

Among the systemd resource controls are IPAddressAllow= and IPAddressDeny=, which allow you to limit what IP addresses your systemd thing can interact with. This is implemented with eBPF. A limitation of these as applied to systemd .service units is that they restrict all traffic, both inbound connections and things your service initiates (like, say, DNS lookups), while you may want only a simple inbound connection filter. However, you can also set these on systemd.socket units. If you do, your IP address restrictions apply only to the socket (or sockets), not to the service unit that it starts. To quote the documentation:

Note that for socket-activated services, the IP access list configured on the socket unit applies to all sockets associated with it directly, but not to any sockets created by the ultimately activated services for it.

So if you have a systemd socket activated service, you can control who can access the socket without restricting who the service itself can talk to.

In general, systemd IP access controls are done through eBPF programs set up on cgroups. If you set up IP access controls on a socket, such as ssh.socket in Ubuntu 24.04, you do get such eBPF programs attached to the ssh.socket cgroup (and there is a ssh.socket cgroup, perhaps because of the eBPF programs):

# pwd
/sys/fs/cgroup/system.slice
# bpftool cgroup list ssh.socket
ID  AttachType      AttachFlags  Name
12  cgroup_inet_ingress   multi  sd_fw_ingress
11  cgroup_inet_egress    multi  sd_fw_egress

However, if you look there are no processes or threads in the ssh.socket cgroup, which is not really surprising but also means there is nothing there for these eBPF programs to apply to. And if you dump the eBPF program itself (with 'ebpftool dump xlated id 12'), it doesn't really look like it checks for the port number.

What I think must be going on is that the eBPF filtering program is connected to the SSH socket itself. Since I can't find any relevant looking uses in the systemd code of the `SO_ATTACH_*' BPF related options from socket(7) (which would be used with setsockopt(2) to directly attach programs to a socket), I assume that what happens is that if you create or perhaps start using a socket within a cgroup, that socket gets tied to the cgroup and its eBPF programs, and this attachment stays when the socket is passed to another program in a different cgroup.

(I don't know if there's any way to see what eBPF programs are attached to a socket or a file descriptor for a socket.)

If this is what's going on, it unfortunately means that there's no way to extend this feature of socket units to get per-port IP access control in .service units. Systemd isn't writing special eBPF filter programs for socket units that only apply to those exact ports, which you could in theory reuse for a service unit; instead, it's arranging to connect (only) specific sockets to its general, broad IP access control eBPF programs. Programs that make their own listening sockets won't be doing anything to get eBPF programs attached to them (and only them), so we're out of luck.

(One could experiment with relocating programs between cgroups, with the initial cgroup in which the program creates its listening sockets restricted and the other not, but I will leave that up to interested parties.)

The things that make me so attached to xterm as my terminal program

By: cks
2 March 2026 at 04:27

I've said before in various contexts (eg) that I'm very attached to the venerable xterm as my terminal (emulator) program, and I'm not looking forward to the day that I may have to migrate away from it due to Wayland (although I probably can keep running it under XWayland, now that I think about it). But I've never tried to write down a list of the things that make me so attached to it over other alternatives like urxvt, much less more standard ones like gnome-terminal. Today I'm going to try to do that, although my list is probably going to be incomplete.

  • Xterm's ziconbeep feature, which I use heavily. Urxvt can have an equivalent but I don't know if other terminal programs do.

  • I routinely use xterm's very convenient way of making large selections, which is supported in urxvt but not in gnome-terminal (and it can't be since gnome-terminal uses mouse button 3 for its own purposes).

  • The ability to turn off all terminal colours, because they often don't work in my preferred terminal colours. Other terminal programs have somewhat different and sometimes less annoying colours, but it's still far to easy for programs to display things in unreadable colours.

    Yes, I can set my shell environment and many programs to not use colours, but I can't set all of them; some modern programs simply always use colours on terminals. Xterm can be set to completely ignore them.

  • I'm very used to xterm's specific behavior when it comes to what is a 'word' for double-click selection. You can read the full details in the xterm manual page's section on character classes. I'm not sure if it's possible to fully emulate this behavior in other terminal programs; I once made an incomplete attempt in urxvt, while gnome-terminal is quite different and has little or no options for customizing that behavior (in the Gnome way). Generally the modern double click selection behavior is too broad for me.

    (For instance, I'm extremely attached to double-click selecting only individual directories in full paths, rather than the entire thing. I can always swipe to select an entire path, but if I can't pick out individual path elements with a double click my only choice is character by character selection, which is a giant pain.)

    Based on a quick experiment, I think I can make KDE's konsole behave more or less the way I want by clearing out its entire set of "Word characters" in profiles. I think this isn't quite how xterm behaves but it's probably close enough for my reflexes.

  • Xterm doesn't treat text specially because of its contents, for example by underlining URLs or worse, hijacking clicks on them to do things. I already have well evolved systems for dealing with things like URLs and I don't want my terminal emulator to provide any 'help'. I believe that KDE's konsole can turn this off, but gnome-terminal doesn't seem to have any option for it.

  • Many of xterm's behaviors can be controlled from command line switches. Some other terminal emulators (like gnome-terminal) force you to bundle these behaviors together as 'profiles' and only let you select a profile. Similarly, a lot of xterm's behavior can be temporarily changed on the fly through its context menus, without having to change the profile's settings (and then change them back).

  • Every xterm window is a completely separate program that starts from scratch, and xterm is happy to run on remote servers without complications; this isn't something I can say for all other competitors. Starting from scratch also means things like not deciding to place yourself where your last window was, which is konsole's behavior (and infuriates me).

Of these, the hardest two to duplicate are probably xterm's double click selection behavior of what is a word and xterm's large selection behavior. The latter is hard because it requires the terminal program to not use mouse button 3 for a popup menu.

I use some other xterm features, like key binding, including duplicating windows, but I could live without them, especially if the alternate terminal program directly supports modern cut and paste in addition to xterm's traditional style. And I'm accustomed to a few of xterm's special control characters, especially Ctrl-space, but I think this may be pretty universally supported by now (Ctrl-space is in gnome-terminal).

There are probably things that other terminal programs like konsole, gnome-terminal and so on do that I don't want them to (and that xterm doesn't). But since I don't use anything other than xterm (and a bit of gnome-terminal and once in a while a bit of urxvt), I don't know what those undesired features are. Experimenting with konsole for this entry taught me some things I definitely don't want, such as it automatically placing itself where it was before (including placing a new konsole window on top of one of the existing ones, if you have multiple ones).

(This elaborates on a comment I made elsewhere.)

On the Bourne shell's distinction between shell variables and exported ones

By: cks
28 February 2026 at 03:44

One of the famous things that people run into with the Bourne shell is that it draws a distinction between plain shell variables and special exported shell variables, which are put into the environment of processes started by the shell. This distinction is a source of frustration when you set a variable, run a program, and the program doesn't have the variable available to it:

$ GODEBUG=...
$ go-program
[doesn't see your $GODEBUG setting]

It's also a source of mysterious failures, because more or less all of the environment variables that are present automatically become exported shell variables. So whether or not 'GODEBUG=..; echo running program; go-program' works can depend on whether $GODEBUG was already set when your shell started. The environment variables of regular shell sessions are usually fairly predictable, but the environment variables present when shell scripts get run can be much more varied. This makes it easy to write a shell script that only works right for you, because in your environment it runs with certain environment variables set and so they automatically become exported shell variables.

I've told you all of that because despite these pains, I believe that the Bourne shell made the right choice here, in addition to a pragmatically necessary choice at the time it was created, in V7 (Research) Unix. So let's start with the pragmatics.

The Bourne shell was created along side environment variables themselves, and on the comparatively small machines that V7 ran on, you didn't have much room for the combination of program arguments and the new environment. If either grew too big, you got 'argument list too long' when you tried to run programs. This made it important to minimize and control the size of the environment that the shell gave to new processes. If you want to do that without limiting the use of shell variables so much, a split between plain shell variables and exported ones makes sense and requires only a minor bit of syntax (in the form of 'export').

Both machines and exec() size limits are much larger now, so you might think that getting rid of the distinction is a good thing. The Bell Labs Research Unix people thought so, so they did do this in Tom Duff's rc shell for V10 Unix and Plan 9. Having used both the Bourne shell and a version of rc for many years, I both agree and disagree with them.

For interactive use, having no distinction between shell variables and exported shell variables is generally great. If I set $GODEBUG, $PYTHONPATH, or any number of any other environment variables that I want to affect programs I run, I don't have to remember to do a special 'export' dance; it just works. This is a sufficiently nice (and obvious) thing that it's an option for the POSIX 'sh', in the form of 'set -a' (and this set option is present in more or less all modern Bourne shells, including Bash).

('Set -a' wasn't in the V7 sh, but I haven't looked to see where it came from. I suspect that it may have come from ksh, since POSIX took a lot of the specification for their 'sh' from ksh.)

For shell scripting, however, not having a distinction is messy and sometimes painful. If I write an rc script, every shell variable that I use to keep track of something will leak into the environment of programs that I run. The shell variables for intermediate results, the shell variables for command line options, the shell variables used for for loops, you name it, it all winds up in the environment unless I go well out of my way to painfully scrub them all out. For shell scripts, it's quite useful to have the Bourne shell's strong distinction between ordinary shell variables, which are local to your script, and exported shell variables, which you deliberately act to make available to programs.

(This comes up for shell scripts and not for interactive use because you commonly use a lot more shell variables in shell scripts than you do in interactive sessions.)

For a new Unix shell today that's made primarily or almost entirely for interactive use, automatically exporting shell variables into the environment is probably the right choice. If you wanted to be slightly more selective, you could make it so that shell variables with upper case names are automatically exported and everything else can be manually exported. But for a shell that's aimed at scripting, you want to be able to control and limit variable scope, only exporting things that you explicitly want to.

Systemd resource controls on user.slice and system.slice work fine

By: cks
25 February 2026 at 03:54

We have a number of systems where we traditionally set strict overcommit handling, and for some time this has caused us some heartburn. Some years ago I speculated that we might want to use resource controls on user.slice or systemd.slice if they worked, and then recently in a comment here I speculated that this was the way to (relatively) safely limit memory use if it worked.

Well, it does (as far as I can tell, without deep testing). If you want to limit how much of the system's memory people who log in can use so that system services don't explode, you can set MemoryMin= on system.slice to guarantee some amount of memory to it and all things under it. Alternately, you can set MemoryMax= on user.slice, collectively limiting all user sessions to that amount of memory. In either case my view is that you might want to set MemorySwapMax= on user.slice so that user sessions don't spend all of their time swapping. Which one you set things on depends on which is easier and you trust more; my inclination is MemoryMax, although that means you need to dynamically size it depending on this machine's total memory.

(If you want to limit user memory use you'll need to make sure that things like user cron jobs are forced into user sessions, rather than running under cron.service in system.slice.)

Of course this is what you should expect, given systemd's documentation and the kernel documentation. On the other hand, the Linux kernel cgroup and memory system is sufficiently opaque and ever changing that I feel the need to verify that things actually do work (in our environment) as I expect them to. Sometimes there are surprises, or settings that nominally work but don't really affect things the way I expect.

This does raise the question of how much memory you want to reserve for the system. It would be nice if you could use systemd-cgtop to see how much memory your system.slice is currently using, but unfortunately the number it will show is potentially misleadingly high. This is because the memory attributed to any cgroup includes (much) more than program RAM usage. For example, on our it seems typical for system.slice to be using under a gigabyte of 'user' RAM but also several gigabytes of filesystem cache and other kernel memory. You probably want to allow for some of that in what memory you reserve for system.slice, but maybe not all of the current usage.

(You can get the current version of the 'memdu' program I use as memdu.py.)

Gnome, GSettings, gconf, and which one you want

By: cks
24 February 2026 at 03:22

On the Fediverse a while back, I said:

Ah yes, GNOME, it is of course my mistake that I used gconf-editor instead of dconf-editor. But at least now Gnome-Terminal no longer intercepts F11, so I can possibly use g-t to enter F11 into serial consoles to get the attention of a BIOS. If everything works in UEFI land.

Gnome has had at least two settings systems, GSettings/dconf (also) and the older GConf. If you're using a modern Gnome program, especially a standard Gnome program like gnome-terminal, it will use GSettings and you will want to use dconf-editor to modify its settings outside of whatever Preferences dialogs it gives you (or doesn't give you). You can also use the gsettings or dconf programs from the command line.

(This can include Gnome-derived desktop environments like Cinnamon, which has updated to using GSettings.)

If the program you're using hasn't been updated to the latest things that Gnome is doing, for example Thunderbird (at least as of 2024), then it will still be using GConf. You need to edit its settings using gconf-editor or gconftool-2, or possibly you'll need to look at the GConf version of general Gnome settings. I don't know if there's anything in Gnome that synchronizes general Gnome GSettings settings into GConf settings for programs that haven't yet been updated.

(This is relevant for programs, like Thunderbird, that use general Gnome settings for things like 'how to open a particular sort of thing'. Although I think modern Gnome may not have very many settings for this because it always goes to the GTK GIO system, based on the Arch Wiki's page on Default Applications.)

Because I've made this mistake between gconf-editor and dconf-editor more than once, I've now created a personal gconf-editor cover script that prints an explanation of the situation when I run it without a special --really argument. Hopefully this will keep me sorted out the next time I run gconf-editor instead of dconf-editor.

PS: Probably I want to use gsettings instead of dconf-editor and dconf as much as possible, since gsettings works through the GSettings layer and so apparently has more safety checks than dconf-editor and dconf do.

PPS: Don't ask me what the equivalents are for KDE. KDE settings are currently opaque to me.

Testing Linux memory limits is a bit of a pain

By: cks
13 February 2026 at 04:23

For reasons outside of the scope of this entry, I want to test how various systemd memory resource limits work and interact with each other (which means that I'm really digging into cgroup v2 memory controls). When I started trying to do this, it turned out that I had no good test program (or programs), although I had some ones that gave me partial answers.

There are two complexities in memory usage testing programs in a cgroups environment. First, you may be able to allocate more memory than you can actually use, depending on your system's settings for strict overcommit. So it's not enough to see how much memory you can allocate using the mechanism of your choice (I tend to use mmap() rather than go through language allocators). After you've either determined how much memory you can allocate or allocated your target amount, you have to at least force the kernel to materialize your memory by writing something to every page of it. Since the kernel can probably swap out some amount of your memory, you may need to keep repeatedly reading all of it.

The second issue is that if you're not in strict overcommit (and sometimes even if you are), the kernel can let you allocate more memory than you can actually use and then you try to use it, hit you with the OOM killer. For my testing, I care about the actual usable amount of memory, not how much memory I can allocate, so I need to deal with this somehow (and this is where my current test programs are inadequate). Since the OOM killer can't be caught by a process (that's sort of the point), the simple approach is probably to have my test program progressively report on how much memory its touched so far, so I can see how far it got before it was OOM-killed. A more complex approach would be to do the testing in a child process with progress reports back to the parent so it could try to narrow in on how much it could use rather than me guessing that I wanted progress reports every, say, 16 MBytes or 32 MBytes of memory touching.

(Hopefully the OOM killer would only kill the child and not the parent, but with the OOM killer you can never be sure.)

I'm probably not the first person to have this sort of need, so I suspect that other people have written test programs and maybe even put them up somewhere. I don't expect to be able to find them in today's ambient Internet search noise, plus this is very close to the much more popular issue of testing your RAM memory.

(Will I put up my little test program when I hack it up? Probably not, it's too much work to do it properly, with actual documentation and so on. And these days I'm not very enthused about putting more repositories on Github, so I'd need to find some alternate place.)

Undo in Vi and its successors, and my views on the mess

By: cks
12 February 2026 at 04:19

The original Bill Joy vi famously only had a single level of undo (which is part of what makes it a product of its time). The 'u' command either undid your latest change or it redid the change, undo'ing your undo. When POSIX and the Single Unix Specification wrote vi into the standard, they required this behavior; the vi specification requires 'u' to work the same as it does in ex, where it is specified as:

Reverse the changes made by the last command that modified the contents of the edit buffer, including undo.

This is one particular piece of POSIX compliance that I think everyone should ignore.

Vim and its derivatives ignore the POSIX requirement and implement multi-level undo and redo in the usual and relatively obvious way. The vim 'u' command only undoes changes but it can undo lots of them, and to redo changes you use Ctrl-r ('r' and 'R' were already taken). Because 'u' (and Ctrl-r) are regular commands they can be used with counts, so you can undo the last 10 changes (or redo the last 10 undos). Vim can be set to vi compatible behavior if you want. I believe that vim's multi-level undo and redo is the default even when it's invoked as 'vi' in an unconfigured environment, but I can't fully test that.

Nvi has opted to remain POSIX compliant and operate in the traditional vi way, while still supporting multi-level undo. To get multi-level undo in nvi, you extend the first 'u' with '.' commands, so 'u..' undoes the most recent three changes. The 'u' command can be extended with '.' in either of its modes (undo'ing or redo'ing), so 'u..u..' is a no-op. The '.' operation doesn't appear to take a count in nvi, so there is no way to do multiple undos (or redos) in one action; you have to step through them by hand. I'm not sure how nvi reacts if you want do things like move your cursor position during an undo or redo sequence (my limited testing suggests that it can perturb the sequence, so that '.' now doesn't continue undoing or redoing the way vim will continue if you use 'u' or Ctrl-r again).

The vi emulation package evil for GNU Emacs inherits GNU Emacs' multi-level undo and nominally binds undo and redo to 'u' and Ctrl-r respectively. However, I don't understand its actual stock undo behavior. It appears to do multi-level undo if you enter a sequence of 'u' commands and accepts a count for that, but it feels not vi or vim compatible if you intersperse 'u' commands with things like cursor movement, and I don't understand redo at all (evil has some customization settings for undo behavior, especially evil-undo-system). I haven't investigated Evil extensively and this undo and redo stuff makes me less likely to try using it in the future.

The BusyBox implementation of vi is minimal but it can be built with support for 'u' and multi-level undo, which is done by repeatedly invoking 'u'. It doesn't appear to have any redo support, which makes a certain amount of sense in an environment when your biggest concern may be reverting things so they're no worse than they started out. The Ubuntu and Fedora versions of busybox appear to be built this way, but your distance may vary on other Linuxes.

My personal view is that the vim undo and redo behavior is the best and most human friendly option. Undo and redo are predictable and you can predictably intersperse undo and redo operations with other operations that don't modify the buffer, such as moving the cursor, searching, and yanking portions of text. The nvi behavior essentially creates a special additional undo mode, where you have to remember that you're in a sequence of undo or redo operations and you can't necessarily do other vi operations in the middle (such as cursor movement, searches, or yanks). This matters a lot to me because I routinely use multi-level undo when I'm writing text to rewind my buffer to a previous state and yank out some wording that I've decided I like better than its replacement.

(For additional vi versions, on the Fediverse, I was also pointed to nextvi, which appears to use vim's approach to undo and redo; I believe neatvi also does this but I can't spot any obvious documentation on it. There are vi-inspired editors such as vile and vis, but they're not things people would normally use as a direct replacement for vi. I believe that vile follows the nvi approach of 'u.' while vis follows the vim model of 'uu' and Ctrl-r.)

Systemd and blocking connections to localhost, including via 'any'

By: cks
9 February 2026 at 04:21

I recently discovered a surprising path to accessing localhost URLs and services, where instead of connecting to 127.0.0.1 or the IPv6 equivalent, you connected to 0.0.0.0 (or the IPv6 equivalent). In that entry I mentioned that I didn't know if systemd's IPAddressDeny would block this. I've now tested this, and the answer is that systemd's restrictions do block this. If you set 'IPAddressDeny=localhost', the service or whatever is blocked from the 0.0.0.0 variation as well (for both outbound and inbound connections). This is exactly the way it should be, so you might wonder why I was uncertain and felt I needed to test it.

There are a variety of ways at different levels that you might implement access controls on a process (or a group of processes) in Linux, for IP addresses or anything else. For example, you might create an eBPF program that filtered the system calls and system call arguments allowed and attach it to a process and all of its children using seccomp(2). Alternately, for filtering IP connections specifically, you might use a cgroup socket address eBPF program (also), which are among the the cgroup program types that are available. Or perhaps you'd prefer to use a cgroup socket buffer program.

How a program such as systemd implements filtering has implications for what sort of things it has to consider and know about when doing the filtering. For example, if we reasonably conclude that the kernel will have mapped 0.0.0.0 to 127.0.0.1 by the time it invokes cgroup socket address eBPF programs, such a program doesn't need to have any special handling to block access to localhost by people using '0.0.0.0' as the target address to connect to. On the other hand, if you're filtering at the system call level, the kernel has almost certainly not done such mapping at the time it invokes you, so your connect() filter had better know that '0.0.0.0' is equivalent to 127.0.0.1 and it should block both.

This diversity is why I felt I couldn't be completely sure about systemd's behavior without actually testing it. To be honest, I didn't know what the specific options were until I researched them for this entry. I knew systemd used eBPF for IPAddressDeny (because it mentions that in the manual page in passing), but I vaguely knew there are a lot of ways and places to use eBPF and I didn't know if systemd's way needed to know about 0.0.0.0 or if systemd did know.

Sidebar: What systemd uses

As I found out through use of 'bpftool cgroup list /sys/fs/cgroup/<relevant thing>' on a systemd service that I knew uses systemd IP address filtering, systemd uses cgroup socket buffer programs, and is presumably looking for good and bad IP addresses and netblocks in those programs. This unfortunately means that it would be hard for systemd to have different filtering for inbound connections as opposed to outgoing connections, because at the socket buffer level it's all packets.

(You'd have to go up a level to more complicated filters on socket address operations.)

The original vi is a product of its time (and its time has passed)

By: cks
8 February 2026 at 03:50

Recently I saw another discussion of how some people are very attached to the original, classical vi and its behaviors (cf). I'm quite sympathetic to this view, since I too am very attached to the idiosyncratic behavior of various programs I've gotten used to (such as xterm's very specific behavior in various areas), but at the same time I had a hot take over on the Fediverse:

Hot take: basic vim (without plugins) is mostly what vi should have been in the first place, and much of the differences between vi and vim are improvements. Multi-level undo and redo in an obvious way? Windows for easier multi-file, cross-file operations? Yes please, sign me up.

Basic vi is a product of its time, namely the early 1980s, and the rather limited Unix machines of the time (yes a VAX 11/780 was limited).

(The touches of vim superintelligence, not so much, and I turn them off.)

For me, vim is a combination of genuine improvements in vi's core editing behavior (cf), frustrating (to me) bits of trying too hard to be smart (which I mostly disable when I run across them), and an extension mechanism I ignore but people use to make vim into a superintelligent editor with things like LSP integrations.

Some of the improvements and additions to vi's core editing may be things that Bill Joy either didn't think of or didn't think were important enough. However, I feel strongly that some or even many of omitted features and differences are a product of the limited environments vi had to operate in. The poster child for this is vi's support of only a single level of undo, which drastically constrains the potential memory requirements (and implementation complexity) of undo, especially since a single editing operation in vi can make sweeping changes across a large file (consider a whole-file ':...s/../../' substitution, for example).

(The lack of split windows might be one part memory limitations and one part that splitting an 80 by 24 serial terminal screen is much less useful than splitting, say, an 80 by 50 terminal window.)

Vim isn't the only improved version of vi that has added features like multi-level undo and split windows so you can see multiple files at once (or several parts of the same file); there's also at least nvi. I'm used to vim so I'm biased, but I happen to think that a lot of vim's choices for things like multi-level undo are good ones, ones that will be relatively obvious and natural to new people and avoid various sorts of errors and accidents. But other people like nvi and I'm not going to say they're wrong.

I do feel strongly that giving stock vi to anyone who doesn't specifically ask for it is doing them a disservice, and this includes installing stock vi as 'vi' on new Unix installs. At this point, what new people are introduced to and what is the default on systems should be something better and less limited than stock vi. Time has moved on and Unix systems should move on with it.

(I have similar feelings about the default shell for new accounts for people, as opposed to system accounts. Giving people bare Bourne shell is not doing them any favours and is not likely to make a good first impression. I don't care what you give them but it should at least support cursor editing, file completion, and history, and those should be on by default.)

PS: I have complicated feelings about Unixes that install stock vi as 'vi' and something else under its full name, because on the one hand that sounds okay but on the other hand there is so much stuff out there that says to use 'vi' because that's the one name that's universal. And if you then make 'vi' the name of the default (visual) editor, well, it certainly feels like you're steering new people into it and doing them a disservice.

(I don't expect to change the mind of any Unix that is still shipping stock vi as 'vi'. They've made their cultural decisions a long time ago and they're likely happy with the results.)

Early Linux package manager history and patching upstream source releases

By: cks
1 February 2026 at 03:19

One of the important roles of Linux system package managers like dpkg and RPM is providing a single interface to building programs from source even though the programs may use a wide assortment of build processes. One of the source building features that both dpkg and RPM included (I believe from the start) is patching the upstream source code, as well as providing additional files along with it. My impression is that today this is considered much less important in package managers, and some may make it at least somewhat awkward to patch the source release on the fly. Recently I realized that there may be a reason for this potential oddity in dpkg and RPM.

Both dpkg and RPM are very old (by Linux standards). As covered in Andrew Nesbitt's Package Manager Timeline, both date from the mid-1990s (dpkg in January 1994, RPM in September 1995). Linux itself was quite new at the time and the Unix world was still dominated by commercial Unixes (partly because the march of x86 PCs was only just starting). As a result, Linux was a minority target for a lot of general Unix free software (although obviously not for Linux specific software). I suspect that this was compounded by limitations in early Linux libc, where apparently it had some issues with standards (see eg this, also, also, also).

As a minority target, I suspect that Linux regularly had problems compiling upstream software, and for various reasons not all upstreams were interested in fixing (or changing) that (especially if it involved accepting patches to cope with a non standards compliant environment; one reply was to tell Linux to get standards compliant). This probably left early Linux distributions regularly patching software in order to make it build on (their) Linux, leading to first class support for patching upstream source code in early package managers.

(I don't know for sure because at that time I wasn't using Linux or x86 PCs, and I might have been vaguely in the incorrect 'Linux isn't Unix' camp. My first Linux came somewhat later.)

These days things have changed drastically. Linux is much more standards compliant and of course it's a major platform. Free software that works on non-Linux Unixes but doesn't build cleanly on Linux is a rarity, so it's much easier to imagine (or have) a package manager that is focused on building upstream source code unaltered and where patching is uncommon and not as easy (or trivial) as dpkg and RPM make it.

(You still need to be able to patch upstream releases to handle security patches and so on, since projects don't necessarily publish new releases for them. I believe some projects simply issue patches and tell you to apply them to their current release. And you may have to backport a patch yourself if you're sticking on an older release of the project that they no longer do patches for.)

Making a FreeBSD system have a serial console on its second serial port

By: cks
31 January 2026 at 04:57

Over on the Fediverse I said:

Today's other work achievement: getting a UEFI booted FreeBSD 15 machine to use a serial console on its second serial port, not its first one. Why? Because the BMC's Serial over Lan stuff appears to be hardwired to the second serial port, and life is too short to wire up physical serial cables to test servers.

The basics of serial console support for your FreeBSD machine are covered in the loader.conf manual page, under the 'console' setting (in the 'Default Settings' section). But between UEFI and FreeBSD's various consoles, things get complicated, and for me the manual pages didn't do a great job of putting the pieces together clearly. So I'll start with my descriptions of all of the loader.conf variables that are relevant:

console="efi,comconsole"
Sets both the bootloader console and the kernel console to both the EFI console and the serial port, by default COM1 (ttyu0, Linux ttyS0). This is somewhat harmful if your UEFI BIOS is already echoing console output to the serial port (or at least to the serial port you want); you'll get doubled serial output from the FreeBSD bootloader, but not doubled output from the kernel.

boot_multicons="YES"
As covered in loader_simp(8), this establishes multiple low level consoles for kernel messages. It's not necessary if your UEFI BIOS is already echoing console output to the serial port (and the bootloader and kernel can recognize this), but it's harmless to set it just in case.

comconsole_speed="115200"
Sets the serial console speed (and in theory 115200 is the default). It's not necessary if the UEFI BIOS has set things up but it's harmless. See loader_simp(8) again.

comconsole_port="0x2f8"
Sets the serial port used to COM2. It's not necessary if the UEFI BIOS has set things up, but again it's harmless. You can use 0x3f8 to specify COM1, although it's the default. See loader_simp(8).

hw.uart.console="io:0x2f8,br:115200"
This tells the kernel where the serial console is and what baud rate it's at, here COM2 and 115200 baud. The loader will automatically set it for you if you set the comconsole_* variables, either because you also need a 'console=' setting or because you're being redundant. See loader.efi(8) (and then loader_simp(8) and uart(4)).

(That the loader does this even without a 'comconsole' in your nonexistent 'console=' line may some day be considered a bug and fixed.)

If they agree with each other, you can safely set both hw.uart.console and the comconsole_* variables.

On a system where the UEFI BIOS isn't echoing the UEFI console output to a serial port, the basic version of FreeBSD using both the video console (settings for which are in vt(4)) and the serial console (on the default of COM1), with the primary being the video console, is a loader.conf setting of:

console="efi,comconsole"
boot_multicons="YES"

This will change both the bootloader console and the kernel console after boot. If your UEFI BIOS is already echoing 'console' output to the serial port, bootloader output will be doubled and you'll get to see fun bootloader output like:

LLooaaddiinngg  ccoonnffiigguurreedd  mmoodduulleess......

If you see this (or already know that your UEFI BIOS is doing this), the minimal alternate loader.conf settings (for COM1) are:

# for COM1 / ttyu0
hw.uart.console="io:0x3f8,br:115200"

(The details are covered in loader.efi(8)'s discussion of console considerations.)

If you don't need a 'console=' setting because of your UEFI BIOS, you must set either hw.uart.console or the comconsole_* settings. Technically, setting hw.uart.console is the correct approach; that setting only comconsole_* still works may be a bug.

If you don't explicitly set a serial port to use, FreeBSD will use COM1 (ttyu0, Linux ttyS0) for the bootloader and kernel. This is only possible if you're using 'console=', because otherwise you have to directly or indirectly set 'hw.uart.console', which directly tells the kernel which serial port to use (and the bootloader will use whatever UEFI tells it to). To change the serial port to COM2, you need to set the appropriate one of 'comconsole_port' and 'hw.uart.console' from 0x3f8 (COM1) to the right PC port value of 0x2f8.

So our more or less final COM2 /boot/loader.conf for a case where you can turn off or ignore the BIOS echoing to the serial console is:

console="efi,comconsole"
boot_multicons="YES"
comconsole_speed="115200"
# For the COM2 case
comconsole_port="0x2f8"

If your UEFI BIOS is already echoing 'console' output to the serial port, the minimal version of the above (again for COM2) is:

# For the COM2 case
hw.uart.console="io:0x2f8,br:115200"

(As with Linux, the FreeBSD kernel will only use one serial port as the serial console; you can't send kernel messages to two serial ports. FreeBSD at least makes this explicit in its settings.)

As covered in conscontrol and elsewhere, FreeBSD has a high level console, represented by /dev/console, and a low level console, used directly by the kernel for things like kernel messages. The high level console can only go to one device, normally the first one; this is either the first one in your 'console=' line or whatever UEFI considers the primary console. The low level console can go to multiple devices. Unlike Linux, this can be changed on the fly once the system is up through conscontrol (and also have its state checked).

Conveniently, you don't need to do anything to start a serial login on your chosen console serial port. All four possible (PC) serial ports, /dev/ttyu0 through /dev/ttyu3, come pre-set in /etc/ttys with 'onifconsole' (and 'secure'), so that if the kernel is using one of them, there's a getty started on it. I haven't tested what happens if you use conscontrol to change the console on the fly.

Booting FreeBSD on a UEFI based system is covered through the manual page series of uefi(8), boot(8), loader.efi(8), and loader(8). It's not clear to me if loader.efi is the EFI specific version of loader(8), or if the one loads and starts the other in a multi-stage boot process. I suspect it's the former.

Sidebar: What we may wind up with in loader.conf

Here's what I think is a generic commented block for serial console support:

# Uncomment if the UEFI BIOS does not echo to serial port
#console="efi,comconsole"
boot_multicons="YES"
comconsole_speed="115200"
# Uncomment for COM2
#comconsole_port="0x2f8"
# change 0x3f8 (COM1) to 0x2f8 for COM2
hw.uart.console="io:0x3f8,br:115200"

All of this works for me on FreeBSD 15, but your distance may vary.

Why Linux wound up with system package managers

By: cks
29 January 2026 at 04:37

Yesterday I discussed the two sorts of program package managers, system package managers that manage the whole system and application package managers that mostly or entirely manage third party programs. Commercial Unix got application package managers in the very early 1990s, but Linux's first program managers were system package managers, in dpkg and RPM (or at least those seem to be the first Linux package managers).

The abstract way to describe why is to say that Linux distributions had to assemble a whole thing from separate pieces; the kernel came from one place, libc from another, coreutils from a third, and so on. The concrete version is to think about what problems you'd have without a package manager. Suppose that you assembled a directory tree of all of the source code of the kernel, libc, coreutils, GCC, and so on. Now you need to build all of these things (or rebuild, let's ignore bootstrapping for the moment).

Building everything is complicated partly because everything goes about it differently. The kernel has its own configuration and build system, a variety of things use autoconf but not necessarily with the same set of options to control things like features, GCC has a multi-stage build process, Perl has its own configuration and bootstrapping process, X is frankly weird and vaguely terrifying, and so on. Then not everyone uses 'make install' to actually install their software, so you have another set of variations for all of this.

(The less said about the build processes for either TeX or GNU Emacs in the early to mid 1990s, the better.)

If you do this at any scale, you need to keep track of all of this information (cf) and you want a uniform interface for 'turn this piece into a compiled and ready to unpack blob'. That is, you want a source package (which encapsulates all of the 'how to do it' knowledge) and a command that takes a source package and does a build with it. Once you're building things that you can turn into blobs, it's simpler to always ship a new version of the blob whenever you change anything.

(You want the 'install' part of 'build and install' to result in a blob rather than directly installing things on your running system because until it finishes, you're not entirely sure the build and install has fully worked. Also, this gives you an easy way to split overall system up into multiple pieces, some of which people don't have to install. And in the very early days, to split them across multiple floppy disks, as SLS did.)

Now you almost have a system package manager with source packages and binary packages. You're building all of the pieces of your Linux distribution in a standard way from something that looks a lot like source packages, and you pretty much want to create binary blobs from them rather than dump everything into a filesystem. People will obviously want a command that takes a binary blob and 'installs' it by unpacking it on their system (and possibly extra stuff), rather than having to run 'tar whatever' all the time themselves, and they'll also want to automatically keep track of which of your packages they've installed rather than having to keep their own records. Now you have all of the essential parts of a system package manager.

(Both dpkg and RPM also keep track of which package installed what files, which is important for upgrading and removing packages, along with things having versions.)

Scraping the FreeBSD 'mpd5' daemon to obtain L2TP VPN usage data

By: cks
26 January 2026 at 04:00

We have a collection of VPN servers, some OpenVPN based and some L2TP based. They used to be based on OpenBSD, but we're moving from OpenBSD to FreeBSD and the VPN servers recently moved too. We also have a system for collecting Prometheus metrics on VPN usage, which worked by parsing the output of things. For OpenVPN, our scripts just kept working when we switched to FreeBSD because the two OSes use basically the same OpenVPN setup. This was not the case for our L2TP VPN server.

OpenBSD does L2TP using npppd, which supports a handy command line control program, npppctl, that can readily extract and report status information. On FreeBSD, we wound up using mpd5. Unfortunately, mpd5 has no equivalent of npppctl. Instead, as covered (sort of) in its user manual you get your choice of a TCP based console that's clearly intended for interactive use and a web interface that is also sort of intended for interactive use (and isn't all that well documented).

Fortunately, one convenient thing about the web interface is that it uses HTTP Basic authentication, which means that you can easily talk to it through tools like curl. To do status scraping through the web interface, first you need to turn it on and then you need an unprivileged mpd5 user you'll use for this:

set web self 127.0.0.1 5006
set web open

set user metrics <some-password> user

At this point you can use curl to get responses from the mpd5 web server (from the local host, ie your VPN server itself):

curl -s -u metrics:... --basic 'http://localhost:5006/<something>'

There are two useful things you can ask the web server interface for. First, you can ask it for a complete dump of its status in JSON format, by asking for 'http://localhost:5006/json' (although the documentation claims that the information returned is what 'show summary' in the console would give you, it is more than that). If you understand mpd5 and like parsing and processing JSON, this is probably a good option. We did not opt to do this.

The other option is that you can ask the web interface to run console (interface) commands for you, and then give you the output in either a 'pleasant' HTML page or in a basic plain text version. This is done by requesting either '/cmd?<command>' or '/bincmd?<command>' respectively. For statistics scraping, the most useful version is the 'bincmd' one, and the command we used is 'show session':

curl -s -u metrics:... --basic 'http://localhost:5006/bincmd?show%20session'

This gets you output that looks like:

ng1  172.29.X.Y  B2-2 9375347-B2-2  L2-2  2  9375347-L2-2  someuser  A.B.C.D
RESULT: 0

(I assume 'RESULT: 0' would be something else if there was some sort of problem.)

Of these, the useful fields for us are the first, which gives the local network device, the second, which gives the internal VPN IP of this connection, and the last two, which give us the VPN user and their remote IP. The others are internal MPD things that we (hopefully) don't have to care about. The internal VPN IP isn't necessary for (our) metrics but may be useful for log correlation.

To get traffic volume information, you need to extract the usage information from each local network device that a L2TP session is using (ie, 'ng1' and its friends). As far as I know, the only tool for this in (base) FreeBSD is netstat. Although you can invoke it interface by interface, probably the better thing to do (and what we did) is to use 'netstat -ibn -f link' to dump everything at once and then pick through the output to get the lines that give you packet and byte counts for each L2TP interface, such as ng1 here.

(I'm not sure if dropped packets is relevant for these interfaces; if you think it might be, you want 'netstat -ibnd -f link'.)

FreeBSD has a general system, 'libxo', for producing output from many commands in a variety of handy formats. As covered in xo_options, this can be used to get this netstat output in JSON if you find that more convenient. I opted to get the plain text format and use field numbers for the information I wanted for our VPN traffic metrics.

(Partly this was because I could ultimately reuse a lot of my metrics generation tools from the OpenBSD npppctl parsing. Both environments generated two sets of line and field based information, so a significant amount of the work was merely shuffling around which field was used for what.)

PS: Because of how mpd5 behaves, my view is that you don't want to let anyone but system staff log on to the server where you're using it. It is an old C code base and I would not trust it if people can hammer on its TCP console or its web server. I certainly wouldn't expose the web server to a non-localhost network, even apart from the bit where it definitely doesn't support HTTPS.

The long painful history of (re)using login to log people in

By: cks
21 January 2026 at 03:36

The news of the time interval is that Linux's usual telnetd has had a giant security vulnerability for a decade. As people on the Fediverse observed, we've been here before; Solaris apparently had a similar bug 20 or so years ago (which was CVE-2007-0882, cf, via), and AIX in the mid 1990s (CVE-1999-0113, source, also)), and also apparently SGI Irix, and no doubt many others (eg). It's not necessarily telnetd at fault, either, as I believe it's sometimes been rlogind.

All of these bugs have a simple underlying cause; in a way that root cause is people using Unix correctly and according to its virtue of modularity, where each program does one thing and you string programs together to achieve your goal. Telnetd and rlogind have the already complicated job of talking a protocol to the network, setting up ptys, and so on, so obviously they should leave the also complex job of logging the user in to login, which already exists to do that. In theory this should work fine.

The problem with this is that from more or less the beginning, login has had several versions of its job. From no later than V3 in 1972, login could also be used to switch from one user to another, not just log in initially. In 4.2 BSD, login was modified and reused to become part of rlogind's authentication mechanism (really; .rhosts is checked in the 4.2BSD login.c, not in rlogind). Later, various versions of login were modified to support 'automatic' logins, without challenging for a password (see eg FreeBSD login(1), OpenBSD login(1), and Linux login(1); use of -f for this appears to date back to around 4.3 Tahoe). Sometimes this was explicitly for the use of things that were running as root and had already authenticated the login.

In theory this is all perfectly Unixy. In practice, login figured out which of these variations of its basic job it was being used for based on a combination of command line arguments and what UID it was running as, which made it absolutely critical that programs running as root that reused login never allowed login to be invoked with arguments that would shift it to a different mode than they expected. Telnetd and rlogind have traditionally run as root, creating this exposure.

People are fallible, programmers included, and attackers are very ingenious. Over the years any number of people have found any number of ways to trick network daemons running as root into running login with 'bad' arguments.

The one daemon I don't think has ever been tricked this way is OpenSSH, because from very early on sshd refused to delegate logging people in to login. Instead, sshd has its own code to log people in to the system. This has had its complexities but has also shielded sshd from all of these (login) context problems.

In my view, this is one of the unfortunate times when the ideals of Unix run up against the uncomfortable realities of the world. Network daemons delegating logging people in to login is the correct Unix answer, but in practice it has repeatedly gone wrong and the best answer is OpenSSH's.

Systemd-networkd and giving your virtual devices alternate names

By: cks
17 January 2026 at 03:28

Recently I wrote about how Linux network interface names have a length limit, of 15 characters. You can work around this limit by giving network interfaces an 'altname' property, as exposed in (for example) 'ip link'. While you can't work around this at all in Canonical's Netplan, it looks like you can have this for your VLANs in systemd-networkd, since there's AlternativeName= in the systemd.link manual page.

Except, if you look at an actual VLAN configuration as materialized by Netplan (or written out by hand), you'll discover a problem. Your VLANs don't normally have .link files, only .netdev and .network files (and even your normal Ethernet links may not have .link files). The AlternativeName= setting is only valid in .link files, because networkd is like that.

(The AlternativeName= is a '[Link]' section setting and .network files also have a '[Link]' section, but they allow completely different sets of '[Link]' settings. The .netdev file, which is where you define virtual interfaces, doesn't have a '[Link]' section at all, although settings like AlternativeName= apply to them just as much as to regular devices. Alternately, .netdev files could support setting altnames for virtual devices in the '[NetDev]' section along side the mandatory 'Name=' setting.)

You can work around this indirectly, because you can create a .link file for a virtual network device and have it work:

[Match]
Type=vlan
OriginalName=vlan22-mlab

[Link]
AlternativeNamesPolicy=
AlternativeName=vlan22-matterlab

Networkd does the right thing here even though 'vlan22-mlab' doesn't exist when it starts up; when vlan22-mlab comes into existence, it matches the .link file and has the altname stapled on.

Given how awkward this is (and that not everything accepts or sees altnames), I think it's probably not worth bothering with unless you have a very compelling reason to give an altname to a virtual interface. In my case, this is clearly too much work simply to give a VLAN interface its 'proper' name.

Since I tested, I can also say that this works on a Netplan-based Ubuntu server where the underlying VLAN is specified in Netplan. You have to hand write the .link file and stick it in /etc/systemd/network, but after that it cooperates reasonably well with a Netplan VLAN setup.

Linux network interface names have a length limit, and Netplan

By: cks
15 January 2026 at 02:19

Over on the Fediverse, I shared a discovery:

This is my (sad) face that Linux interfaces have a maximum name length. What do you mean I can't call this VLAN interface 'vlan22-matterlab'?

Also, this is my annoyed face that Canonical Netplan doesn't check or report this problem/restriction. Instead your VLAN interface just doesn't get created, and you have to go look at system logs to find systemd-networkd telling you about it.

(This is my face about Netplan in general, of course. The sooner it gets yeeted the better.)

Based on both some Internet searches and looking at kernel headers, I believe the limit is 15 characters for the primary name of an interface. In headers, you will find this called IFNAMSIZ (the kernel) or IF_NAMESIZE (glibc), and it's defined to be 16 but that includes the trailing zero byte for C strings.

(I can be confident that the limit is 15, not 16, because 'vlan22-matterlab' is exactly 16 characters long without a trailing zero byte. Take one character off and it works.)

At the level of ip commands, the error message you get is on the unhelpful side:

# ip link add dev vlan22-matterlab type wireguard
Error: Attribute failed policy validation.

(I picked the type for illustration purposes.)

Systemd-networkd gives you a much better error message:

/run/systemd/network/10-netplan-vlan22-matterlab.netdev:2: Interface name is not valid or too long, ignoring assignment: vlan22-matterlab

(Then you get some additional errors because there's no name.)

As mentioned in my Fediverse post, Netplan tells you nothing. One direct consequence of this is that in any context where you're writing down your own network interface names, such as VLANs or WireGuard interfaces, simply having 'netplan try' or 'netplan apply' succeed without errors does not mean that your configuration actually works. You'll need to look at error logs and perhaps inventory all your network devices.

(This isn't the first time I've seen Netplan behave this way, and it remains just as dangerous.)

As covered in the ip link manual page, network interfaces can have either or both of aliases and 'altname' properties. These alternate names can be (much) longer than 16 characters, and the 'ip link property' altname property can be used in various contexts to make things convenient (I'm not sure what good aliases are, though). However this is somewhat irrelevant for people using Netplan, because the current Netplan YAML doesn't allow you to set interface altnames.

You can set altnames in networkd .link files, as covered in the systemd.link manual page. The direct thing you want is AlternativeName=, but apparently you may also want to set a blank alternative names policy, AlternativeNamesPolicy=. Of course this probably only helps if you're using systemd-networkd directly, instead of through Netplan.

PS: Netplan itself has the notion of Ethernet interfaces having symbolic names, such as 'vlanif0', but this is purely internal to Netplan; it's not manifested as an actual interface altname in the 'rendered' systemd-networkd control files that Netplan writes out.

(Technically this applies to all physical device types.)

An annoyance in how Netplan requires you to specify VLANs

By: cks
12 January 2026 at 04:27

Netplan is Canonical's more or less mandatory method of specifying networking on Ubuntu. Netplan has a collection of limitations and irritations, and recently I ran into a new one, which is how VLANs can and can't be specified. To explain this, I can start with the YAML configuration language. To quote the top level version, it looks like:

network:
  version: NUMBER
  renderer: STRING
  [...]
  ethernets: MAPPING
  [...]
  vlans: MAPPING
  [...]

To translate this, you specify VLANs separately from your Ethernet or other networking devices. On the one hand, this is nicely flexible. On the other hand it creates a problem, because here is what you have to write for VLAN properties:

network:
  vlans:
    vlan123:
      id: 123
      link: enp5s0
      addresses: <something>

Every VLAN is on top of some networking device, and because VLANs are specified as a separate category of top level devices, you have to name the underlying device in every VLAN (which gets very annoying and old very fast if you have ten or twenty VLANs to specify). Did you decide to switch from a 1G network port to a 10G network port for the link with all of your VLANs on it? Congratulations, you get to go through every 'vlans:' entry and change its 'link:' value. We hope you don't overlook one.

(Or perhaps you had to move the system disks from one model of 1U server to another model of 1U server because the hardware failed. Or you would just like to write generic install instructions with a generic block of YAML that people can insert directly.)

The best way for Netplan to deal with this would be to allow you to also specify VLANs as part of other devices, especially Ethernet devices. Then you could write:

network:
  ethernet:
    enp5s0: 
      vlans:
        vlan123:
          id: 123
          addresses: <something>

Every VLAN specified in enp5s0's configuration would implicitly use enp5s0 as its underlying link device, and you could rename all of them trivially. This also matches how I think most people think of and deal with VLANs, which is that (obviously) they're tied to some underlying device, and you want to think of them as 'children' of the other device.

(You can have an approach to VLANs where they're more free-floating and the interface that delivers any specific VLAN to your server can change, for load balancing or whatever. But you could still do this, since Netplan will need to keep supporting the separate 'vlans:' section.)

If you want to work around this today, you have to go for the far less convenient approach of artificial network names.

network:
  ethernet:
    vlanif0:
      match:
        name: enp5s0

  vlans:
    vlan123:
      id: 123
      link: vlanif0
      addresses: <something>

This way you only need to change one thing if your VLAN network interface changes, but at the cost of doing a non-standard way of setting up the base interface. (Yes, Netplan accepts it, but it's not how the Ubuntu installer will create your netplan files and who knows what other Canonical tools will have a problem with it as a result.)

We have one future Ubuntu server where we're going to need to set up a lot of VLANs on one underlying physical interface. I'm not sure which option we're going to pick, but the 'vlanif0' option is certainly tempting. If nothing else, it probably means we can put all of the VLANs into a separate, generic Netplan file.

Early experience with using Linux tc to fight bufferbloat latency

By: cks
11 January 2026 at 03:52

Over on the Fediverse I mentioned something recently:

Current status: doing extremely "I don't know what I'm really doing, I'm copying from a website¹" things with Linux tc to see if I can improve my home Internet latency under load without doing too much damage to bandwidth or breaking my firewall rules. So far, it seems to work and things² claim to like the result.

¹ <documentation link>
² https://bufferbloat.libreqos.com/ via @davecb

What started this was running into a Fediverse post about the bufferbloat test, trying it, and discovering that (as expected) my home DSL link performed badly, with significant increased latency during downloads, uploads, or both. My memory is that reported figures went up to the area of 400 milliseconds.

Conveniently for me, my Linux home desktop is also my DSL router; it speaks PPPoE directly through my DSL modem. This means that doing traffic shaping on my Linux desktop should cover everything, without any need to wrestle with a limited router OS environment. And there was some more or less cut and paste directions on the site.

So my outbound configuration was simple and obviously not harmful:

tc qdisc add root dev ppp0 cake bandwidth 7.6Mbit

The bandwidth is a guess, although one informed by checking both my raw DSL line rate and what testing sites told me.

The inbound configuration was copied from the documentation and it's where I don't understand what I'm doing:

ip link add name ifb4ppp0 type ifb
tc qdisc add dev ppp0 handle ffff: ingress
tc qdisc add dev ifb4ppp0 root cake bandwidth 40Mbit besteffort
ip link set ifb4ppp0 up
tc filter add dev ppp0 parent ffff: matchall action mirred egress redirect dev ifb4ppp0

(This order follows the documentation.)

Here is what I understand about this. As covered in the tc manual page, traffic shaping and scheduling happens only on 'egress', which is to say for outbound traffic. To handle inbound traffic, we need a level of indirection to a special ifb (Intermediate Functional Block) (also) device, that is apparently used only for our (inbound) tc qdisc.

So we have two pieces. The first is the actual traffic shaping on the IFB link, ifb4ppp0, and setting the link 'up' so that it will actually handle traffic instead of throw it away. The second is that we have to push inbound traffic on ppp0 through ifb4ppp0 to get its traffic shaping. To do this we add a special 'ingress' qdisc to ppp0, which applies to inbound traffic, and then we use a tc filter that matches all (ingress) traffic and redirects it to ifb4ppp0 as 'egress' traffic. Since it's now egress traffic, the tc shaping on ifb4ppp0 will now apply to it and do things.

When I set this up I wasn't certain if it was going to break my non-trivial firewall rules on the ppp0 interface. However, everything seems to fine, and the only thing the tc redirect is affecting is traffic shaping. My firewall blocks and NAT rules are still working.

Applying these tc rules definitely improved my latency scores on the test site; my link went from an F rating to an A rating (and a C rating for downloads and uploads happening at once). Does this improve my latency in practice for things like interactive SSH connections while downloads and uploads are happening? It's hard for me to tell, partly because I don't do such downloads and uploads very often, especially while I'm doing interactive stuff over SSH.

(Of course partly this is because I've sort of conditioned myself out of trying to do interactive SSH while other things are happening on my DSL link.)

The most I can say is that this probably improves things, and that since my DSL connection has drifted into having relatively bad latency to start with (by my standards), it probably helps to minimize how much worse it gets under load.

I do seem to get slightly less bandwidth for transfers than I did before; experimentation says that how much less can be fiddled with by adjusting the tc 'bandwidth' settings, although that also changes latency (more bandwidth creates worse latency). Given that I rarely do large downloads or uploads, I'm willing to trade off slightly lower bandwidth for (much) less of a latency hit. One reason that my bandwidth numbers are approximate anyway is that I'm not sure how much PPPoE DSL framing compensation I need.

(The Arch wiki has a page on advanced traffic control that has some discussion of tc.)

Sidebar: A rewritten command order for ingress traffic

If my understanding is correct, we can rewrite the commands to set up inbound traffic shaping to be more clearly ordered:

# Create and enable ifb link
ip link add name ifb4ppp0 type ifb
ip link set ifb4ppp0 up

# Set CAKE with bandwidth limits for
# our actual shaping, on ifb link.
tc qdisc add dev ifb4ppp0 root cake bandwidth 40Mbit besteffort

# Wire ifb link (with tc shaping) to inbound
# ppp0 traffic.
tc qdisc add dev ppp0 handle ffff: ingress
tc filter add dev ppp0 parent ffff: matchall action mirred egress redirect dev ifb4ppp0

The 'ifb4ppp0' name is arbitrary but conventional, set up as 'ifb4<whatever>'.

Distribution source packages and whether or not to embed in the source code

By: cks
10 January 2026 at 03:46

When I described my current ideal Linux source package format, I said that it should be embedded in the source code of the software being packaged. In a comment, bitprophet had a perfectly reasonable and good preference the other way:

Re: other points: all else equal I think I vaguely prefer the Arch "repo contains just the extras/instructions + a reference to the upstream source" approach as it's cleaner overall, and makes it easier to do "more often than it ought to be" cursed things like "apply some form of newer packaging instructions against an older upstream version" (or vice versa).

The Arch approach is isomorphic to the source RPM format, which has various extras and instructions plus a pre-downloaded set of upstream sources. It's not really isomorphic to the Debian source format because you don't normally work with the split up version; the split up version is just a package distribution thing (as dgit shows).

(I believe the Arch approach is also how the FreeBSD and OpenBSD ports trees work. Also, the source package format you work in is not necessarily how you bundle up and distribute source packages, again as shown by Debian.)

Let's call these two packaging options the inline approach (Debian) and the out of line approach (Arch, RPM). My view is that which one you want depends on what you want to do with software and packages. The out of line approach makes it easier to build unmodified packages, and as bitprophet comments it's easy to do weird build things. If you start from a standard template for the type of build and install the software uses, you can practically write the packaging instructions yourself. And the files you need to keep are quite compact (and if you want, it's relatively easy to put a bunch of them into a single VCS repository, each in its own subdirectory).

However, the out of line approach makes modifying upstream software much more difficult than a good version of the inline approach (such as, for example, dgit). To modify upstream software in the out of line approach you have to go through some process similar to what you'd do in the inline approach, and then turn your modifications into patches that your packaging instructions apply on top of the pristine upstream. Moving changes from version to version may be painful in various ways, and in addition to those nice compact out of line 'extras/instructions' package repos, you may want to keep around your full VCS work tree that you built the patches from.

(Out of line versus inline is a separate issue from whether or not the upstream source code should include packaging instructions in any form; I think that generally the upstream should not.)

As a system administrator, I'm biased toward easy modification of upstream packages and thus upstream source because that's most of why I need to build my own packages. However, these days I'm not sure if that's what a Linux distribution should be focusing on. This is especially true for 'rolling' distributions that mostly deal with security issues and bugs not by patching their own version of the software but by moving to a new upstream version that has the security fix or bug fix. If most of what a distribution packages is unmodified from the upstream version, optimizing for that in your (working) source package format is perfectly sensible.

A small suggestion in modern Linux: take screenshots (before upgrades)

By: cks
4 January 2026 at 03:50

Mike Hoye recently wrote Powering Up, which is in part about helping people install (desktop) Linux, and the Fediverse thread version of it reminded me of something that I don't do enough of:

A related thing I've taken to doing before potential lurching changes (like Linux distribution upgrades) is to take screenshots and window images. Because comparing a now and then image is a heck of a lot easier than restoring backups, and I can look at it repeatedly as I fix things on the new setup.

Linux distributions and the software they package have a long history of deciding to change things for your own good. They will tinker with font choices, font sizes, default DPI determinations, the size of UI elements, and so on, not quite at the drop of a hat but definitely when you do something like upgrade your distribution and bring in a bunch of significant package version changes (and new programs to replace old programs).

Some people are perfectly okay with these changes. Other people, like me, are quite attached to the specifics of how their current desktop environment looks and will notice and be unhappy about even relatively small changes (eg, also). However, because we're fallible humans, people like me can't always recognize exactly what changed and remember exactly what the old version looked like (these two are related); instead, sometimes all we have is the sense that something changed but we're not quite sure exactly what or exactly how.

Screenshots and window images are the fix for that unspecific feeling. Has something changed? You can call up an old screenshot to check, and to example what (and then maybe work out how to reverse it, or decide to live with the change). Screenshots aren't perfect; for example, they won't necessarily tell you what the old fonts were called or what sizes were being used. But they're a lot better than trying to rely on memory or other options.

It would probably also do me good to get into the habit of taking screenshots periodically, even outside of distribution upgrades. Looking back over time every so often is potentially useful to see more subtle, more long term changes, and perhaps ask myself either why I'm not doing something any more or why I'm still doing it.

(Currently I'm somewhat lackadasical about taking screenshots even before distribution upgrades. I have a distribution upgrade process but I haven't made screenshots part of it, and I don't have an explicit checklist for the process. Which I definitely should create. Possibly I should also try to capture font information in text form, to the extent that I can find it.)

My ideal Linux source package format (at the moment)

By: cks
31 December 2025 at 04:25

I've written recently on why source packages are complicated and why packages should be declarative (in contrast to Arch style shell scripts), but I haven't said anything about what I'd like in a source package format, which will mostly be from the perspective of a system administrator who sometimes needs to modify upstream packages or package things myself.

A source package format is a compromise. After my recent experiences with dgit, I now feel that the best option is that a source package is a VCS repository directory tree (Git by default) with special control files in a subdirectory. Normally this will be the upstream VCS repository with packaging control files and any local changes merged in as VCS commits. You perform normal builds in this checked out repository, which has the advantage of convenience and the disadvantage that you have to clean up the result, possibly with liberal use of 'git clean' and 'git reset'. Hermetic builds are done by some tool that copies the checked out files to a build area, or clones the repository, or some other option. If a binary package is built in an environment where this information is available, its metadata should include the exact current VCS commit it was built from, and I would make binary packages not build if there were uncommitted changes.

(Making the native source package a VCS tree with all of the source code makes it easy to work on but mingles package control files with the program source. In today's environment with good distributed VCSes I think this is the right tradeoff.)

The control files should be as declarative as possible, and they should directly express major package metadata such as version numbers (unlike the Debian package format, where the version number is derived from debian/changelog). There should be a changelog but it should be relatively free-form, like RPM changelogs. Changelogs are especially useful for local modifications because they go along with the installed binary package, which means that you can get an answer to 'what did we change in this locally modified package' without having to find your source. The main metadata file that controls everything should be kept simple; I would go as far as to say it should have a format that doesn't allow for multi-line strings, and anything that requires multi-line strings should go in additional separate files (including the package description). You could make it TOML but I don't think you should make it YAML.

Both the build time actions, such as configuring and compiling the source, and the binary package install time actions should by default be declarative; you should be able to say 'this is an autoconf based program and it should have the following additional options', and the build system will take care of everything else. Similarly you should be able to directly express that the binary package needs certain standard things done when it's installed, like adding system users and enabling services. However, this will never be enough so you should also be able to express additional shell script level things that are done to prepare, build, install, upgrade, and so on the package. Unlike RPM and Debian source packages but somewhat like Arch packages, these should be separate files in the control directory, eg 'pkgmeta/build.sh'. Making these separate files makes it much easier to do things like run shellcheck on them or edit them in syntax-aware editor environments.

(It should be possible to combine standard declarative prepare and build actions with additional shell or other language scripting. We want people to be able to do as much as possible with standard, declarative things. Also, although I used '.sh', you should be able to write these actions in other languages too, such as Python or Perl.)

I feel that like RPMs, you should have to at least default to explicitly declaring what files and directories are included in the binary package. Like RPMs, these installed files should be analyzed to determine the binary package dependencies rather than force you to try to declare them in the (source) package metadata (although you'll always have to declare build dependencies in the source package metadata). Like build and install scripts, these file lists should be in separate files, not in the main package metadata file. The RPM collection of magic ways to declare file locations is complex but useful so that, for example, you don't have to keep editing your file lists when the Python version changes. I also feel that you should have to specifically mark files in the file lists with unusual permissions, such as setuid or setgid bits.

The natural way to start packing something new in this system would be to clone its repository and then start adding the package control files. The packaging system could make this easier by having additional tools that you ran in the root of your just-cloned repository and looked around to find indications of things like the name, the version (based on repository tags), the build system in use, and so on, and then wrote out preliminary versions of the control files. More tools could be used incrementally for things like generating the file lists; you'd run the build and 'install' process, then have a tool inventory the installed files for you (and in the process it could recognize places where it should change absolute paths into specially encoded ones for things like 'the current Python package location').

This sketch leaves a lot of questions open, such as what 'source packages' should look like when published by distributions. One answer is to publish the VCS repository but that's potentially quite heavyweight, so you might want a more minimal form. However, once you create a 'source only' minimal form without the VCS history, you're going to want a way to disentangle your local changes from the upstream source.

Linux distribution packaging should be as declarative as possible

By: cks
30 December 2025 at 01:49

A commentator on my entry on why Debian and RPM (source) packages are complicated suggested looking at Arch Linux packaging, where most of the information is in a single file as more or less a shell script (example). Unfortunately, I'm not a fan of this sort of shell script or shell script like format, ultimately because it's only declarative by convention (although I suspect Arch enforces some of those conventions). One reason that declarative formats are important is that you can analyze and understand what they do without having to execute code. Another reason is that such formats naturally standardize things, which makes it much more likely that any divergence from the standard approach is something that matters, instead of a style difference.

Being able to analyze and manipulate declarative (source) packaging is useful for large scale changes within a distribution. The RPM source package format uses standard, more or less declarative macros to build most software, which I understand has made it relatively easy to build a lot of software with special C and C++ hardening options. You can inject similar things into a shell script based environment, but then you wind up with ad-hoc looking modifications in some circumstances, as we see in the Dovecot example.

Some things about declarative source packages versus Arch style minimalism are issues of what could be called 'hygiene'. RPM packages push you to list and categorize what files will be included in the built binary package, rather than simply assuming that everything installed into a scratch hierarchy should be packaged. This can be frustrating (and there are shortcuts), but it does give you a chance to avoid accidentally shipping unintended files. You could do this with shell script style minimal packaging if you wanted to, of course. Both RPM and Debian packages have standard and relatively declarative ways to modify a pristine upstream package, and while you can do that in Arch packages, it's not declarative, which hampers various sorts of things.

Basically my feeling is that at scale, you're likely to wind up with something that's essentially as formulaic as a declarative source package format without having its assured benefits. There will be standard templates that everyone is supposed to follow and they mostly will, and you'll be able to mostly analyze the result, and that 'mostly' qualification will be quietly annoying.

(On the positive side, the Arch package format does let you run shellcheck on your shell stanzas, which isn't straightforward to do in the RPM source format.)

Why Debian and RPM (source) packages are complicated

By: cks
28 December 2025 at 02:44

A commentator on my early notes on dgit mentioned that they found packaging in Debian overly complicated (and I think perhaps RPMs as well) and would rather build and ship a container. On the one hand, this is in a way fair; my impression is that the process of specifying and building a container is rather easier than for source packages. On the other hand, Debian and RPM source packages are complicated for good reasons.

Any reasonably capable source package format needs to contain a number of things. A source package needs to supply the original upstream source code, some amount of distribution changes, instructions for building and 'installing' the source, a list of (some) dependencies (for either or both build time and install time), a list of files and directories it packages, and possibly additional instructions for things to do when the binary package is installed (such as creating users, enabling services, and so on). Then generally you need some system for 'hermetic' builds, ones that don't depend on things in your local (Linux) login environment. You'll also want some amount of metadata to go with the package, like a name, a version number, and a description. Good source package formats also support building multiple binary packages from a single source package, because sometimes you want to split up the built binary files to reduce the amount of stuff some people have to install. A built binary package contains a subset of this; it has (at least) the metadata, the dependencies, a file list, all of the files in the file list, and those install and upgrade time instructions.

Built containers are a self contained blob plus some metadata. You don't need file lists or dependencies or install and removal actions because all of those are about interaction with the rest of the system and by design containers don't interact with the rest of the system. To build a container you still need some of the same information that a source package has, but you need less and it's deliberately more self-contained and freeform. Since the built container is a self contained artifact you don't need a file list, I believe it's uncommon to modify upstream source code as part of the container build process (instead you patch it in advance in your local repository), and your addition of users, activation of services, and so on is mostly free form and at container build time; once built the container is supposed to be ready to go. And my impression is that in practice people mostly don't try to do things like multiple UIDs in a single container.

(You may still want or need to understand what things you install where in the container image, but that's your problem to keep track of; the container format itself only needs a little bit of information from you.)

Containers have also learned from source packages in that they can be layered, which is to say that you can build your container by starting from some other container, either literally or by sticking another level of build instructions on the end. Layered source packages don't make any sense when you're thinking like a distribution, but they make a lot of sense for people who need to modify the distribution's source packages (this is what dgit makes much easier, partly because Git is effectively a layering system; that's one way to look at a sequence of Git commits).

(My impression of container building is that it's a lot more ad-hoc than package building. Both Debian and RPM have tried to standardize and automate a lot of the standard source code building steps, like running autoconf, but the cost of this is that each of them has a bespoke set of 'convenient' automation to learn if you want to build a package from scratch. With containers, you can probably mostly copy the upstream's shell-based build instructions (or these days, their Dockerfile).)

Dgit based building of (potentially modified) Debian packages can be surprisingly close to the container building experience. Like containers, you first prepare your modifications in a repository and then you run some relatively simple commands to build the artifacts you'll actually use. Provided that your modifications don't change the dependencies, files to be packaged, and so on, you don't have to care about how Debian defines and manipulates those, plus you don't even need to know exactly how to build the software (the Debian stuff takes care of that for you, which is to say that the Debian package builders have already worked it out).

In general I don't think you can get much closer to the container build experience other than the dgit build experience or the general RPM experience (if you're starting from scratch). Packaging takes work because packages aren't isolated, self contained objects; they're objects that need to be integrated into a whole system in a reversible way (ie, you can uninstall them, or upgrade them even though the upgraded version has a somewhat different set of files). You need more information, more understanding, and a more complicated build process.

(Well, I suppose there are flatpaks (and snaps). But these mostly don't integrate with the rest of your system; they're explicitly designed to be self-contained, standalone artifacts that run in a somewhat less isolated environment than containers.)

Moving local package changes to a new Ubuntu release with dgit

By: cks
23 December 2025 at 23:55

Suppose, not entirely hypothetically, that you've made local changes to an Ubuntu package on one Ubuntu release, such as 22.04 ('jammy'), and now you want to move to another Ubuntu release such as 24.04 ('noble'). If you're working with straight 'apt-get source' Ubuntu source packages, this is done by tediously copying all of your patches over (hopefully the package uses quilt) to duplicate and recreate your 22.04 work.

If you're using dgit, this is much easier. Partly this is because dgit is based on Git, but partly this is because dgit has an extremely convenient feature where it can have several different releases in the same Git repository. So here's what we want to do, assuming you have a dgit repository for your package already.

(For safety you may want to do this in a copy of your repository. I make rsync'd copies of Git repositories all the time for stuff like this.)

Our first step is to fetch the new 24.04 ('noble') version of the package into our dgit repository as a new dgit branch, and then check out the branch:

dgit fetch -d ubuntu noble,-security,-updates
dgit checkout noble,-security,-updates

We could do this in one operation but I'd rather do it in two, in case there are problems with the fetch.

The Git operation we want to do now is to cherry-pick (also) our changes to the 22.04 version of the package onto the 24.04 version of the package. If this goes well the changes will apply cleanly and we're done. However, there is a complication. If we've followed the usual process for making dgit-based local changes, the last commit on our 22.04 version is an update to debian/changelog. We don't want that change, because we need to do our own 'gbp dch' on the 24.04 version after we've moved our own changes over to make our own 24.04 change to debian/changelog (among other things, the 22.04 changelog change has the wrong version number for the 24.04 package).

In general, cherry-picking all our local changes is 'git cherry-pick old-upstream..old-local'. To get all but the last change, we want 'old-local~' instead. Dgit has long and somewhat obscure branch names; its upstream for our 22.04 changes is 'dgit/dgit/jammy,-security,-updates' (ie, the full 'suite' name we had to use with 'dgit clone' and 'dgit fetch'), while our local branch is 'dgit/jammy,-security,-updates'. So our full command, with a 'git log' beforehand to be sure we're getting what we want, is:

git log dgit/dgit/jammy,-security,-updates..dgit/jammy,-security,-updates~
git cherry-pick dgit/dgit/jammy,-security,-updates..dgit/jammy,-security,-updates~

(We've seen this dgit/dgit/... stuff before when doing 'gbp dch'.)

Then we need to make our debian/changelog update. Here, as an important safety tip, don't blindly copy the command you used while building the 22.04 package, using 'jammy,...' in the --since argument, because that will try to create a very confused changelog of everything between the 22.04 version of the package and the 24.04 version. Instead, you obviously need to update it to your new 'noble' 24.04 upstream, making it:

gbp dch --since dgit/dgit/noble,-security,-updates --local .cslab. --ignore-branch --commit

('git reset --hard HEAD~' may be useful if you make a mistake here. As they say, ask me how I know.)

If the cherry-pick doesn't apply cleanly, you'll have to resolve that yourself. If the cherry-pick applies cleanly but the result doesn't build or perhaps doesn't work because the code has changed too much, you'll be using various ways to modify and update your changes. But at least this is a bunch easier than trying to sort out and update a quilt-based patch series.

Appendix: Dealing with Ubuntu package updates

Based on this conversation, if Ubuntu releases a new version of the package, what I think I need to do is to use 'dgit fetch' and then explicitly rebase:

dgit fetch -d ubuntu

You have to use '-d ubuntu' here or 'dgit fetch' gets confused and fails. There may be ways to fix this with git config settings, but setting them all is exhausting and if you miss one it explodes, so I'm going to have to use '-d ubuntu' all the time (unless dgit fixes this someday).

Dgit repositories don't have an explicit Git upstream set, so I don't think we can use plain rebase. Instead I think we need the more complicated form:

git rebase dgit/dgit/jammy,-security,-updates dgit/jammy,-security,-updates

(Until I do it for real, these arguments are speculative. I believe they should work if I understand 'git rebase' correctly, but I'm not completely sure. I might need the full three argument form and to make the 'upstream' a commit hash.)

Then, as above, we need to drop our debian/changelog change and redo it:

git reset --hard HEAD~
gbp dch --since dgit/dgit/jammy,-security,-updates --local .cslab. --ignore-branch --commit

(There may be a clever way to tell 'git rebase' to skip the last change, or you can do an interactive rebase (with '-i') instead of a non-interactive one and delete it yourself.)

Early notes about using dgit on Ubuntu (LTS)

By: cks
23 December 2025 at 04:25

I recently read Ian Jackson's Debian’s git transition (via) and had a reaction:

I would really like to be able to patch and rebuild Ubuntu packages from a git repository with our local changes (re)based on top of upstream git. It would be much better than quilt'ing and debuild'ing .dsc packages (I have non-complimentary opinions on the Debian source package format). This news gives me hope that it'll be possible someday, but especially for Ubuntu I have no idea how soon or how well documented it will be.

(It could even be better than RPMs.)

The subsequent discussion got me to try out dgit, especially since it had an attractive dgit-user(7) manual page that gave very simple directions on how to make a local change to an upstream package. It turns out that things aren't entirely smooth on Ubuntu, but they're workable.

The starting point is 'dgit clone', but on Ubuntu you currently get to use special arguments that aren't necessary on Debian:

dgit clone -d ubuntu dovecot jammy,-security,-updates

(You don't have to do this on a machine running 'jammy' (Ubuntu 22.04); it may be more convenient to do it from another one, perhaps with a more up to date dgit.)

The latest Ubuntu package for something may be in either their <release>-security or their <release>-updates 'suite', so you need both. I think this is equivalent to what 'apt-get source' gets you, but you might want to double check. Once you've gotten the source in a Git repository, you can modify it and commit those modifications as usual, for example through Magit. If you have an existing locally patched version of the package that you did with quilt, you can import all of the quilt patches, either one by one or all at once and then using Magit's selective commits to sort things out.

Having made your modifications, whether tentative or otherwise, you can now automatically modify debian/changelog:

gbp dch --since dgit/dgit/jammy,-security,-updates --local .cslab. --ignore-branch --commit

(You might want to use -S for snapshots when testing modifications and builds, I don't know. Our practice is to use --local to add a local suffix on the upstream package number, so we can keep our packages straight.)

The special bit is the 'dgit/dgit/<whatever you used in dgit clone>', which tells gbp-dch (part of the gbp suite of stuff) where to start the changelog from. Using --commit is optional; what I did was to first run 'gbp dch' without it, then use 'git diff' to inspect the resulting debian/changelog changes, and then 'git restore debian/changelog' and re-run it with a better set of options until eventually I added the '--commit'.

You can then install build-deps (if necessary) and build the binary packages with the dgit-user(7) recommended 'dpkg-buildpackage -uc -b'. Normally I'd say that you absolutely want to build source packages too, but since you have a Git repository with the state frozen that you can rebuild from, I don't think it's necessary here.

(After the build finishes you can admire 'git status' output that will tell you just how many files in your source tree the Debian or Ubuntu package building process modified. One of the nice things about using Git and building from a Git repository is that you can trivially fix them all, rather than the usual set of painful workarounds.)

The dgit-user(7) manual page suggests but doesn't confirm that if you're bold, you can build from a tree with uncommitted changes. Personally, even if I was in the process of developing changes I'd commit them and then make liberal use of rebasing, git-absorb, and so on to keep updating my (committed) changes.

It's not clear to me how to integrate upstream updates (for example, a new Ubuntu update to the Dovecot package) with your local changes. It's possible that 'dgit pull' will automatically rebase your changes, or give you the opportunity to do that. If not, you can always do another 'dgit clone' and then manually import your Git changes as patches.

(A disclaimer: at this point I've only cloned, modified, and built one package, although it's a real one we use. Still, I'm sold; the ability to reset the tree after a build is valuable all by itself, never mind having a better way than quilt to handle making changes.)

The FreeBSD 15 version of PF has basically caught up to OpenBSD

By: cks
16 December 2025 at 04:06

When we initially became interested in FreeBSD a year ago, I said that FreeBSD's version of PF was close enough to an older version of OpenBSD PF (in syntax and semantics) that we could deal with it. Indeed, as we've moved firewalls from OpenBSD to FreeBSD we found that most of our rules moved over without trouble and things certainly performed well (better than they had on OpenBSD). Things have gotten even better with the recent release of FreeBSD 15, as covered in Updates to the pf packet filter in FreeBSD and pfSense software. To quote the important bit:

Over the years this difference between OpenBSD and FreeBSD was a common point of discussion, often in overly generalised (and as a result, deeply inaccurate) terms. Thanks to recent efforts by Kristof Provost and Kajetan Staszkiewicz focused on aligning FreeBSD’s pf with the one in OpenBSD, that discussion can be put to rest.

A change that's important for us in FreeBSD 15.0 is that OpenBSD style integrated NAT rules are now supported in the FreeBSD PF. Last year as we were exploring FreeBSD, I wrote about OpenBSD versus FreeBSD syntax for NAT, where a single OpenBSD rule that both passed traffic and NAT'd it had to be split into two FreeBSD rules in the basic version. With FreeBSD 15, we can write NAT rules using the OpenBSD version of syntax.

(I'm talking about syntax here because I don't care about how it's implemented behind the scenes. PF already performs some degree of ruleset transformations, so if the syntax works and the semantics don't change, we're happy even if a peek under the hood would show two rules. But I believe that the FreeBSD 15 changes mean that FreeBSD now has the OpenBSD implementation of this too.)

So far we've converted two firewall rulesets to the old PF NAT syntax, one a simple case that's now in production and a second, more complex one that's not yet in production. We were holding off on our most complex PF NAT firewall, which is complex partly because it uses some stuff that's close to policy based routing. The release of FreeBSD 15 will make it easier to migrate this firewall (in the new year, we don't make big firewall changes shortly before our winter break).

In general, I'm quite happy that FreeBSD and OpenBSD have reached close to parity in their PF as of FreeBSD 15, because that makes it easier to chose between them based on what other aspects of them you like.

(I say 'close to' based on Kristof Provost's comment about the situation on this entry. The situation will get even better (ie, closer) in future FreeBSD versions.)

The systemd journal, message priorities, and (syslog) facilities

By: cks
15 December 2025 at 03:27

If you use systemd units or systemd-run to conveniently capture output from scripts and programs into the systemd journal, one of the things that it looks like you don't get is message priorities and (syslog) facilities. Fortunately, systemd's journal support is a bit more sophisticated than that.

When you print out regular output and systemd captures it into the journal, systemd assigns it a default priority that's set with SyslogLevel=; this is normally 'info', which is a good default choice. Similarly, you can pick the syslog facility associated with your unit or your systemd-run invocation with SyslogFacility=. Systemd defaults to 'daemon', which may not entirely be what you want. On the other hand, the choice of syslog facility matters less if you're primarily working with journalctl, where what you usually care about is the systemd unit name.

(You can use journalctl to select messages by priority or syslog facility with the -p and --facility options. You can also select by syslog identifier with the -t option. This is probably going to be handy for searching the journal for messages from some of our programs that use syslog to report things.)

If you know that you're logging to systemd (or you don't care that your regular output looks a bit weird in spots), you can also print messages with special priority markers, as covered in sd-daemon(3). Now that I know about this, I may put it to use in some of our scripts and programs. Sadly, unlike the normal Linux logger and its --prio-prefix option, you can't change the syslog facility this way, but if you're doing pure journald logging you probably don't care about that.

(It's possible that sd-daemon(3) actually supports the logger behavior of changing the syslog facility too, but if so it's not documented and you shouldn't count on it. Instead you should assume that you have to control the syslog facility through setting SyslogFacility=, which unfortunately means you can't log just authentication things to 'auth' and everything else to 'daemon' or some other appropriate facility.)

PS: Unfortunately, as far as I know journalctl has no way to augment its normal syslog-like output with some additional fields, such as the priority or the syslog facility. Instead you have to go all the way to a verbose dump of information in one of the supported formats for field selection.

The annoyances of the traditional Unix 'logger' program

By: cks
13 December 2025 at 04:10

The venerable 'logger' command has been around so long it's part of the Single Unix Specification (really, logger — log messages). Although syslog(3) is in 4.2 BSD (along with syslog(8), the daemon), it doesn't seem to have been until 4.3 BSD that we got logger(1), with more or less the same arguments as the POSIX version. Unfortunately, if you want to do more than throw messages into your syslog and actually create well-formed, useful syslog messages, 'logger' has some annoyances and flaws.

The flaw is front and center in the manual page and the POSIX specification, if you read the description of the -i option carefully:

-i: Log the process ID of the logger process with each message.

(Emphasis mine.)

In shell scripts where you want to report the script's activities to syslog, it's not unusual to want to report more than one thing. In well-formed syslog messages, these would all have the same PID, so that you can tell that they all came from the same invocation of your script. Logger doesn't support this; if you run logger several times over the course of your script and use '-i', every log message will have a different PID. In some environments (such as FreeBSD and Linux with systemd), logger usually puts in its own PID whether you like it or not.

(The traditional fake for this was to not use '-i' and then embed your script's PID into your syslog identifier (FreeBSD even recommends this in their logger(1) manual page). This worked okay when syslog identifiers were nothing more than what got stuck on the front of the message in your log files, but these days it's not necessarily ideal even if your 'logger' environment doesn't add a PID itself. If you're sending syslog to a log aggregation system, the identifier can be meaningful and important and you want it to be a constant for a given message source so you can search on it.)

Since it's a front end to syslog, logger inherits the traditional syslog issues that you have to select a meaningful syslog facility, priority, and identifier (traditionally, the basename of your script). On the positive side, you can easily vary these from message to message; on the not so great side, you have to supply them for every logger invocation and it's on you to make sure all of your uses of logger use the same ones. Logger doesn't insist that you provide these and it doesn't have any mechanism (such as a set of environment variables) for you to provide defaults. This was a bigger issue in the days before shell functions, since these days you can write a 'logit' function for your shell script that invokes logger correctly (for your environment). This function is also a good place to automatically embed your script's PID in the logged message (perhaps as 'pid=... <supplied message>').

Out of the three of these, the syslog identifier is the easiest to do a good job of (since you should be picking a meaningful name for your script anyway) but the traditional syslog environment makes the identifier relatively meaningless.

It's possible to send all of the output of your script to syslog, or with a bunch of work you can send just standard error to syslog (and perhaps repeat it again). But doing either of these requires wrapping the body of your script up and feeding all of it to logger:

(
... script stuff ...
) 2>&1 | logger -i -t "$(basename "$0")" -pX.Y

(Everything will have the same facility and priority, but if it's really important to log things at a different priority you can put in direct 'logger' invocations in the body of the script.)

I suspect that people who used logger a lot probably wrote a wrapper script (you could call it 'stderr-to-syslog') and ran all of the real scripts under it.

All of this adds up to a collection of small annoyances. It's not impossible to use logger in scripts to push things into syslog, but generally it has to be relatively important to capture the information. There's nothing off the shelf that makes it easy. And if you want to have portable logging for your scripts, this basic logger use is all you get.

(Linux with systemd has an entire separate system for this and the standard Linux logger has additional options even for syslog logging. But OpenBSD logger(1) is quite minimal and FreeBSD logger(1) is in between, with its own additional features that don't overlap with the Linux version.)

What goes into a well-formed Unix syslog entry

By: cks
12 December 2025 at 04:54

In a recent entry, I said in passing that the venerable logger utility had some amount of annoyances associated with it. In order to explain those annoyances, I need to first talk about what goes into a well-formed, useful Unix syslog entry in a traditional Unix syslog environment.

(This is 'well-formed' in a social sense, not in a technical sense of simply conforming to the syslog message format. There are a lot of ways to produce technically 'correct' syslog messages that are neither well formed nor useful.)

A well-formed syslog entry is made up from a number of pieces:

  • A timestamp, the one thing that you don't have to worry about because your syslog environment should automatically generate it for you.

    (Your syslog environment will also assign a hostname, which you also don't worry about.)

  • An appropriate syslog facility, chosen from the assorted options that you generally find listed in your local syslog(3) (the available facilities vary from Unix to Unix). Your program may need to log to multiple different facilities depending on what the messages are about; for example, a network daemon that does authentication should probably send authentication related messages to 'auth' or 'authpriv' and general things to 'daemon'.

    (I know I've said to throw every syslog facility together in one place, but having a correct facility still matters.)

  • An appropriate syslog level (aka priority), where you need to at least distinguish between informational reports ('info'), things only of interest during debugging problems ('debug', and probably normally not logged), and active errors that need attention ('error'). Using more levels is useful if they make sense in your program.

    (This doesn't work out in practice but I'm describing how things should be.)

  • A meaningful and unique identifier ('tag' in logger) that identifies your program as the source of the syslog entry and groups all of its syslog entries together. This is normally expected to be the name of your program or perhaps your system. All syslog entries from your program should have this identifier.

  • Your process ID (PID), to uniquely identify this instance of your program. Your syslog entries should include a PID even if only one instance of your program is ever running at a time, because that lets system administrators match your syslog messages up with other PID-based information and also tell if and when your program was restarted.

    (Under normal circumstances, all messages logged by a single instance of your program should use the same PID, because that's how people match up messages to get all of the ones this particular instance generated.)

  • A meaningful message that is more or less readable plain text. Plain text is not a great format for logs, but syslog message text that people can read without too much effort is the Unix tradition, even if it means not including a certain amount of available metadata (structured log formats are not 'plain text').

The text and importance of your message text should match the syslog level of the syslog entry; if your text says 'ERROR' but you logged at level 'info', this isn't really a well-formed syslog entry. This goes double if you're using a semi-structured message text format, so that you actually logged 'level=error ...' at level 'info' (or the other way around).

All of this is in service to letting people find your program's syslog entries, pick out the important ones, understand them, and categorize both your syslog entries and syslog entries from other programs. If a busy sysadmin wants to see an overview of all authentication activity, they should be able to look at where they're sending 'auth' logs. If they want to look for problems, they can look for 'error' or higher priority logs. And the syslog facility your program uses should be sensible in general, although there aren't many options these days (and you should probably allow the local system administrators to pick what facility you normally use, so they can assign you a unique local one to collect just your logs somewhere).

A good library or tool for making syslog entries should make it as easy as possible to create well-formed, useful syslog entries. I will note in passing that the traditional syslog(3) API is not ideal for this, because it assumes that your program will log all entries in a single facility, which is not necessarily true for programs that do authentication and something else.

Some notes on using systemd-run or systemd-cat for logging program output

By: cks
9 December 2025 at 03:44

In response to yesterday's entry on using systemd (service) units for easy capturing of log output, a commentator drew my attention to systemd-run and systemd-cat. I spent a bit of time poking at both of them and so I've wound up with some things to remember and some opinions.

(The short summary is that you probably want to use systemd-run with a specific unit name that you pick.)

Systemd-cat is very roughly the systemd equivalent of logger. As you'd expect, things that it puts in the systemd journal flow through to anywhere that regular journal entries would, including things that directly get fed from the journal and syslog (including remote syslog destinations). The most convenient way to use systemd-cat is to just have it run a command, at which point it will capture all of the output from the command and put it in the journal. However, there is a little issue with using just 'systemd-cat /some/command', which is that the journal log identifiers that systemd-cat generates in this case will be the direct name of whatever program produced the output. If /some/command is a script that runs a variety of programs that produce output (perhaps it echos some status information itself then runs a program, which produces output on its own), you'll get a mixture of identifier names in the resulting log:

your-script[...]: >>> Frobulating the thing
some-prog[...]: Frobulation results: 23 processed, 0 errors

Journal logs written by systemd-cat also inherit whatever unit it was in (a session unit, cron.service, etc), and the combination can make it hard to clearly see all of the logs from running your script. To do better you need to give systemd-cat an explicit identifier, 'systemd-cat -t <something> /some/command', which point everything is logged with that name, but still in whatever systemd unit systemd-cat ran in.

Generally you want your script to report all its logs under a single unit name, so you can find them and sort them out from all of the other things your system is logging. To do this you need to use systemd-run with an explicit unit name:

systemd-run -u myscript --quiet --wait -G /some/script

I believe you can then hook this into any systemd service unit infrastructure you want, such as sending email if the unit fails (if you do, you probably want to add '--service-type=oneshot'). Using systemd-run this way gets you the best of both systemd-cat worlds; all of the output from /some/script will be directly labeled with what program produced it, but you can find it all using the unit name.

Systemd-run will refuse to activate a unit with a name that duplicates an existing unit, including existing systemd-run units. In many cases this is a feature for script use, since you basically get 'run only one copy' locking for free (although the error message is noisy, so you may want to do your own quiet locking). If you want to always run your program even if another instance is running, you'll have to generate non-constant unit names (or let systemd-run do it for you).

Systemd-cat has some features that systemd-run doesn't offer, such as setting the priority of messages (and setting a different priority for standard error output). If these features are important to you, I'd suggest nesting systemd-cat (with no '-t' argument) inside systemd-run, so you get both the searchable unit name and the systemd-cat features. If you're already in an environment with a useful unit name and you just need to divert log messages from wherever else the environment wants to send them into the system journal, bare systemd-cat will do the job.

(Arguably this is the case for things run from cron, if you're content to look for all of them under cron.service (or crond.service, depending on your Linux distribution). Running things under systemd-cat puts their output in the journal instead of having them send you email, which may be good enough and saves you having to invent and then remember a bunch of unit names.)

Turning to systemd units for easy capturing of log output

By: cks
8 December 2025 at 03:17

Suppose, not hypothetically, that you have a third party tool that you need to run periodically. This tool prints things to standard output (or standard error) that are potentially useful to capture somehow. You want this captured output to be associated with the program (or your general system for running the program) and timestamped, and it would be handy if the log output wound up in all of the usual places in your systems for output. Unix has traditionally had some solutions for this, such as logger for sending things to syslog, but they all have a certain amount of annoyances associated with them.

(If you directly run your script or program from cron, you will automatically capture the output in a nice dated form, but you'll also get email all the time. Let's assume we want a quieter experience than email from cron, because you don't need to regularly see the output, you just want it to be available if you go looking.)

On modern Linux systems, the easy and lazy thing to do is to run your script or program from a systemd service unit, because systemd will automatically do this for you and send the result into the systemd journal (and anything that pulls data from that) and, if configured, into whatever overall systems you have for handling syslog logs. You want a unit like this:

[Unit]
Description=Local: Do whatever
ConditionFileIsExecutable=/root/do-whatever

[Service]
Type=oneshot
ExecStart=/root/do-whatever

Unlike the usual setup for running scripts as systemd services, we don't set 'RemainAfterExit=True' because we want to be able to repeatedly trigger our script with, for example, 'systemctl start local-whatever.service'. You can even arrange to get email if this unit (ie, your script) fails.

You can run this directly from cron through suitable /etc/cron.d files that use 'systemctl start', or set up a systemd timer unit (possibly with a randomized start time). The advantage of a systemd timer unit is that you definitely won't ever get email about this unless you specifically configure it. If you're setting up a relatively unimportant and throwaway thing, it being reliably silent is probably a feature.

(Setting up a systemd timer unit also keeps everything within the systemd ecosystem rather than worrying about various aspects of running 'systemctl start' from scripts or crontabs or etc.)

On the one hand, it feels awkward to go all the way to a systemd service unit simply to get easy to handle logs; it feels like there should be a better solution somewhere. On the other hand, it works and it only needs one extra file over what you'd already need (the .service).

Why I (still) love Linux

24 November 2025 at 07:52

A screen showing htop

I know, this title might come as a surprise to many. Or perhaps, for those who truly know me, it won’t. I am not a fanboy. The BSDs and the illumos distributions generally follow an approach to design and development that aligns more closely with the way I think, not to mention the wonderful communities around them, but that does not mean I do not use and appreciate other solutions. I usually publish articles about how much I love the BSDs or illumos distributions, but today I want to talk about Linux (or, better, GNU/Linux) and why, despite everything, it still holds a place in my heart. This will be the first in a series of articles where I’ll discuss other operating systems.

Where It All Began

I started right here, with GNU/Linux, back in 1996. It was my first real prompt after the Commodore 64 and DOS. It was my first step toward Unix systems, and it was love at first shell. I felt a sense of freedom - a freedom that the operating systems I had known up to that point (few, to be honest) had never given me. It was like a “blank sheet” (or rather, a black one) with a prompt on it. I understood immediately that this prompt, thanks to command chaining, pipes, and all the marvels of Unix and Unix-like systems, would allow me to do anything. And that sense of freedom is what makes me love Unix systems to this day.

I was young, but my intuition was correct. And even though I couldn't afford to keep a full Linux installation on that computer long-term due to hardware limitations, I realized that this would be my future. A year later, a new computer arrived, allowing me to use Linux daily, for everything. And successfully, without missing Windows at all (except for a small partition, strictly for gaming).

When I arrived at university, in 1998, I was one of the few who knew it. One of the few who appreciated it. One of the few who hoped to see a flourishing future for it. Everywhere. Widespread. A dream come true. I was a speaker at Linux Days, I actively participated in translation projects, and I wrote articles for Italian magazines. I was a purist regarding the "GNU/Linux" nomenclature because I felt it was wrong to ignore the GNU part - it was fundamental. Because perhaps the "Year of the Linux Desktop" never arrived, but Linux is now everywhere. On my desktop, without a doubt. But also on my smartphone (Android) and on those of hundreds of millions of people. Just as it is in my car. And in countless devices surrounding us - even if we don’t know it. And this is the true success. Let’s not focus too much on the complaint that "it’s not compatible with my device X". It is your device that is not compatible with Linux, not the other way around. Just like when, many years ago, people complained that their WinModems (modems that offloaded all processing to obscure, closed-source Windows drivers) didn't work on Linux. For "early adopters" like me, this concept has always been present, even though, fortunately, things have improved exponentially.

Linux was what companies accepted most willingly (not totally, but still...): the ongoing lawsuits against the BSDs hampered their spread, and Linux seemed like that "breath of fresh air" the world needed.

Linux and its distributions (especially those untethered from corporations, like Debian, Gentoo, Arch, etc.) allowed us to replicate expensive "commercial" setups at a fraction of the cost. Reliability was good, updating was simple, and there was a certain consistency. Not as marked as that of the BSDs, but sufficient.

The world was ready to accept it, albeit reluctantly. Linus Torvalds, despite his sometimes harsh and undiplomatic tone, carried forward the kernel development with continuity and coherence, making difficult decisions but always in line with the project. The "move fast and break things" model was almost necessary because there was still so much to build. I also remember the era when Linux - speaking of the kernel - was designed almost exclusively for x86. The other architectures, to simplify, worked thanks to a series of adaptations that brought most behavior back to what was expected for x86.

And the distributions, especially the more "arduous" ones to install, taught me a lot. The distro-hopping of the early 2000s made me truly understand partitioning, the boot procedure (Lilo first, then Grub, etc.), and for this, I must mainly thank Gentoo and Arch (and the FreeBSD handbook - but this is for another article). I learned the importance of backups the hard way, and I keep this lesson well in mind today. My Linux desktops ran mainly with Debian (initially), then Gentoo, Arch, and openSUSE (which, at the time, was still called "SUSE Linux"), Manjaro, etc. My old 486sx 25Mhz with 4MB (yes, MB) of RAM, powered by Debian, allowed me to download emails (mutt and fetchmail), news (inn + suck), program in C, and create shell scripts - at the end of the 90s.

When Linux Conquered the World

Then the first Ubuntu was launched, and many things changed. I don't know if it was thanks to Ubuntu or simply because the time was ripe, but attention shifted to Linux on the desktop as well (albeit mainly on the computers of us enthusiasts), and many companies began to contribute actively to the system or distributions.

I am not against the participation of large companies in Open Source. Their contributions can be valuable for the development of Open Source itself, and if companies make money from it, good for them. If this ultimately leads to a more complete and valid Open Source product, then I welcome it! It is precisely thanks to mass adoption that Linux cleared the path for the acceptance of Open Source at all levels. I still remember when, just after graduating, I was told that Linux (and Open Source systems like the BSDs) were "toys for universities". I dare anyone to say that today!

But this must be done correctly: without spoiling the original idea of the project and without hijacking (voluntarily or not) development toward a different model. Toward a different evolution. The use of Open Source must not become a vehicle for a business model that tends to close, trap, or cage the user. Or harm anyone. And if it is oriented toward worsening the product solely for one's own gain, I can only be against it.

What Changed Along the Way

And this is where, unfortunately, I believe things have changed in the Linux world (if not in the kernel itself, at least in many distributions). Innovation used to be disruptive out of necessity. Today, in many cases, disruption happens without purpose, and stability is often sacrificed for changes that do not solve real problems. Sometimes, in the name of improved security or stability, a new, immature, and unstable product is created - effectively worsening the status quo.

To give an example, I am not against systemd on principle, but I consider it a tool distant from the original Unix principles - do one thing and do it well - full of features and functions that, frankly, I often do not need. I don't want systemd managing my containerization. For restarting stopped services? There are monit and supervisor - efficient, effective, and optional. And, I might add: services shouldn't crash; they should handle problems in a non-destructive way. My Raspberry Pi A+ doesn't need systemd, which occupies a huge amount of RAM (and precious clock cycles) for features that will never be useful or necessary on that platform.

But "move fast and break things" has arrived everywhere, and software is often written by gluing together unstable libraries or those laden with system vulnerabilities. Not to mention so-called "vibe coding" - which might give acceptable results at certain levels, but should not be used when security and confidentiality become primary necessities or, at least, without an understanding of what has been written.

We are losing much of the Unix philosophy, and many Linux distributions are now taking the path of distancing themselves from a concept of cross-compatibility ("if it works on Linux, I don't care about other operating systems"), of minimalism, of "do one thing and do it well". And, in my opinion, we are therefore losing many of the hallmarks that have distinguished its behavior over the years.

In my view, this depends on two factors: a development model linked to a concept of "disposable" electronics, applied even to software, and the pressure from some companies to push development where they want, not where the project should go. Therefore, in certain cases, the GPL becomes a double-edged sword: on one hand, it protects the software and ensures that contributions remain available. On the other, it risks creating a situation where the most "influential" player can totally direct development because - unable to close their product - they have an interest in the entire project going in the direction they have predisposed. In these cases, perhaps, BSD licenses actually protect the software itself more effectively. Because companies can take and use without an obligation to contribute. If they do, it is because they want to, as in the virtuous case of Netflix with FreeBSD. And this, while it may remove (sometimes precious) contributions to the operating system, guarantees that the steering wheel remains firmly in the hands of those in charge - whether foundations, groups, or individuals.

And Why I Still Care

And so yes, despite all this, I (still) love Linux.

Because it was the first Open Source project I truly believed in (and which truly succeeded), because it works, and because the entire world has developed around it. Because it is a platform on which tons of distributions have been built (and some, like Alpine Linux, still maintain that sense of minimalism that I consider correct for an operating system). Because it has distributions like openSUSE (and many others) that work immediately and without problems on my laptop (suspension and hibernation included) and on my miniPC, a fantastic tool I use daily. Because hardware support has improved immensely, and it is now rare to find incompatible hardware.

Because it has been my life companion for 30 years and has contributed significantly to putting food on the table and letting me sleep soundly. Because it allowed me to study without spending insane amounts on licenses or manuals. Because it taught me, first, to think outside the box. To be free.

So thank you, GNU/Linux.

Even if your btrfs, after almost 18 years, still eats data in spectacular fashion. Even if you rename my network interfaces after a reboot. Even though, at times, I get the feeling that you’re slowly turning into what you once wanted to defeat.

Even if you are not my first choice for many workloads, I foresee spending a lot of time with you for at least the next 30 years.

Static Web Hosting on the Intel N150: FreeBSD, SmartOS, NetBSD, OpenBSD and Linux Compared

19 November 2025 at 08:16

A server rack with some servers and cables

Update: This post has been updated to include Docker benchmarks and a comparison of container overhead versus FreeBSD Jails and illumos Zones.

Note: Some operating systems (FreeBSD and Linux) support kernel TLS (kTLS) and the related SSL_sendfile path in nginx, which can improve HTTPS performance for static files. Since this feature is not available on all the systems included in the comparison (for example NetBSD, OpenBSD and illumos), the benchmarks were run with a common baseline configuration that does not rely on kTLS. The goal is to compare the systems under similar conditions rather than to measure OS specific optimizations.

I often get very specific infrastructure requests from clients. Most of the time it is some form of hosting. My job is usually to suggest and implement the setup that fits their goals, skills and long term plans.

If there are competent technicians on the other side, and they are willing to learn or already comfortable with Unix style systems, my first choices are usually one of the BSDs or an illumos distribution. If they need a control panel, or they already have a lot of experience with a particular stack that will clearly help them, I will happily use Linux and it usually delivers solid, reliable results.

Every now and then someone asks the question I like the least:

“But how does it perform compared to X or Y?”

I have never been a big fan of benchmarks. At best they capture a very specific workload on a very specific setup. They are almost never a perfect reflection of what will happen in the real world.

For example, I discovered that idle bhyve VMs seem to use fewer resources when the host is illumos than when the host is FreeBSD. It looks strange at first sight, but the illumos people are clearly working very hard on this, and the result is a very capable and efficient platform.

Despite my skepticism, from time to time I enjoy running some comparative tests. I already did it with Proxmox KVM versus FreeBSD bhyve, and I also compared Jails, Zones, bhyve and KVM on the same Intel N150 box. That led to the FreeBSD vs SmartOS article where I focused on CPU and memory performance on this small mini PC.

This time I wanted to do something simpler, but also closer to what I see every day: static web hosting.

Instead of synthetic CPU or I/O tests, I wanted to measure how different operating systems behave when they serve a small static site with nginx, both over HTTP and HTTPS.

This is not meant to be a super rigorous benchmark. I used the default nginx packages, almost default configuration, and did not tune any OS specific kernel settings. In my experience, careful tuning of kernel and network parameters can easily move numbers by several tens of percentage points. The problem is that very few people actually spend time chasing such optimizations. Much more often, once a limit is reached, someone yells “we need mooooar powaaaar” while the real fix would be to tune the existing stack a bit.

So the question I want to answer here is more modest and more practical:

With default nginx and a small static site, how much does the choice of host OS really matter on this Intel N150 mini PC?

Spoiler: less than people think, at least for plain HTTP. Things get more interesting once TLS enters the picture.


Disclaimer
These benchmarks are a snapshot of my specific hardware, network and configuration. They are useful to compare relative behavior on this setup. They are not a universal ranking of operating systems. Different CPUs, NICs, crypto extensions, kernel versions or nginx builds can completely change the picture.


Test setup

The hardware is the same Intel N150 mini PC I used in my previous tests: a small, low power box that still has enough cores to be interesting for lab and small production workloads.

On it, I installed several operating systems and environments, always on the bare metal, not nested inside each other. On each OS I installed nginx from the official packages.

Software under test

On the host:

SmartOS, with:
- a Debian 12 LX zone
- an Alpine Linux 3.22 LX zone
- a native SmartOS zone

FreeBSD 14.3-RELEASE:
- nginx running inside a native jail

OpenBSD 7.8:
- nginx on the host

NetBSD 10.1:
- nginx on the host

Debian 13.2:
- nginx on the host

Alpine Linux 3.22:
- nginx on the host
- Docker: Debian 13 container running on the Alpine host (ports mapped)

I also tried to include DragonFlyBSD, but the NIC in this box is not supported. Using a different NIC just for one OS would have made the comparison meaningless, so I excluded it.

nginx configuration

In all environments:

  • nginx was installed from the system packages
  • worker_processes was set to auto
  • the web root contained the same static content

The important part is that I used exactly the same nginx.conf file for all operating systems and all combinations in this article. I copied the same configuration file verbatim to every host, jail and zone. The only changes were the IP address and file paths where needed, for example for the TLS certificate and key.

The static content was a default build of the example site generated by BSSG, my Bash static site generator. The web root was the same logical structure on every OS and container type.

There is no OS specific tuning in the configuration and no kernel level tweaks. This is very close to a “package install plus minimal config” situation.

TLS configuration

For HTTPS I used a very simple configuration, identical on every host.

Self signed certificate created with:

openssl req -x509 -newkey rsa:4096 -nodes -keyout server.key -out server.crt -days 365 -subj "/CN=localhost"  

Example nginx server block for HTTPS (simplified):

server {  
listen 443 ssl http2;  
listen [::]:443 ssl http2;  

server_name _;  

ssl_certificate /etc/nginx/ssl/server.crt;  
ssl_certificate_key /etc/nginx/ssl/server.key;  

root /var/www/html;  
index index.html index.htm;  

location / {  
try_files $uri $uri/ =404;  
}  
}  

The HTTP virtual host is also the same everywhere, with the root pointing to the BSSG example site.

Load generator

The tests were run from my workstation on the same LAN:

  • client host: a mini PC machine connected at 2.5 Gbit/s
  • switch: 2.5 Gbit/s
  • test tool: wrk

For each target host I ran:

  • wrk -t4 -c50 -d10s http://IP
  • wrk -t4 -c10 -d10s http://IP
  • wrk -t4 -c50 -d10s https://IP
  • wrk -t4 -c10 -d10s https://IP

Each scenario was executed multiple times to reduce noise; the numbers below are medians (or very close to them) from the runs.

The contenders

To keep things readable, I will refer to each setup as follows:

  • SmartOS Debian LX → SmartOS host, Debian 12 LX zone
  • SmartOS Alpine LX → SmartOS host, Alpine 3.22 LX zone
  • SmartOS Native → SmartOS host, native zone
  • FreeBSD Jail → FreeBSD 14.3-RELEASE, nginx in a jail
  • OpenBSD Host → OpenBSD 7.8, nginx on the host
  • NetBSD Host → NetBSD 10.1, nginx on the host
  • Debian Host → Debian 13.2, nginx on the host
  • Alpine Host → Alpine 3.22, nginx on the host
  • Docker Container → Alpine host, Debian 13 Docker container

Everything uses the same nginx configuration file and the same static site.

Static HTTP results

Let us start with plain HTTP, since this removes TLS from the picture and focuses on the kernel, network stack and nginx itself.

HTTP, 4 threads, 50 concurrent connections

Approximate median wrk results:

Environment HTTP 50 connections
SmartOS Debian LX ~46.2 k
SmartOS Alpine LX ~49.2 k
SmartOS Native ~63.7 k
FreeBSD Jail ~63.9 k
OpenBSD Host ~64.1 k
NetBSD Host ~64.0 k
Debian Host ~63.8 k
Alpine Host ~63.9 k
Docker Container ~63.7 k

Two things stand out:

  1. All the native or jail/container setups on the hosts that are not LX zones cluster around 63 to 64k requests per second.
  2. The two SmartOS LX zones sit slightly lower, in the 46 to 49k range, which is still very respectable for this hardware.

In other words, as long as you are on the host or in something very close to it (FreeBSD jail, SmartOS native zone, NetBSD, OpenBSD, Linux on bare metal), static HTTP on nginx will happily max out around 64k requests per second with this small Intel N150 CPU.

The Debian and Alpine LX zones on SmartOS are a bit slower, but not dramatically so. They still deliver close to 50k requests per second and, in a real world scenario, you would probably saturate the network or the client long before hitting those numbers.

HTTP, 4 threads, 10 concurrent connections

With fewer concurrent connections, absolute throughput drops, but the relative picture is similar:

  • SmartOS Native around 44k
  • NetBSD and Alpine Host around 34 to 35k
  • FreeBSD, Debian, OpenBSD around 31 to 33k
  • The Docker Container sits slightly lower at ~30.2k req/s, showing a small overhead from the networking layer
  • The SmartOS LX zones sit slightly below, around 35 to 37k req/s

The important conclusion is simple:

For plain HTTP static hosting, once nginx is installed and correctly configured, the choice between these operating systems makes very little difference on this hardware. Zones and jails add negligible overhead, LX zones add a small one.

If you are only serving static content over HTTP, your choice of OS should be driven by other factors: ecosystem, tooling, update strategy, your own expertise and preference.

Static HTTPS results

TLS is where things start to diverge more clearly and where CPU utilization becomes interesting.

HTTPS, 4 threads, 50 concurrent connections

Approximate medians:

Environment HTTPS 50 connections CPU notes at 50 HTTPS connections
SmartOS Debian LX ~51.4 k CPU saturated
SmartOS Alpine LX ~40.4 k CPU saturated
SmartOS Native ~52.8 k CPU saturated
FreeBSD Jail ~62.9 k around 60% CPU idle
OpenBSD Host ~39.7 k CPU saturated
NetBSD Host ~40.4 k CPU saturated
Debian Host ~62.8 k about 20% CPU idle
Alpine Host ~62.4 k small idle headroom, around 7% idle
Docker Container ~62.7 k CPU saturated

These numbers tell a more nuanced story.

  1. FreeBSD, Debian and Alpine on bare metal form a “fast TLS” group.
    All three sit around 62 to 63k requests per second with 50 concurrent HTTPS connections.

  2. FreeBSD does this while using significantly less CPU.
    During the HTTPS tests with 50 connections, the FreeBSD host still had around 60% CPU idle. It is the platform that handled TLS load most comfortably in terms of CPU headroom.

  3. Debian and Alpine are close in throughput, but push the CPU harder.
    Debian still had some idle time left, Alpine even less. In practice, all three are excellent here, but FreeBSD gives you more room before you hit the wall.

  4. SmartOS, NetBSD and OpenBSD form a “good but heavier” TLS group.
    Their HTTPS throughput is in the 40 to 52k req/s range and they reach full CPU usage at 50 concurrent connections. OpenBSD and NetBSD stabilize around 39 to 40k req/s. SmartOS native and the Debian LX zone manage slightly better (around 51 to 53k) but still with the CPU pegged.

HTTPS, 4 threads, 10 concurrent connections

With lower concurrency:

  • FreeBSD, Debian and Alpine still sit in roughly the 29 to 31k req/s range
  • SmartOS Native and LX zones are in the mid to high 30k range
  • The Docker Container drops slightly to ~27.8k req/s
  • NetBSD and OpenBSD sit around 26 to 27k req/s

The relative pattern is the same: for this TLS workload, FreeBSD and modern Linux distributions on bare metal appear to make better use of the cryptographic capabilities of the CPU, delivering higher throughput or more headroom or both.

What TLS seems to highlight

The HTTPS tests point to something that is not about nginx itself, but about the TLS stack and how well it can exploit the hardware.

On this Intel N150, my feeling is:

  • FreeBSD, with the userland and crypto stack I am running, is very efficient at TLS here. It delivers the highest throughput while keeping plenty of CPU in reserve.
  • Debian and Alpine, with their recent kernels and libraries, are also strong performers, close to FreeBSD in throughput, but with less idle CPU.
  • NetBSD, OpenBSD and SmartOS (native and LX) are still perfectly capable of serving a lot of HTTPS traffic, but they have to work harder to keep up and they hit 100% CPU much earlier.

This matches what I see in day to day operations: TLS performance is often less about “nginx vs something else” and more about the combination of:

  • the TLS library version and configuration
  • how well the OS uses the CPU crypto instructions
  • kernel level details in the network and crypto paths

I suspect the differences here are mostly due to how each system combines its TLS stack (OpenSSL, LibreSSL and friends), its kernel and its hardware acceleration support. It would take a deeper dive into profiling and configuration knobs to attribute the gaps precisely.

In any case, on this specific mini PC, if I had to pick a platform to handle a large amount of HTTPS static traffic, FreeBSD, Debian and Alpine would be my first candidates, in that order.

Zones, jails, containers and Docker: overhead in practice

Another interesting part of the story is the overhead introduced by different isolation technologies.

From these tests and the previous virtualization article on the same N150 machine, the picture is consistent:

  • FreeBSD jails behave almost like bare metal and are significantly more efficient than Docker.
    For both HTTP and HTTPS, running nginx in a jail on FreeBSD 14.3-RELEASE produces numbers practically identical to native hosts.
    The contrast with Docker is striking: while the Docker container required 100% CPU to reach peak for the HTTP and HTTPS throughput, the FreeBSD jail delivered the same speed with ~60% of the CPU sitting idle. In terms of performance cost per request, Jails are drastically cheaper.

  • SmartOS native zones are also very close to the metal.
    Static HTTP performance reaches the same 64k req/s region and HTTPS is only slightly behind the "fast TLS" group, although with higher CPU usage.

  • SmartOS LX zones introduce a noticeable but modest overhead.
    Both Debian and Alpine LX zones on SmartOS perform slightly worse than the native zone or FreeBSD jails. For static HTTP they are still very fast. For HTTPS the Debian LX zone remains competitive but costs more CPU, while the Alpine LX zone is slower.

  • Docker on Linux performs efficiently but eats the margins. I ran an additional test using a Debian 13 Docker container running on the Alpine Linux host. At peak load (50 connections), the throughput was impressive and virtually identical to bare metal: ~63.7k req/s for HTTP and ~62.7k req/s for HTTPS. However, there is a clear cost. First, while the bare metal host maintained a small CPU buffer (~7% idle) during the HTTPS test, Docker saturated the CPU to 100%. Second, at lower concurrency (10 connections), the overhead became visible. The Docker container scored ~30.2k req/s for HTTP and ~27.8k req/s for HTTPS, slightly trailing the ~31-34k and ~29-31k range of the bare metal counterparts. The abstraction layers (NAT, bridging, namespaces) are extremely efficient, but they are not completely free.

This leads to a clear conclusion on efficiency: FreeBSD Jails provide the highest throughput with the lowest CPU cost. LX zones and Docker containers can match the speed (or come close), but they burn significantly more CPU cycles to do so.

What this means for real workloads

It is easy to get lost in tables and percentages, so let us go back to the initial question.

A client wants static hosting.
Does the choice between FreeBSD, SmartOS, NetBSD or Linux matter in terms of performance?

For plain HTTP on this hardware, with nginx and the same configuration:

  • Not really.
    All the native hosts and FreeBSD jails deliver roughly the same maximum throughput, in the 63 to 64k req/s range. SmartOS LX zones are slightly slower but still strong.

For HTTPS:

  • Yes, it starts to matter a bit more.
  • FreeBSD stands out for how relaxed the CPU is under high TLS load.
  • Debian and Alpine are very close in throughput, with more CPU used but still with some headroom.
  • SmartOS, NetBSD and OpenBSD can still push a lot of HTTPS traffic, but they reach 100% CPU earlier and stabilize at lower request rates.

Does this mean you should always choose FreeBSD or Debian or Alpine for static HTTPS hosting?

Not necessarily.

In real deployments, the bottleneck is rarely the TLS performance of a single node serving a small static site. Network throughput, storage, logging, reverse proxies, CDNs and application layers all play a role.

However, knowing that FreeBSD and current Linux distributions can squeeze more out of a small CPU under TLS is useful when you are:

  • sizing hardware for small VPS nodes that must serve many HTTPS requests
  • planning to consolidate multiple services on a low power box
  • deciding whether you can afford to keep some CPU aside for other tasks (cache, background jobs, monitoring, and so on)

As always, the right answer depends on the complete picture: your skills, your tooling, your backups, your monitoring, the rest of your stack, and your tolerance for troubleshooting when things go sideways.

Final thoughts

From these small tests, my main takeaways are:

  1. Static HTTP is basically solved on all these platforms.
    On a modest Intel N150, every system tested can push around 64k static HTTP requests per second with nginx set to almost default settings. For many use cases, that is already more than enough.

  2. TLS performance is where the OS and crypto stack start to matter.
    FreeBSD, Debian and Alpine squeeze more HTTPS requests out of the N150, and FreeBSD in particular does it with a surprising amount of idle CPU left. NetBSD, OpenBSD and SmartOS need more CPU to reach similar speeds and stabilize at lower throughput once the CPU is saturated.

  3. Jails and native zones are essentially free, LX zones cost a bit more.
    FreeBSD jails and SmartOS native zones show very little overhead for this workload. SmartOS LX zones are still perfectly usable, but if you are chasing every last request per second you will see the cost of the translation layer.

  4. Benchmarks are only part of the story.
    If your team knows OpenBSD inside out and has tooling, scripts and workflows built around it, you might happily accept using more CPU on TLS in exchange for security features, simplicity and familiarity. The same goes for NetBSD or SmartOS in environments where their specific strengths shine.

I will not choose an operating system for a client just because a benchmark looks nicer. These numbers are one of the many inputs I consider. What matters most is always the combination of reliability, security, maintainability and the human beings who will have to operate the
system at three in the morning when something goes wrong.

Still, it is nice to know that if you put a tiny Intel N150 in front of a static site and you pick FreeBSD or a modern Linux distribution for HTTPS, you are giving that little CPU a fair chance to shine.

In Linux, filesystems can and do have things with inode number zero

By: cks
5 December 2025 at 04:19

A while back I wrote about how in POSIX you could theoretically use inode (number) zero. Not all Unixes consider inode zero to be valid; prominently, OpenBSD's getdents(2) doesn't return valid entries with an inode number of 0, and by extension, OpenBSD's filesystems won't have anything that uses inode zero. However, Linux is a different beast.

Recently, I saw a Go commit message with the interesting description of:

os: allow direntries to have zero inodes on Linux

Some Linux filesystems have been known to return valid entries with zero inodes. This new behavior also puts Go in agreement with recent glibc.

This fixes issue #76428, and the issue has a simple reproduction to create something with inode numbers of zero. According to the bug report:

[...] On a Linux system with libfuse 3.17.1 or later, you can do this easily with GVFS:

# Create many dir entries
(cd big && printf '%04x ' {0..1023} | xargs mkdir -p)
gio mount sftp://localhost/$PWD/big

The resulting filesystem mount is in /run/user/$UID/gvfs (see the issue for the exact long path) and can be experimentally verified to have entries with inode numbers of zero (well, as reported by reading the directory). On systems using glibc 2.37 and later, you can look at this directory with 'ls' and see the zero inode numbers.

(Interested parties can try their favorite non-C or non-glibc bindings to see if those environments correctly handle this case.)

That this requires glibc 2.37 is due to this glibc bug, first opened in 2010 (but rejected at the time for reasons you can read in the glibc bug) and then resurfaced in 2016 and eventually fixed in 2022 (and then again in 2024 for the thread safe version of readdir). The 2016 glibc issue has a bit of a discussion about the kernel side. As covered in the Go issue, libfuse returning a zero inode number may be a bug itself, but there are (many) versions of libfuse out in the wild that actually do this today.

Of course, libfuse (and gvfs) may not be the only Linux filesystems and filesystem environments that can create this effect. I believe there are alternate language bindings and APIs for the kernel FUSE (also, also) support, so they might have the same bug as libfuse does.

(Both Go and Rust have at least one native binding to the kernel FUSE driver. I haven't looked at either to see what they do about inode numbers.)

PS: My understanding of the Linux (kernel) situation is that if you have something inside the kernel that needs an inode number and you ask the kernel to give you one (through get_next_ino(), an internal function for this), the kernel will carefully avoid giving you inode number 0. A lot of things get inode numbers this way, so this makes life easier for everyone. However, a filesystem can decide on inode numbers itself, and when it does it can use inode number 0 (either explicitly or by zeroing out the d_ino field in the getdents(2) dirent structs that it returns, which I believe is what's happening in the libfuse situation).

Some things on X11's obscure DirectColor visual type

By: cks
4 December 2025 at 03:21

The X Window System has a long standing concept called 'visuals'; to simplify, an X visual determines how to determine the colors of your pixels. As I wrote about a number of years ago, these days X11 mostly uses 'TrueColor' visuals, which directly supply 8-bit values for red, green, and blue ('24-bit color'). However X11 has a number of visual types, such as the straightforward PseudoColor indirect colormap (where every pixel value is an index into an RGB colormap; typically you'd get 8-bit pixels and 24-bit colormaps, so you could have 256 colors out of a full 24-bit gamut). One of the (now) obscure visual types is DirectColor. To quote:

For DirectColor, a pixel value is decomposed into separate RGB subfields, and each subfield separately indexes the colormap for the corresponding value. The RGB values can be changed dynamically.

(This is specific to X11; X10 had a different display color model.)

In a PseudoColor visual, each pixel's value is taken as a whole and used as an index into a colormap that gives the RGB values for that entry. In DirectColor, the pixel value is split apart into three values, one each for red, green, and blue, and each value indexes a separate colormap for that color component. Compared to a PseudoColor visual of the same pixel depth (size, eg each pixel is an 8-bit byte), you get less possible variety within a single color component and (I believe) no more colors in total.

When this came up in my old entry about TrueColor and PseudoColor visuals, in a comment Aristotle Pagaltzis speculated:

[...] maybe it can be implemented as three LUTs in front of a DAC’s inputs or something where the performance impact is minimal? (I’m not a hardware person.) [...]

I was recently reminded of this old entry and when I reread that comment, an obvious realization struck me about why DirectColor might make hardware sense. Back in the days of analog video, essentially every serious sort of video connection between your computer and your display carried the red, green, and blue components separately; you can see this in the VGA connector pinouts, and on old Unix workstations these might literally be separate wires connected to separate BNC connectors on your CRT display.

If you're sending the red, green, and blue signals separately you might also be generating them separately, with one DAC per color channel. If you have separate DACs, it might be easier to feed them from separate LUTs and separate pixel data, especially back in the days when much of a Unix workstation's graphics system was implemented in relatively basic, non-custom chips and components. You can split off the bits from the raw pixel value with basic hardware and then route each color channel to its own LUT, DAC, and associated circuits (although presumably you need to drive them with a common clock).

The other way to look at DirectColor is that it's a more flexible version of TrueColor. A TrueColor visual is effectively a 24-bit DirectColor visual where the color mappings for red, green, and blue are fixed rather than variable (this is in fact how it's described in the X documentation). Making these mappings variable costs you only a tiny bit of extra memory (you need 256 bytes for each color) and might require only a bit of extra hardware in the color generation process, and it enables the program using the display to change colors on the fly with small writes to the colormap rather than large writes to the framebuffer (which, back in the days, were not necessarily very fast). For instance, if you're looking at a full screen image and you want to brighten it, you could simply shift the color values in the colormaps to raise the low values, rather than recompute and redraw all the pixels.

(Apparently DirectColor was often used with 24-bit pixels, split into one byte for each color, which is the same pixel layout as a 24-bit TrueColor visual; see eg this section of the Starlink Project's Graphics Cookbook. Also, this seems to be how the A/UX X server worked. If you were going to do 8-bit pixels I suspected people preferred PseudoColor to DirectColor.)

These days this is mostly irrelevant and the basic simplicity of the TrueColor visual has won out. Well, what won out is PC graphics systems that followed the same basic approach of fixed 24-bit RGB color, and then X went along with it on PC hardware, which became more or less the only hardware.

(There probably was hardware with DirectColor support. While X on PC Unixes will probably still claim to support DirectColor visuals, as reported in things like xdpyinfo, I suspect that it involves software emulation. Although these days you could probably implement DirectColor with GPU shaders at basically no cost.)

Making Polkit authenticate people like su does (with group wheel)

By: cks
25 November 2025 at 03:46

Polkit is how a lot of things on modern Linux systems decide whether or not to let people do privileged operations, including systemd's run0, which effectively functions as another su or sudo. Polkit normally has a significantly different authentication model than su or sudo, where an arbitrary login can authenticate for privileged operations by giving the password of any 'administrator' account (accounts in group wheel or group admin, depending on your Linux distribution).

Suppose, not hypothetically, that you want a su like model in Polkit, one where people in group 'wheel' can authenticate by providing the root password, while people not in group 'wheel' cannot authenticate for privileged operations at all. In my earlier entry on learning about Polkit and adjusting it I put forward an untested Polkit stanza to do this. Now I've tested it and I can provide an actual working version.

polkit.addAdminRule(function(action, subject) {
    if (subject.isInGroup("wheel")) {
        return ["unix-user:0"];
    } else {
        // must exist but have a locked password
        return ["unix-user:nobody"];
    }
});

(This goes in /etc/polkit-1/rules.d/50-default.rules, and the filename is important because it has to replace the standard version in /usr/share/polkit-1/rules.d.)

This doesn't quite work the way 'su' does, where it will just refuse to work for people not in group wheel. Instead, if you're not in group wheel you'll be prompted for the password of 'nobody' (or whatever other login you're using), which you can never successfully supply because the password is locked.

As I've experimentally determined, it doesn't work to return an empty list ('[]'), or a Unix group that doesn't exist ('unix-group:nosuchgroup'), or a Unix group that exists but has no members. In all cases my Fedora 42 system falls back to asking for the root password, which I assume is a built-in default for privileged authentication. Instead you apparently have to return something that Polkit thinks it can plausibly use to authenticate the person, even if that authentication can't succeed. Hopefully Polkit will never get smart enough to work that out and stop accepting accounts with locked passwords.

(If you want to be friendly and you expect people on your servers to run into this a lot, you should probably create a login with a more useful name and GECOS field, perhaps 'not-allowed' and 'You cannot authenticate for this operation', that has a locked password. People may or may not realize what's going on, but at least they have a chance.)

PS: This is with the Fedora 42 version of Polkit, which is version 126. This appears to be the most recent version from the upstream project.

Sidebar: Disabling Polkit entirely

Initially I assumed that Polkit had explicit rules somewhere that authorized the 'root' user. However, as far as I can tell this isn't true; there's no normal rules that specifically authorize root or any other UID 0 login name, and despite that root can perform actions that are restricted to groups that root isn't in. I believe this means that you can explicitly disable all discretionary Polkit authorization with an '00-disable.rules' file that contains:

polkit.addRule(function(action, subject) {
    return polkit.Result.NO;
});

Based on experimentation, this disables absolutely everything, even actions that are considered generally harmless (like libvirt's 'virsh list', which I think normally anyone can do).

A slightly more friendly version can be had by creating a situation where there are no allowed administrative users. I think this would be done with a 50-default.rules file that contained:

polkit.addAdminRule(function(action, subject) {
    // must exist but have a locked password
    return ["unix-user:nobody"];
});

You'd also want to make sure that nobody is in any special groups that rules in /usr/share/polkit-1/rules.d use to allow automatic access. You can look for these by grep'ing for 'isInGroup'.

The (early) good and bad parts of Polkit for a system administrator

By: cks
24 November 2025 at 03:46

At a high level, Polkit is how a lot of things on modern Linux systems decide whether or not to let you do privileged operations. After looking into it a bit, I've wound up feeling that Polkit has both good and bad aspects from the perspective of a system administrator (especially a system administrator with multi-user Linux systems, where most of the people using them aren't supposed to have any special privileges). While I've used (desktop) Linuxes with Polkit for a while and relied on it for a certain amount of what I was doing, I've done so blindly, effectively as a normal person. This is the first I've looked at the details of Polkit, which is why I'm calling this my early reactions.

On the good side, Polkit is a single source of authorization decisions, much like PAM. On a modern Linux system, there are a steadily increasing number of programs that do privileged things, even on servers (such as systemd's run0). These could all have their own bespoke custom authorization systems, much as how sudo has its own custom one, but instead most of them have centralized on Polkit. In theory Polkit gives you a single thing to look at and a single thing to learn, rather than learning systemd's authentication system, NetworkManager's authentication system, etc. It also means that programs have less of a temptation to hard-code (some of) their authentication rules, because Polkit is very flexible.

(In many cases programs couldn't feasibly use PAM instead, because they want certain actions to be automatically authorized. For example, in its standard configuration libvirt wants everyone in group 'libvirt' to be able to issue libvirt VM management commands without constantly having to authenticate. PAM could probably be extended to do this but it would start to get complicated, partly because PAM configuration files aren't a programming language and so implementing logic in PAM gets awkward in a hurry.)

On the bad side, Polkit is a non-declarative authorization system, and a complex one with its rules not in any single place (instead they're distributed through multiple files in two different formats). Authorization decisions are normally made in (JavaScript) code, which means that they can encode essentially arbitrary logic (although there are standard forms of things). This means that the only way to know who is authorized to do a particular thing is to read its XML 'action' file and then look through all of the JavaScript code to find and then understand things that apply to it.

(Even 'who is authorized' is imprecise by default. Polkit normally allows anyone to authenticate as any administrative account, provided that they know its password and possibly other authentication information. This makes the passwords of people in group wheel or group admin very dangerous things, since anyone who can get their hands on one can probably execute any Polkit-protected action.)

This creates a situation where there's no way in Polkit to get a global overview of who is authorized to do what, or what a particular person has authorization for, since this doesn't exist in a declarative form and instead has to be determined on the fly by evaluating code. Instead you have to know what's customary, like the group that's 'administrative' for your Linux distribution (wheel or admin, typically) and what special groups (like 'libvirt') do what, or you have to read and understand all of the JavaScript and XML involved.

In other words, there's no feasible way to audit what Polkit is allowing people to do on your system. You have to trust that programs have made sensible decisions in their Polkit configuration (ones that you agree with), or run the risk of system malfunctions by turning everything off (or allowing only root to be authorized to do things).

(Not even Polkit itself can give you visibility into why a decision was made or fully predict it in advance, because the JavaScript rules have no pre-filtering to narrow down what they apply to. The only way you find out what a rule really does is invoking it. Well, invoking the function that the addRule() or addAdminRule() added to the rule stack.)

This complexity (and the resulting opacity of authorization) is probably intrinsic in Polkit's goals. I even think they made the right decision by having you write logic in JavaScript rather than try to create their own language for it. However, I do wish Polkit had a declarative subset that could express all of the simple cases, reserving JavaScript rules only for complex ones. I think this would make the overall system much easier for system administrators to understand and analyze, so we had a much better idea (and much better control) over who was authorized for what.

Brief notes on learning and adjusting Polkit on modern Linuxes

By: cks
23 November 2025 at 04:07

Polkit (also, also) is a multi-faceted user level thing used to control access to privileged operations. It's probably used by various D-Bus services on your system, which you can more or less get a list of with pkaction, and there's a pkexec program that's like su and sudo. There are two reasons that you might care about Polkit on your system. First, there might be tools you want to use that use Polkit, such as systemd's run0 (which is developing some interesting options). The other is that Polkit gives people an alternate way to get access to root or other privileges on your servers and you may have opinions about that and what authentication should be required.

Unfortunately, Polkit configuration is arcane and as far as I know, there aren't really any readily accessible options for it. For instance, if you want to force people to authenticate for root-level things using the root password instead of their password, as far as I know you're going to have to write some JavaScript yourself to define a suitable Administrator identity rule. The polkit manual page seems to document what you can put in the code reasonably well, but I'm not sure how you test your new rules and some areas seem underdocumented (for example, it's not clear how 'addAdminRule()' can be used to say that the current user cannot authenticate as an administrative user at all).

(If and when I wind up needing to test rules, I will probably try to do it in a scratch virtual machine that I can blow up. Fortunately Polkit is never likely to be my only way to authenticate things.)

Polkit also has some paper cuts in its current setup. For example, as far as I can see there's no easy way to tell Polkit-using programs that you want to immediately authenticate for administrative access as yourself, rather than be offered a menu of people in group wheel (yourself included) and having to pick yourself. It's also not clear to me (and I lack a test system) if the default setup blocks people who aren't in group wheel (or group admin, depending on your Linux distribution flavour) from administrative authentication or if instead they get to pick authenticating using one of your passwords. I suspect it's the latter.

(All of this makes Polkit seem like it's not really built for multi-user Linux systems, or at least multi-user systems where not everyone is an administrator.)

PS: Now that I've looked at it, I have some issues with Polkit from the perspective of a system administrator, but those are going to be for another entry.

Sidebar: Some options for Polkit (root) authentication

If you want everyone to authenticate as root for administrative actions, I think what you want is:

polkit.addAdminRule(function(action, subject) {
    return ["unix-user:0"];
});

If you want to restrict this to people in group wheel, I think you want something like:

polkit.addAdminRule(function(action, subject) {
    if (subject.isInGroup("wheel")) {
        return ["unix-user:0"];
    } else {
        // might not work to say 'no'?
        return [];
    }
});

If you want people in group wheel to authenticate as themselves, not root, I think you return 'unix-user:' + subject.user instead of 'unix-user:0'. I don't know if people still get prompted by Polkit to pick a user if there's only one possible user.

Automatically scrubbing ZFS pools periodically on FreeBSD

By: cks
20 November 2025 at 03:17

We've been moving from OpenBSD to FreeBSD for firewalls. One advantage of this is giving us a mirrored ZFS pool for the machine's filesystems; we have a lot of experience operating ZFS and it's a simple, reliable, and fully supported way of getting mirrored system disks on important machines. ZFS has checksums and you want to periodically 'scrub' your ZFS pools to verify all of your data (in all of its copies) through these checksums (ideally relatively frequently). All of this is part of basic ZFS knowledge, so I was a little bit surprised to discover that none of our FreeBSD machines had ever scrubbed their root pools, despite some of them having been running for months.

It turns out that while FreeBSD comes with a configuration option to do periodic ZFS scrubs, the option isn't enabled by default (as of FreeBSD 14.3). Instead you have to know to enable it, which admittedly isn't too hard to find once you start looking.

FreeBSD has a general periodic(8) system for triggering things on a daily, weekly, monthly, or other basis. As covered in the manual page, the default configuration for this is in /etc/defaults/periodic.conf and you can override things by creating or modifying /etc/periodic.conf. ZFS scrubs are a 'daily' periodic setting, and as of 14.3 the basic thing you want is an /etc/periodic.conf with:

# Enable ZFS scrubs
daily_scrub_zfs_enable="YES"

FreeBSD will normally scrub each pool a certain number of days after its previous scrub (either a manual scrub or an automatic scrub through the periodic system). The default number of days is 35, which is a bit high for my tastes, so I suggest that you shorten it, making your periodic.conf stanza be:

# Enable ZFS scrubs
daily_scrub_zfs_enable="YES"
daily_scrub_zfs_default_threshold="14"

There are other options you can set that are covered in /etc/defaults/periodic.conf.

(That the daily automatic scrubs happen some number of days after the pool was last scrubbed means that you can adjust their timing by doing a manual scrub. If you have a bunch of machines that you set up at the same time, you can get them to space out their scrubs by scrubbing one a day by hand, and so on.)

Looking at the other ZFS periodic options, I might also enable the daily ZFS status report, because I'm not certain if there's anything else that will alert you if or when ZFS starts reporting errors:

# Find out about ZFS errors?
daily_status_zfs_enable="YES"

You can also tell ZFS to TRIM your SSDs every day. As far as I can see there's no option to do the TRIM less often than once a day; I guess if you want that you have to create your own weekly or monthly periodic script (perhaps by copying the 801.trim-zfs daily script and modifying it appropriately). Or you can just do 'zpool trim ...' every so often by hand.

A surprise with how '#!' handles its program argument in practice

By: cks
18 November 2025 at 03:54

Every so often I get to be surprised about some Unix thing. Today's surprise is the actual behavior of '#!' in practice on at least Linux, FreeBSD, and OpenBSD, which I learned about from a comment by Aristotle Pagaltzis on my entry on (not) using '#!/usr/bin/env'. I'll quote the starting part here:

In fact the shebang line doesn’t require absolute paths, you can use relative paths too. The path is simply resolved from your current directory, just as any other path would be – the kernel simply doesn’t do anything special for shebang line paths at all. [...]

I found this so surprising that I tested it on our Linux servers as well as a FreeBSD and an OpenBSD machine. On the Linux servers (and probably on the others too), the kernel really does accept the full collection of relative paths in '#!'. You can write '#!python3', '#!bin/python3', '#!../python3', '#!../../../usr/bin/python3', and so on, and provided that your current directory is in the right place in the filesystem, they all worked.

(On FreeBSD and OpenBSD I only tested the '#!python3' case.)

As far as I can tell, this behavior goes all the way back to 4.2 BSD (which isn't quite the origin point of '#!' support in the Unix kernel but is about as close as we can get). The execve() kernel implementation in sys/kern_exec.c finds the program from your '#!' line with a namei() call that uses the same arguments (apart from the name) as it did to find the initial executable, and that initial executable can definitely be a relative path.

Although this is probably the easiest way to implement '#!' inside the kernel, I'm a little bit surprised that it survived in Linux (in a completely independent implementation) and in OpenBSD (where the security people might have had a double-take at some point). But given Hyrum's Law there are probably people out there who are depending on this behavior so we're now stuck with it.

(In the kernel, you'd have to go at least a little bit out of your way to check that the new path starts with a '/' or use a kernel name lookup function that only resolves absolute paths. Using a general name lookup function that accepts both absolute and relative paths is the simplest approach.)

PS: I don't have access to Illumos based systems, other BSDs (NetBSD, etc), or macOS, but I'd be surprised if they had different behavior. People with access to less mainstream Unixes (including commercial ones like AIX) can give it a try to see if there are any Unixes that don't support relative paths in '#!'.

Discovering orphaned binaries in /usr/sbin on Fedora 42

By: cks
11 November 2025 at 04:10

Over on the Fediverse, I shared a somewhat unwelcome discovery I made after upgrading to Fedora 42:

This is my face when I have quite a few binaries in /usr/sbin on my office Fedora desktop that aren't owned by any package. Presumably they were once owned by packages, but the packages got removed without the files being removed with them, which isn't supposed to happen.

(My office Fedora install has been around for almost 20 years now without being reinstalled, so things have had time to happen. But some of these binaries date from 2021.)

There seem to be two sorts of these lingering, unowned /usr/sbin programs. One sort, such as /usr/sbin/getcaps, seems to have been left behind when its package moved things to /usr/bin, possibly due to this RPM bug (via). The other sort is genuinely unowned programs dating to anywhere from 2007 (at the oldest) to 2021 (at the newest), which have nothing else left of them sitting around. The newest programs are what I believe are wireless management programs: iwconfig, iwevent, iwgetid, iwlist, iwpriv, and iwspy, and also "ifrename" (which I believe was also part of a 'wireless-tools' package). I had the wireless-tools package installed on my office desktop until recently, but I removed it some time during Fedora 40, probably sparked by the /sbin to /usr/sbin migration, and it's possible that binaries didn't get cleaned up properly due to that migration.

The most interesting orphan is /usr/sbin/sln, dating from 2018, when apparently various people discovered it as an orphan on their system. Unlike all the other orphan programs, the sln manual page is still shipped as part of the standard 'man-pages' package and so you can read sln(8) online. Based on the manual page, it sounds like it may have been part of glibc at one point.

(Another orphaned program from 2018 is pam_tally, although it's coupled to pam_tally2.so, which did get removed.)

I don't know if there's any good way to get mappings from files to RPM packages for old Fedora versions. If there is, I'd certainly pick through it to try to find where various of these files came from originally. Unfortunately I suspect that for sufficiently old Fedora versions, much of this information is either offline or can't be processed by modern versions of things like dnf.

(The basic information is used by eg 'dnf provides' and can be built by hand from the raw RPMs, but I have no desire to download all of the RPMs for decade-old Fedora versions even if they're still available somewhere. I'm curious but not that curious.)

PS: At the moment I'm inclined to leave everything as it is until at least Fedora 43, since RPM bugs are still being sorted out here. I'll have to clean up genuinely orphaned files at some point but I don't think there's any rush. And I'm not removing any more old packages that use '/sbin/<whatever>', since that seems like it has some bugs.

Some notes on duplicating xterm windows

By: cks
5 November 2025 at 03:45

Recently on the Fediverse, Dave Fischer mentioned a neat hack:

In the decades-long process of getting my fvwm config JUST RIGHT, my xterm right-click menu now has a "duplicate" command, which opens a new xterm with the same geometry, on the same node, IN THE SAME DIRECTORY. (Directory info aquired via /proc.)

[...]

(See also a followup note.)

This led to @grawity sharing an xterm-native approach to this, using xterm's spawn-new-terminal() internal function that's available through xterm's keybindings facility.

I have a long-standing shell function in my shell that attempts to do this (imaginatively called 'spawn'), but this is only available in environments where my shell is set up, so I was quite interested in the whole area and did some experiments. The good news is that xterm's 'spawn-new-terminal' works, in that it will start a new xterm and the new xterm will be in the right directory. The bad news for me is that that's about all that it will do, and in my environment this has two limitations that will probably make it not something I use a lot.

The first limitation is that this starts an xterm that doesn't copy the command line state or settings of the parent xterm. If you've set special options on the parent xterm (for example, you like your root xterms to have a red foreground), this won't be carried over to the new xterm. Similarly, if you've increased (or decreased) the font size in your current xterm or otherwise changed its settings, spawn-new-terminal doesn't duplicate these; you get a default xterm. This is reasonable but disappointing.

(While spawn-new-terminal takes arguments that I believe it will pass to the new xterm, as far as I know there's no way to retrieve the current xterm's command line arguments to insert them here.)

The larger limitation for me is that when I'm at home, I'm often running SSH inside of an xterm in order to log in to some other system (I have a 'sshterm' script to automate all the aspects of this). What I really want when I 'duplicate' such an xterm is not a copy of the local xterm running a local shell (or even starting another SSH to the remove system), but the remote (shell) context, with the same (remote) current directory and so on. This is impossible to get in general and difficult to set up even for situations where it's theoretically possible. To use spawn-new-terminal effectively, you basically need either all local xterms or copious use of remote X forwarded over SSH (where the xterm is running on the remote system, so a duplicate of it will be as well and can get the right current directory).

Going through this experience has given me some ideas on how to improve the situation overall. Probably I should write a 'spawn' shell script to replace or augment my 'spawn' shell function so I can readily have it in more places. Then when I'm ssh'd in to a system, I can make the 'spawn' script at least print out a command line or two for me to copy and paste to get set up again.

(Two command lines is the easiest approach, with one command that starts the right xterm plus SSH combination and the other a 'cd' to the right place that I'd execute in the new logged in window. It's probably possible to combine these into an all-in-one script but that starts to get too clever in various ways, especially as SSH has no straightforward way to pass extra information to a login shell.)

Removing Fedora's selinux-policy-targeted package is mostly harmless so far

By: cks
1 November 2025 at 01:32

A while back I discussed why I might want to remove the selinux-policy-targeted RPM package for a Fedora 42 upgrade. Today, I upgraded my office workstation from Fedora 41 to Fedora 42, and as part of preparing for that upgrade I removed the selinux-policy-targeted policy (and all of the packages that depended on it). The result appears to work, although there were a few things that came up during the upgrade and I may reinstall at least selinux-policy-targeted itself to get rid of them (for now).

The root issue appears to be that when I removed the selinux-policy-targeted package, I probably should have edited /etc/selinux/config to set SELINUXTYPE to some bogus value, not left it set to "targeted". For entirely sensible reasons, various packages have postinstall scripts that assume that if your SELinux configuration says your SELinux type is 'targeted', they can do things that implicitly or explicitly require things from the package or from the selinux-policy package, which got removed when I removed selinux-policy-targeted.

I'm not sure if my change to SELINUXTYPE will completely fix things, because I suspect that there are other assumptions about SELinux policy programs and data files being present lurking in standard, still-installed package tools and so on. Some of these standard SELinux related packages definitely can't be removed without gutting Fedora of things that are important to me, so I'll either have to live with periodic failures of postinstall scripts or put selinux-policy-targeted and some other bits back. On the whole, reinstalling selinux-policy-targeted is probably the safest way and the issue that caused me to remove it only applies during Fedora version upgrades and might anyway be fixed in Fedora 42.

What this illustrates to me is that regardless of package dependencies, SELinux is not really optional on Fedora. The Fedora environment assumes that a functioning SELinux environment is there and if it isn't, things are likely to go wrong. I can't blame Fedora for this, or for not fully capturing this in package dependencies (and Fedora did protect the selinux-policy-targeted package from being removed; I overrode that by hand, so what happens afterward is on me).

(Although I haven't checked modern versions of Fedora, I suspect that there's no official way to install Fedora without getting a SELinux policy package installed, and possibly selinux-policy-targeted specifically.)

PS: I still plan to temporarily remove selinux-policy-targeted when I upgrade my home desktop to Fedora 42. A few package postinstall glitches is better than not being able to read DNF output due to the package's spam.

PUSTIMO BURŽOAZNO REVOLUCIJO V PRETEKLOSTI, NA DNEVNEM REDU JE SOCIALISTIČNA! 

26 November 2025 at 12:09

V nedavnem referendumu o prostovoljnem končanju življenja lahko vidimo poskus, da bi končno izpolnili program francoske revolucije. V časih pred buržoazno revolucijo so v Evropi cerkve imele monopol nad potekom življenja. Rojstva, poroke, smrt, glavne življenjske postaje, je cerkev obvladovala s svojimi zakramenti. Buržoazna država je sčasoma prevzela register rojstev in poroke, s podržavljenjem nadzora nad prebivalstvom je ljudi osvobodila cerkvenega gospostva. S svobodnim odločanjem o porajanju otrok je zagotovila svobodno upravljanje z življenjem – od rojstva do smrti. Ne pa o smrti sami! Referendum 23. novembra bi nas lahko osvobodil tudi na tej točki, na zadnjem oporišču cerkvene moči. Pa nas ni!

Zakaj se državljanke in državljani niso hoteli otresti zadnjega srednjeveškega jarma? Razlogi za glasovanje »proti« so bili različni, nas poučujejo strokovnjaki. Ideologija »svetosti življenja« in pokorščina papeški cerkvi sta očitna razloga. A za nas pomembnejši je razlog tistih, ki so menili, da je zakon slab. Zakon je res močno zapletel prostovoljno končanje življenja. Bolj ko zapletajo pravne postopke, večja je verjetnost, da bodo povečevali tudi možnosti za izigravanje zakona, množili »pravne luknje«.

Nasploh zmore buržoazna pravna država »osvoboditi« posameznice in posameznike samo s pomočjo »pravne države«, tj. pravnega fetišizma. To pa ni emancipacija človeka. Kritiko francoske revolucije je objavil Karl Marx že leta 1844 v Prispevku k judovskemu vprašanju. Francoska revolucija, je napisal, osvobodi individua zgolj politično in s tem razbije družbo na atomizirane individue, ki jih povezuje samo še pravo. 

Preprosto rečeno: buržoazna revolucija uvede boj vseh proti vsem v mejah zakonov buržoazne pravne države. Med drugim je to tudi temelj za »svobodno« delovno pogodbo med proletarko, proletarcem in kapitalistom – ta pogodba pa je osnova za kapitalistično izkoriščanje. Buržoazni pravni fetišizem ne zagotavlja svobodnega sožitja v solidarni družbi.

»Proti« je bržkone glasoval tudi marsikdo, ki je hotel s tem protestirati proti politiki sedanje vlade. A proti vladi je lahko glasoval spet iz različnih razlogov: npr. zato ker ni vzpostavila trdnega javnega zdravstva – ali pa zato ker ni zdravstva dokončno sprivatizirala. Torej iz popolnoma nasprotnih razlogov.

Iz tega, da različni, celo nasprotujoči si razlogi pripeljejo do enake odločitve na referendumu, lahko razberemo splošno omejenost buržoaznega političnega sistema. Zakon je pripravila stranka, podprle so ga koalicijske stranke, sprejel ga je strankarski parlament. Med pripravo zakona so v javnosti nekoliko, sicer ne preveč zavzeto, razpravljali o vprašanju prostovoljnega končanja življenja. A koliko so misli iz razprave upoštevali pri pisanju zakona, so odločale stranke. 

Pred referendumom je bila razprava o zakonu resda živahna – a ni več mogla vplivati na zakon. Idej, ki so jih predstavili v razpravi pred referendumom, ni bilo mogoče ustvarjalno uporabiti. Ujete so bile v skopo izbiro za zakon ali proti zakonu, kakršnega so določile stranke. Strankarska demokracija ne zmore izkoristiti vseh intelektualnih moči družbe. Tudi na volitvah se lahko odločamo zgolj za strankarske liste ali proti njim. Navsezadnje se odločimo za najmanj slabo možnost. Buržoazna demokracija ni demokratična.

Zato smo spet pred starim vprašanjem: je treba najprej do konca izpeljati buržoazno revolucijo (človekove pravice, pravna država, buržoazni parlamentarizem) – ali je na dnevnem redu socialistična revolucija in se moramo bojevati za odpravo razredov in izkoriščanja, za podružbljenje produkcijskih sredstev in odločanja, za solidarno sožitje?

V kapitalizmu ni mogoče uresničiti obljub buržoazne revolucije. Brez neplačanega dela v gospodinjstvu bi se kapitalizem sesul. V vseh obdobjih je potreboval nesvobodno delo – od »tradicionalnih« odnosov v kolonijah do suženjstva na ameriškem jugu in migrantskega dela zdaj.

Zato bi s popravljanjem kapitalizma samo cepetali v zgodovinski slepi ulici. Na dnevnem redu je socialistična revolucija. Še zlasti za nas, ki smo jo še nedavno prakticirali.

Gostujoče pero je napisal Rastko Močnik

GOSTUJOČI PRISPEVEK // RP je odprta platforma in omogoča objavo prispevkov avtoric, ki se dotikajo naprednih bojev ali vprašanj

FOTO: Žiga Živulovič jr./Bobo

The post PUSTIMO BURŽOAZNO REVOLUCIJO V PRETEKLOSTI, NA DNEVNEM REDU JE SOCIALISTIČNA!  first appeared on Rdeča Pesa.

Modern Linux filesystem mounts are rather complex things

By: cks
28 October 2025 at 03:04

Once upon a time, Unix filesystem mounts worked by putting one inode on top of another, and this was also how they worked in very early Linux. It wasn't wrong to say that mounts were really about inodes, with the names only being used to find the inodes. This is no longer how things work in Linux (and perhaps other Unixes, but Linux is what I'm most familiar with for this). Today, I believe that filesystem mounts in Linux are best understood as namespace operations.

Each separate (unmounted) filesystem is a a tree of names (a namespace). At a broad level, filesystem mounts in Linux take some name from that filesystem tree and project it on top of something in an existing namespace, generally with some properties attached to the projection. A regular conventional mount takes the root name of the new filesystem and puts the whole tree somewhere, but for a long time Linux's bind mounts took some other name in the filesystem as their starting point (what we could call the root inode of the mount). In modern Linux, there can also be multiple mount namespaces in existence at one time, with different contents and properties. A filesystem mount does not necessarily appear in all of them, and different things can be mounted at the same spot in the tree of names in different mount namespaces.

(Some mount properties are still global to the filesystem as a whole, while other mount properties are specific to a particular mount. See mount(2) for a discussion of general mount properties. I don't know if there's a mechanism to handle filesystem specific mount properties on a per mount basis.)

This can't really be implemented with an inode-based view of mounts. You can somewhat implement traditional Linux bind mounts with an inode based approach, but mount namespaces have to be separate from the underlying inodes. At a minimum a mount point must be a pair of 'this inode in this namespace has something on top of it', instead of just 'this inode has something on top of it'.

(A pure inode based approach has problems going up the directory tree even in old bind mounts, because the parent directory of a particular directory depends on how you got to the directory. If /usr/share is part of /usr and you bind mounted /usr/share to /a/b, the value of '..' depends on if you're looking at '/usr/share/..' or '/a/b/..', even though /usr/share and /a/b are the same inode in the /usr filesystem.)

If I'm reading manual pages correctly, Linux still normally requires the initial mount of any particular filesystem be of its root name (its true root inode). Only after that initial mount is made can you make bind mounts to pull out some subset of its tree of names and then unmount the original full filesystem mount. I believe that a particular filesystem can provide ways to sidestep this with a filesystem specific mount option, such as btrfs's subvol= mount option that's covered in the btrfs(5) manual page (or 'btrfs subvolume set-default').

Two reasons why Unix traditionally requires mount points to exist

By: cks
24 October 2025 at 02:29

Recently on the Fediverse, argv minus one asked a good question:

Why does #Linux require #mount points to exist?

And are there any circumstances where a mount can be done without a pre-existing mount point (i.e. a mount point appears out of thin air)?

I think there is one answer for why this is a good idea in general and otherwise complex to do, although you can argue about it, and then a second historical answer based on how mount points were initially implemented.

The general problem is directory listings. We obviously want and need mount points to appear in readdir() results, but in the kernel, directory listings are historically the responsibility of filesystems and are generated and returned in pieces on the fly (which is clearly necessary if you have a giant directory; the kernel doesn't read the entire thing into memory and then start giving your program slices out of it as you ask). If mount points never appear in the underlying directory, then they must be inserted at some point in this process. If mount points can sometimes exist and sometimes not, it's worse; you need to somehow keep track of which ones actually exist and then add the ones that don't at the end of the directory listing. The simplest way to make sure that mount points always exist in directory listings is to require them to have an existence in the underlying filesystem.

(This was my initial answer.)

The historical answer is that in early versions of Unix, filesystems were actually mounted on top of inodes, not directories (or filesystem objects). When you passed a (directory) path to the mount(2) system call, all it was used for was getting the corresponding inode, which was then flagged as '(this) inode is mounted on' and linked (sort of) to the new mounted filesystem on top of it. All of the things that dealt with mount points and mounted filesystem did so by inode and inode number, with no further use of the paths and the root inode of the mounted filesystem being quietly substituted for the mounted-on inode. All of the mechanics of this needed the inode and directory entry for the name to actually exist (and V7 required the name to be a directory).

I don't think modern kernels (Linux or otherwise) still use this approach to handling mounts, but I believe it lingered on for quite a while. And it's a sufficiently obvious and attractive implementation choice that early versions of Linux also used it (see the Linux 0.96c version of iget() in fs/inode.c).

Sidebar: The details of how mounts worked in V7

When you passed a path to the mount(2) system call (called 'smount()' in sys/sys3.c), it used the name to get the inode and then set the IMOUNT flag from sys/h/inode.h on it (and put the mount details in a fixed size array of mounts, which wasn't very big). When iget() in sys/iget.c was fetching inodes for you and you'd asked for an IMOUNT inode, it gave you the root inode of the filesystem instead, which worked in cooperation with name lookup in a directory (the name lookup in the directory would find the underlying inode number, and then iget() would turn it into the mounted filesystem's root inode). This gave Research Unix a simple, low code approach to finding and checking for mount points, at the cost of pinning a few more inodes into memory (not necessarily a small thing when even a big V7 system only had at most 200 inodes in memory at once, but then a big V7 system was limited to 8 mounts, see h/param.h).

We don't update kernels without immediately rebooting the machine

By: cks
22 October 2025 at 03:07

I've mentioned this before in passing (cf, also) but today I feel like saying it explicitly: our habit with all of our machines is to never apply a kernel update without immediately rebooting the machine into the new kernel. On our Ubuntu machines this is done by holding the relevant kernel packages; on my Fedora desktops I normally run 'dnf update --exclude "kernel*"' unless I'm willing to reboot on the spot.

The obvious reason for this is that we want to switch to the new kernel under controlled, attended conditions when we'll be able to take immediate action if something is wrong, rather than possibly have the new kernel activate at some random time without us present and paying attention if there's a power failure, a kernel panic, or whatever. This is especially acute on my desktops, where I use ZFS by building my own OpenZFS packages and kernel modules. If something goes wrong and the kernel modules don't load or don't work right, an unattended reboot can leave my desktops completely unusable and off the network until I can get to them. I'd rather avoid that if possible (sometimes it isn't).

(In general I prefer to reboot my Fedora machines with me present because weird things happen from time to time and sometimes I make mistakes, also.)

The less obvious reason is that when you reboot a machine right after applying a kernel update, it's clear in your mind that the machine has switched to a new kernel. If there are system problems in the days immediately afterward the update, you're relatively likely to remember this and at least consider the possibility that the new kernel is involved. If you apply a kernel update, walk away without rebooting, and the machine reboots a week and a half later for some unrelated reason, you may not remember that one of the things the reboot did was switch to a new kernel.

(Kernels aren't the only thing that this can happen with, since not all system updates and changes take effect immediately when made or applied. Perhaps one should reboot after making them, too.)

I'm assuming here that your Linux distribution's package management system is sensible, so there's no risk of losing old kernels (especially the one you're currently running) merely because you installed some new ones but didn't reboot into them. This is how Debian and Ubuntu behave (if you don't 'apt autoremove' kernels), but not quite how Fedora's dnf does it (as far as I know). Fedora dnf keeps the N most recent kernels around and probably doesn't let you remove the currently running kernel even if it's more than N kernels old, but I don't believe it tracks whether or not you've rebooted into those N kernels and stretches the N out if you haven't (or removes more recent installed kernels that you've never rebooted into, instead of older kernels that you did use at one point).

PS: Of course if kernel updates were perfect this wouldn't matter. However this isn't something you can assume for the Linux kernel (especially as patched by your distribution), as we've sometimes seen. Although big issues like that are relatively uncommon.

The early Unix history of chown() being restricted to root

By: cks
13 October 2025 at 03:37

A few years ago I wrote about the divide in chown() about who got to give away files, where BSD and V7 were on one side, restricting it to root, while System III and System V were on the other, allowing the owner to give them away too. At the time I quoted the V7 chown(2) explanation of this:

[...] Only the super-user may execute this call, because if users were able to give files away, they could defeat the (nonexistent) file-space accounting procedures.

Recently, for reasons, chown(2) and its history was on my mind and so I wondered if the early Research Unixes had always had this, or if a restriction was added at some point.

The answer is that the restriction was added in V6, where the V6 chown(2) manual page has the same wording as V7. In Research Unix V5 and earlier, people can chown(2) away their own files; this is documented in the V4 chown(2) manual page and is what the V5 kernel code for chown() does. This behavior runs all the way back to the V1 chown() manual page, with an extra restriction that you can't chown() setuid files.

(Since I looked it up, the restriction on chown()'ing setuid files was lifted in V4. In V4 and later, a setuid file has its setuid bit removed on chown; in V3 you still can't give away such a file, according to the V3 chown(2) manual page.)

At this point you might wonder where the System III and System V unrestricted chown came from. The surprising to me answer seems to be that System III partly descends from PWB/UNIX, and PWB/UNIX 1.0, although it was theoretically based on V6, has pre-V6 chown(2) behavior (kernel source, manual page). I suspect that there's a story both to why V6 made chown() more restricted and also why PWB/UNIX specifically didn't take that change from V6, but I don't know if it's been documented anywhere (a casual Internet search didn't turn up anything).

(The System III chown(2) manual page says more or less the same thing as the PWB/UNIX manual page, just more formally, and the kernel code is very similar.)

Maybe why OverlayFS had its readdir() inode number issue

By: cks
12 October 2025 at 02:53

A while back I wrote about readdir()'s inode numbers versus OverlayFS, which discussed an issue where for efficiency reasons, OverlayFS sometimes returned different inode numbers in readdir() than in stat(). This is not POSIX legal unless you do some pretty perverse interpretations (as covered in my entry), but lots of filesystems deviate from POSIX semantics every so often. A more interesting question is why, and I suspect the answer is related to another issue that's come up, the problem of NFS exports of NFS mounts.

What's common in both cases is that NFS servers and OverlayFS both must create an 'identity' for a file (a NFS filehandle and an inode number, respectively). In the case of NFS servers, this identity has some strict requirements; OverlayFS has a somewhat easier life, but in general it still has to create and track some amount of information. Based on reading the OverlayFS article, I believe that OverlayFS considers this expensive enough to only want to do it when it has to.

OverlayFS definitely needs to go to this effort when people call stat(), because various programs will directly use the inode number (the POSIX 'file serial number') to tell files on the same filesystem apart. POSIX technically requires OverlayFS to do this for readdir(), but in practice almost everyone that uses readdir() isn't going to look at the inode number; they look at the file name and perhaps the d_type field to spot directories without needing to stat() everything.

If there was a special 'not a valid inode number' signal value, OverlayFS might use that, but there isn't one (in either POSIX or Linux, which is actually a problem). Since OverlayFS needs to provide some sort of arguably valid inode number, and since it's reading directories from the underlying filesystems, passing through their inode numbers from their d_ino fields is the simple answer.

(This entry was inspired by Kevin Lyda's comment on my earlier entry.)

Sidebar: Why there should be a 'not a valid inode number' signal value

Because both standards and common Unix usage include a d_ino field in the structure readdir() returns, they embed the idea that the stat()-visible inode number can easily be recovered or generated by filesystems purely by reading directories, without needing to perform additional IO. This is true in traditional Unix filesystems, but it's not obvious that you would do that all of the time in all filesystems. The on disk format of directories might only have some sort of object identifier for each name that's not easily mapped to a relatively small 'inode number' (which is required to be some C integer type), and instead the 'inode number' is an attribute you get by reading file metadata based on that object identifier (which you'll do for stat() but would like to avoid for reading directories).

But in practice if you want to design a Unix filesystem that performs decently well and doesn't just make up inode numbers in readdir(), you must store a potentially duplicate copy of your 'inode numbers' in directory entries.

❌
❌